Table of Contents
Basic Autopilot (Found in Cessna 172 and Baron B58)
General information
Note Autopilot functionality can be different between aircraft. Some of the AP functions are not final in the early access version.
You can control the autopilot by two different ways.
- You can control the autopilot from the cockpit using the mouse and mouse wheel, or with your VR controller (VR Mode). Note - VR motion controls are preliminary and in a basic state. This will be improved over time.
- You can bind autopilot controls to your keyboard keys or controller buttons for convenience (Settings/Controls/Autopilot).
The autopilot can stabilize the heading, airspeed, altitude as well as the vertical speed. The autopilot cannot be switched on/off and will disengage when one of the following limits is exceeded:
- bank angle larger than 60 degrees
- pitch angle larger than 45 degrees
- airspeed less than 1.2 times the stall speed
- when the aircraft is on the ground.
Autopilot modes
WINGS LEVEL (ROL)
In this mode the autopilot will attempt to keep the wings level (ROL)
PITCH ALTITUDE HOLD (PIT)
The Pitch Attitude Hold (PIT) mode allows constant attitude climbs and descends.
AIRSPEED (SPD)
The airspeed mode / auto-throttle will adjust the engine power to keep the selected airspeed. The target airspeed is shown in magenta at the virtual cockpit and can be changed by individually programmed buttons or keys.
HEADING HOLD (HDG)
The heading hold mode can be activated and deactivated by tapping on the heading indicator. The box around the heading will change its color to green to indicate the heading is controlled by the autopilot. If no heading was selected, the current heading will be selected and shown in magenta. The target heading can be changed by tapping the + / – buttons below the heading indicator. Pressing these buttons repeatedly will change the selected heading by 5 degrees. The target heading can be changed while the heading mode is engaged, the autopilot will then turn the aircraft to the selected heading.
ALTITUDE HOLD (ALT)
Hold a constant altitude. This mode is perfect for cruise flight at a constant altitude. Tap the altitude indicator to activate this mode. When engaged, the autopilot will climb / descend to the target altitude and level off. The vertical speed in this phase can be selected by using the + / – buttons below the vertical speed indicator . When the target altitude is changed by tapping the + / – buttons below the altitude indicator, the autopilot will initiate a climb / descend to the new altitude. The vertical speed for this will be the last selected vertical speed, provided it has the right direction. If a descent would be required to reach the new altitude and the last selected vertical speed was a climb at 1000 ft/min, this would be changed to a default of -1500 ft/min and vice versa.
Vertical speed (V/S)
Climb / descend at a constant rate. When engaged, the autopilot will try to climb / descend at the selected vertical speed. If the aircraft cannot climb at the selected vertical speed, it will loose airspeed until the autopilot descends at minimum speed. This mode can be selected by tapping the vertical speed indicator. The v/s mode will override the altitude mode, so this can be used to leave an altitude that was previously held constant by the autopilot. On the other hand, if the altitude mode is active, the vertical speed mode will disengage 500 ft before reaching the target altitude to allow levelling off and avoid crossing a selected altitude.
Two axis stabilization (ROL + ALT)
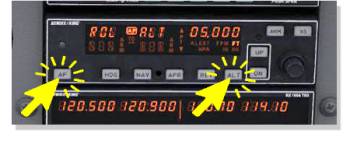
The easiest way to use the autopilot is the ROL/ALT mode. The ROL mode will be enabled automatically if you start the autopilot via the (AP) button on the autopilot panel.
After that press the (ALT) button on the panel. Now the aircraft will be stabilized automatically.
Heading mode (HDG)
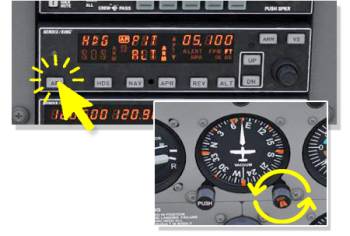
- Click the (AP) button to activate the autopilot
- Click on (HDG) button to activate the Heading Mode. You also will see “HDG” on the panels display
Note - To change your heading manually, turn the heading indicator bug until your new heading is achieved. You can use your mouse wheel to turn the heading bug.
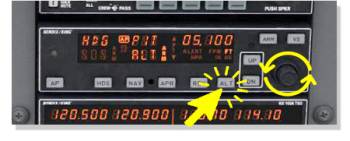
- You can change the altitude by turning the select knob (mouseover and mouse wheel).
- Click on “Arm” to activate the selected height
- Click once again on “ALT” to activate the Pitch, displayed by “PIT”
- Click repeatedly on “UP” or “DN” to select the climb/descend rate
Note - Setting up the autopilot in this way will target the preset height and will hold the flight level automatically. At this point you can change the flight level by pressing the “up” or “down”.
Vertical speed mode (VS)
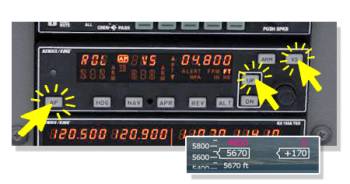 The vertical speed (VS) mode allows variable vertical speed climbs and descents.
- Click on (AP) to activate the autopilot
- Click on (VS) to activate the vertical speed Mode
- Click on (UP) or (DN) to select vertical speed rate
- Control the rate by the vertical speed indicator or climb rate on your instrument panel
Note - You can now add the heading mode by clicking on (HDG) if preferred. You can control the course via the “HDG” select knob and climb rate with the “UP” or “DN” buttons.
Advanced Autopilot
Note
This section will be improved but this will provide you with basic information related to the newly introduced advanced autopilot features and functionality seen in the latest Aerofly FS2 update
Introduction
We want to give a bit of an overview on the current autopilot setup before getting into more detail about what changed. One important aspect is that there are only two autopilot implementations in Aerofly FS2 currently. There is the basic autopilot that is found in the Cessna 172 and Baron B58 and there is an advanced autopilot which has more features and controls all the airliners: Airbus A320, Boeing B737, Boeing B747, C90GTx King Air, Learjet LJ45 and Dash8-Q400. These airliner-autopilots can be split into three groups: Airbus, Boeing and Bombardier autopilots. This autopilot update only affected the autopilot found in the airliners, the basic autopilot wasn't touched at all.
Airbus (A320)
Changes to the autopilot in the A320
The major concept behind the Airbus auto flight system is to reduce the workload for the pilots. There is a lot of automation happening here in the real world and the plan was to improve the typical Airbus flow. All changes made here make it a lot easier to fly from A to B and require less pilot interaction than before.
- when flight director is set on when on ground and a route has been programmed and starts nearby:
- automatically arm “CLB” and “NAV” so that you can take off and directly engage the autopilot, not touch any autopilot things until you're close to the top of descent.
- when setting the aircraft on the departure runway there are now no remaining things todo to prepare the autopilot:The Cruise altitude is set, flight directors are on, CLB and NAV are armed
- autopilot can land the aircraft automatically when the destination runway has an ILS installed
corrected these lateral modes:
- HDG - heading mode now allows for 360° turns to left or right, depending on how the knob was turned
- NAV - now requires an intercept with the flight plan or a low lateral offset
- added the following lateral modes:
- TRK - selected track over the ground is flown, this corrects for any wind drift
- GA TRK - same as track, track synchronized when go around is initiated
- LOC* - capture mode for the localizer, tries to match the track of the aircraft and the ILS course, then centers localizer deflection
- RWY - takeoff mode (requires ILS to be set to departure runway ILS frequency which should happen automatically but doesn't yet, happens outside the AP)
- RWY TRK - when route is available but the takeoff used RWY localizer steering: at lift off use the runway course only and fly this track.
- ROLLOUT - steers the aircraft towards the ILS localizer center on the ground and also does this in crosswind conditions
- corrected the following vertical modes:
- CLB - managed climb mode does no longer set managed speed to true, also allows for a step climb when the altitude change isn't too big (does softer pitch up and down)
- DES - same as for CLB, now flies with idle thrust and varies speed to stay on profile, maintains around -1000ft/min if below target altitude and maintains managed speed + 20kts (or so) to get back down onto profile
- OP CLB - now independent of speed managed or selected
- OP DES - same as OP CLB
- added the following vertical modes:
- FINAL - uses a vertical altitude offset from flight plan to direct the aircraft down to the runway threshold. Used for non-ILS approaches, e.g. if the runway has no ILS installed.
- EXP DES - expedited descent uses maximum speed and idle thrust to nosedive really quickly. Is very effective when speedbrakes are set
- EXP CLB - pulls the nose up towards the green dot speed and adds full climb thrust to maximize the climb gradient. Very effective if the aircraft speed is already high and altitude has to be gained quickly
- G/S* - captures the glide slope
- FLARE - transitions from glide slope to a touch down control, reduces rate of descent and increases the pitch to set the aircraft onto the runway gently
- ROLLOUT - reduces pitch after touchdown
- SRS - speed reference system: Uses V2 + 10kts as a target speed and controls the pitch of the aircraft after lift off or in a low altitude go around. Engages automatically if you set takeoff thrust with flight directors on
- FPA - flight path angle: commands the aircraft to climb or descent at a selected angle. This is very helpful during a descent when you plan to reduce speed. The angle of the descent is maintained even if the speed is increased or decreased, this is what the vertical speed can't to
- ALT* captures the selected altitude
- ALT CRZ - soft altitude hold mode at cruise altitude
- added the following autothrust modes:
- SPEED - we had that before, now it allows to select a speed at any time without affecting the vertical mode
- MACH - after automatic or manual crossover at high altitudes to Mach-Numbers this mode controls the speed in terms of Mach number not indicated airspeed
- IDLE - there are now two types: one that remains idle and one that automatically jumps in during the idle
- DES in case the speed gets too low.
- CLB - reduced thrust is used now.
- manual thrust modes: MAN FLX, MAN TOGA, MAN LVR (forgot the name already, activates between detents)
- A.FLOOR - alpha floor engages automatically whenever the aircraft is forced into a stall due to high angles of attack. Automatically sets full thrust as quickly as possible to be able to recover the low airspeed
- TOGA LK - engages when the angle of attack is reduced but the pilot did not move the thrust levers yet.
- Disengages as soon as the levers are moved a bit.
- managed speed behavior also changed:
- 250kts below 10,000ft
- climb, cruise and descent phases
- descent speed range
- approach phase: ground speed mini (flap and slat retraction speed), automatically engages approach phase at deceleration point or when LOC captures (the latter is a hack while FMS isn't programmed)
- added thrust locked when auto thrust is set off with the A/THR pushbutton
- added thrust command of the auto thrust system is clamped between idle and current thrust lever angle
- added auto thrust is set off when levers pulled to idle
- added auto thrust arms when levers pushed beyond CLB
- added auto thrust arms on ground when flight directors are active and levers are moved to FLX/MCT or TOGA
- added auto thrust engages when previously armed and levers advanced from IDLE to some positive value or when levers are moved into CLB detent from above (usually after takeoff)
- added flashing “LVR CLB” message to PFD to demand the pilot to set levers to climb to engage the auto thrust system, also added ECAM message that explains this in text format
- added boxes around new modes
- added combined modes “LAND”, “FLARE” and “ROLLOUT” to PFD
- added DH is preset as soon as ILS approach is engaged.
- added mode reversions: when route is lost or NAV mode is disengaged managed CLB changes to OP CLB and DES changes to V/S or FPA. Audible tripple click added
- added ground speed mini principle to the managed airspeed: when flaps are 0 speed target remains above green dot speed, when flaps are at 1 speed doesn't drop below -S speed, flaps 2 or 3: above -F speed
- added auto thrust will not allow speed to drop below VLS or above Vmax in the current configuration (e.g. speedbrakes extended) if auto thrust is controlling SPEED
- corrected minimum and maximum select-able speed, min/max selectable altitude and VS or FPA
Fly-By-Wire changes
- increased roll rate
- improved turn coordination
- added protections:
- angle of attack protection: automatic trimming aft is prevented, actively reduces angle of attack to alpha-protection, at full aft stick the angle of attack no longer be able to exceed the stall angle, auto thrust engages at high angle of attack and commands full thrust
- bank protection: depending on overspeed or stall conditions maximum bank angle is reduced from 67° to 45/33° with fully deflected side stick. Will return to 33° when released or 0° when in overspeed or stall conditions
- high and low pitch protections changed, high pitch protection now dynamic and only 25° when speed is below VLS
- overspeed protection: aircraft now pitches up automatically and prevents any nose down command by the pilo
- added: trim resets after touchdown. This has to be softened yet, known issue
Other additions to the A320
- moving pushbuttons
- automatic spoiler retraction in high angles of attack
- added slat retraction inhibited at high angles of attack
- reduced drag
- increased aircraft mass to almost 60t (still below max landing weight)
- corrected v-speeds for increased takeoff-mass of 60t
- changed landing gear levers is locked on the ground
- changed radar altitude callouts now quieter
- corrected FCU display, e.g. dashing values after 10 or 45 seconds
- fixed baro-pull knobs, now push and pull
- fixed auto-brake not on MAX in takeoff configuration
- added throttle detents
Display changes in the A320
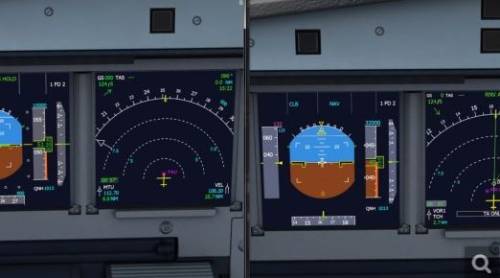
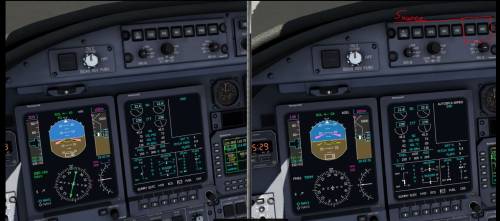
To begin of with, here is a before and after comparison:
primary flight display (PFD)
- changed display colors
- changed flight mode annunciation
- changed names of autopilot modes
- added new modes are boxed
- added comm modes LAND, FLARE, ROLLOUT, FINAL APP
- added approach capability (e.g. CAT 3 DUAL)
- added flashing LVR CLB warning (action required: reduce throttle position to engage auto-thrust system or disable auto-thrust)
- added amber THR LK warning (action required: move thrust levers to gain manual control)
- added “DECELERATE” warning when flown past the top of descent and not stated descent yet
- added “MORE DRAG” warning (action required: extend speed-brakes and monitor vertical deviation)
- added “DH 100 ft” to PFD default enabled when approach phase is set (Baro minimum is prepared as well, can't be used yet)
Changed speed tape:
- completely re-done
- fine tuned design
- added V1 digital readout
- changed numbers (V1, VR, V2, VLS, green dot…) to more realistic values
Changed speed-bug appearance:
- vls, low speed and alpha protection tape now moving depending on load factor
- mach number now correctly positioned
- all overflow clippings or pop-ins simulated correctly as in real world
Changed attitude indicator:
- completely re-done
- changed to a more authentic look
- fine tuned pitch ladder
- added high and low pitch red arrows
- added amber tail-strike warning arrow
- changed pitch and bank protection angles now dynamic
- added flight path vector and BIRD (flight path vector) when in TRK/FPA
- added flight director failure warning and selected heading tick
- added mode reversions (flashing flight director on PFD and audible “3-tick”)
- added flight director failure text (big red “FD” in top left)
Changed altitude tape:
- completely re-done
- accurate magnifier size
- accurate font-size
- accurate altitude-bug roll-in
- added altitude alert
- added flashing QNH/STD barometer reference when above/below transition altitude/level (action required: pull/push baro STD)
- added vertical deviation (green dot on altitude tape)
- added brown low altitude awareness
- adjusted radar altimeter red low altitude awareness rendering
- added support for latest A320 yellow MDA/baro-minium bar
- added qnh/std transition level/altitude flashing warning
- added/adjusted metric altitude readouts
- support for negative altitudes
Changed compass:
- completely re-done
- changed heading bug appearance
- changed ILS overflow to a box
- changed ILS values in lower left to look more realistic
Changed vertical speed indicator:
- overhauled
- displays digital readout correctly now
- changed font size
Changed ILS display of localizer and glideslope:
- overall look fine-tuned
- parked position/overflow points outwards
- added V/DEV for None-ILS managed approach on PFD (magenta brick instead of ILS glide slope)
- added flashing “ILS” warning - push LS button
- added flashing “V/DEV” warning - push LS button
Navigation Display (ND)
- added “TA ONLY” box at the bottom
- added MODE CHANGE and RANGE CHANGE when switching settings
- added selected approach “ILS APP” or “RNV APP” depending on available auto-tuning availability
- added top of climb, top of descent, end of descent, 10,000 ft acceleration and deceleration point, approach speed deceleration point, ETP etc.
- changed route now drawn only partially (remaining route)
- changed chrono time look
- changed bearing needle pointers and tables in left and right bottom corners
- changed GS and TAS readouts in top left corner
- changed next waypoint into in top right corner
- changed LS and VOR modes now display course deviation only if signal received
- changed the look of LS and VOR mode
ECAM
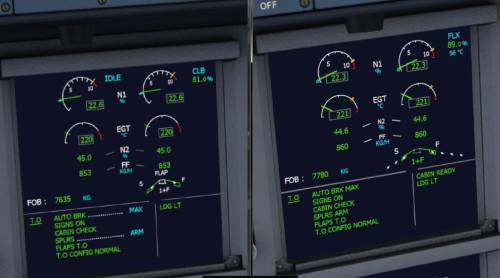
Before and after:
ECAM memo
- added set lever to climb warning on ECAM memo
- added autopilot disconnect (voluntary) and auto-thrust disconnect (voluntary and involuntary)
- added “cabin ready” annunciation
- changed fuel on board, fuel flow and gross weight now rounded
- prepared engine display for shut down engines (not enabled yet)
Changed N1 display
- adjusted look
- changed lever position to a circle
- added auto-thrust command arcs
- added amber “REV” when reversers are in transition
Changed EGT display
- adjusted look
- added max EGT tick
Changed flap display
- completely redone
- more realistic look
- displays now selected flap and slat target
Basic A320 Advanced Flight Tutorial
Here is a short step by step for users getting started with advanced autopilot systems in the A320.
1.Plan your flight; this will be loaded automatically into the A320
2. set the aircraft onto the runway; this will set the cruise altitude and prepare everything for takeoff
3. Advance thrust to TOGA or FLX and lift off
4. After a couple of seconds after lift off engage autopilot
5. when LVR CLB flashes on the PFD move the thrust levers down to CLB detent
6. as speed increases above -S speed retract the flaps
7 when the PFD shows DECELERATE or you see the top of descent on the Map and are close to it, scroll down the selected altitude so the arrival airport elevation + 2000ft or so. Push the altitude button in to begin descending
8. when ILS is received and you're flight plan is about to make the last turn: press the APPR button to arm the ILS localizer and glide slope. Engage second autopilot
9. set flaps 1 and monitor speed. increase flaps when you are below the amber = on the speed scale
10. gear down at about 2000ft radar altitude
11. flaps full prior to reaching 1000ft, set autobrake to MIN, move the spoiler lever all the way forward to arm them (white marking visible)
12. after the fully automatic landing disconnect the autopilot, touch the brakes to disengage them, taxi to gate, raise flaps, disarm spoilers, etc.
Boeing
Changes to the autopilot in the Boeing 747 and 737
The autopilot of the Boeings is a bit different compared to the Airbus style. It's a bit more hands on and requires more pilot interaction in some cases. Also pilot monitoring in approach is crucial.
- default flight director modes on ground is TO/GA on lateral and vertical axis when set on
- when the aircraft is placed on the runway LNAV and VNAV are already armed so that you don't have to press anything after the takeoff.
- heading synchronized
- cruise altitude selected
- selected speed is V2
- TOGA button is available to trigger a go around and advance thrust for takeoff
- when selected altitude is reduced prior to the top of descent the aircraft will start to descent automatically at TOD. This is different to the A320 which only descents when you press a button
- autopilot is capable of fully automatic landing when arrival airport is equipped with an ILS. In the 737 you have to manually tune it now.
- changed lateral modes:
- basic mode is now bank if bank angle was above about 6 degrees and wing level → heading hold if bank angle was smaller
- HDG allows 360° turns
- LOC uses track instead of heading to maintain on center - better for cross wind
- added lateral modes:
- TO/GA used for takeoff - wings level and then runway track
- ROLLOUT - keeps aircraft on runway after touchdown
- changed vertical modes:
- VNAV PATH - already engages when reaching cruise altitude, remains active and descents aircraft if selected altitude is selected lower prior to top of descent
- VNAV PATH - can be used to descent all the way down to minimums if approach is activated
- added vertical modes:
- VNAV SPD - uses managed airspeed and climb thrust to get up to cruise altitude
- VNAV ALT - interrupted vertical navigation: levels off at selected altitude, speed remains managed. Altitude Intervention is also implemented in the 747: Select higher or lower altitude and press the altitude knob to continue the VNAV climb or descent. Engages when selected altitude is not reduced prior to TOD.
- FLCH - uses currently selected airspeed to climb or descent towards target altitude
- TO/GA - similar to the Airbus' SRS: Pitch the aircraft to maintain a speed of V2 + 10kts. In our light configuration of the 747 this mode is only active for couple of seconds
- FLARE - touch down mode
- ROLLOUT - lower nose (is actually not displayed on PFD)
- changes to managed speed:
- managed speed is affected by current flap settings: use vmax -5ks to climb and flap retraction speeds for approach phase
- speed window is opened and closed depending on VNAV status
- speed intervention is available in the 747: to manually override the vnav speed at any time push speed knob
- added auto throttle modes:
- THR REF - uses maximum thrust for the fight phase, TOGA during takeoff and CLB during climb. To engage THR REF on ground please assign a button to the new control command
- HOLD - levers are unlocked an manual thrust lever movement is allowed. To do so you have to move the levers a little bit, otherwise the input is ignored
B737
- added flight director priority lights on MCP
- added moving buttons for MCP
- added mach selection in MCP
- added autopilot disconnect warning light
- added altitude alert
- added gear lever now has an off position
- added auto-brake disengage warning
- added HSI mode can be changed to view lateral and vertical deviation from flight plan (toggle switch in glareshield, left and right of autopilot selection)
- added flight mode annunciator
- changed automatic nav-tuning disabled per default
- changed vertical speed can be stepped in 50 ft/min increments
B747
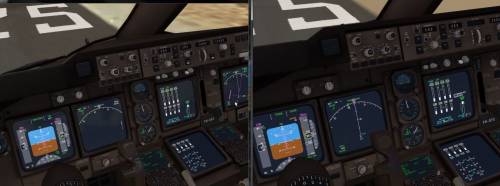
Here is a comparison before and after: note that HOLD and V/S are not correct in the first picture, this has been fixed.
- added crew alerting system (CAS) with messages like auto-break status, autopilot warnings, takeoff configuration warning for spoilers, flaps, etc.
- added THR REF limit for the auto-throttle system. Uses full thrust for takeoff and reduces to 90% after thrust reduction height
- added buttons on glareshield are now moving
- added vertical deviation to navigation display
- added airport elevation visible on PFD
- added autopilot bank limit selection
- added auto-throttle keeps speed at or above flap retraction speed in VNAV during the approach
- added VREF display
- changed flight mode annunciator on PFD highlights new modes and displays correct names
- changed flap retraction speed visible on PFD speed tape
- changed top right information on ND
- changed trend arc for turn doesn't overlap with center line and is white
- changed total drag of the aircraft is reduced
- changed when set to runway selected speed is V2
- changed flap display is removed when flaps and flap selector are up, same with gear
- changed ND plan mode
- changed MCP buttons illuminated when its dark
- changed: autothrottle “ARM” no longer displayed on PFD, “ALT” armed no longer displayed (and a few others)
Bombardier
Changes to the autopilot in the C90GTx King Air, Learjet 45
These autopilots are again very different to Airbus or Boeing aircraft. They don't have an auto thrust or auto throttle installed and they have a manual navigation source selection. This means you have to give the autopilot a deviation and course that it fly towards. This can either be the localizer deviation, VOR deflection or FMS lateral offset. Depending on the selected source on your PFD or the PFD of the copilot side the aircraft will either fly the route or an ILS or VOR. And this can be used for either navigation receiver or FMS. Also automatic frequency tuning (auto tuning) is not available here. And it can't autoland and therefor disengages at 50ft AGL.
- Added source selection:
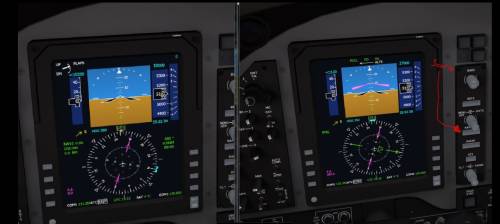
- C90Gtx: press obscured “NAV/BRG” key to the right of the PFD (see screenshot below). This steps through FMS, NAV1, NAV2
- LJ45: press the button “FMS” or “NAV” in the glareshield in front of you repeatedly to select either FMS1/FMS2 or NAV1/NAV2
- XFR or CPL pushbutton selects either left or right PFD (default left). The arrow → or ← on the PFD indicates which side is used for the autopilot. And on that side the NAV source can be found near the compas rose, top left corner.
- Changed lateral modes:
- corrected basic modes: same as boeing: Bank hold if above 6deg, wing level followed by heading hold if below that
- HDG: can now turn 360°
- added lateral modes:
- NAV key: either arms FMS or VOR (depending on nav source)
- VOR: captures and flies a VOR radial (requires CRS and frequency to be set manually)
- Changed vertical modes:
- no VNAV climb available
- VNAV PATH can be armed prior to top of descent if selected altitude is lower than current alt.
- IAS climb/descent now synchronizes airspeed
- VS now always synchronizes with current vertical speed
- Added vertical modes:
- APPR key: either arms LNAV + VNAV approach or LOC + G/S (depending on nav source)
- basic vertical mode is pitch
- added GA PITCH - just a fixed pitch guidance, cannot be flown by AP
- VNAV can be used for the final approach
C90GTX
A Few changes here and there but mostly implementing the nav-source selection here. This is still work in progress.
- added navigation source selection: FMS, NAV1, NAV2 including coupling to left or right HSI
- added autopilot target vertical speed to vertical speed indicator
- added autopilot buttons now move in virtual cockpit
- added label “next page” to radio management unit
- changed HSI displays course even if no signal is received, only course deviation indicator is removed
- changed flight mode annunciator on PFD displays correct names for modes
- changed navigation source legend on primary flight display now displays more realistically if no signal received or no if data present
- changed flap display is not displayed all the time and but only if flaps actually change
- fixed ADF frequency on radio management panel and PFD now visible again
LJ45
- added crew alerting system (CAS) with info like status of auto-spoilers, warning spoilers extended, take off configuration warning: flaps, trim, etc.
- added take off warning affected items boxed in red on EICAS
- added altitude alert
- added FMS mode (TERM, APPR or enroute) displayed on PFD
- added reduced bank limit for autopilot
- added animated buttons in virtual cockpit
- added approach capability displayed on PFD
- added MFD TCAS view
- added AP and YD disconnect warnings now flashing
- changed flight mode annunciator highlights new modes and displays correct names
- changed selecting vertical speed mode hides selected speed and vice versa.
- changed trim display on EICAS
- changed MFD top left FMS information hidden when no route available
- fixed auto-spoilers now only deploy above 60 kts ground speed
