This is an old revision of the document!
Table of Contents
Autopilot
1. Autopilot (PC)
Important note: Please note that the autopilots operation can be fundamentally different dependent on the aircraft type. Some of the AP functions are not final in the early access version. Please keep your aeroflyFS2 via the Steam account up to date. In the next few weeks some different updates will be improve the autopilot functions.
General informations
Please note that you can control the autopilot by two different ways.
- You can control the autopilot at the cockpit panel using the mouse and mousewheel.
- You can use different keys or buttons after setting them up (“Settings” / “Control” / “Autopilot”).
At the beginning it is recommended only to use only one of this possibilities. Using both is only recommended for advanced users.
The autopilot can stabilize the heading, airspeed, altitude as well as the vertical speed. The autopilot cannot be switched on and will disengage when one of the following limits is exceeded: bank angle larger than 60 degrees, pitch angle larger than 45 degrees, airspeed less than 1.2 times the stall speed or when the aircraft is on the ground. These limits are exceeded for example if you fly a looping with heading mode engaged – the autopilot will disengage as soon as the nose is 45 degrees above the horizon.
Autopilot modes
WING LEVELER (ROL)
In this mode the autopilot will engage in the basic roll (ROL) mode which functions as a wing leveler.
PITCH ALTIDUTE HOLD (PIT)
The Pitch Attitude Hold (PIT) mode allows constant attitude climbs and descents.
AIRSPEED (SPD)
The airspeed mode / auto-throttle will adjust the engine power to keep the selected airspeed. The target airspeed is shown in magenta at the virtual cockpit and can be changed by individually programmed buttons or keys. See below how to do.
HEADING HOLD (HDG)
The heading hold mode can be activated and deactivated by tapping on the heading indicator. The box around the heading will change its color to green to indicate the heading is controlled by the autopilot. If no heading was selected so far, the current heading will be selected and shown in magenta. The target heading can be changed by tapping the + / – buttons below the heading indicator. Touching these buttons for a longer time will repeatedly change the selected heading by 5 degrees. The target heading can be changed while the heading mode is engaged, the autopilot will then turn the aircraft to the selected heading.
ALTITUDE HOLD (ALT)
Hold a constant altitude. This mode is perfect for cruise flight at a constant altitude. Tap the altitude indicator to activate this mode. When engaged, the autopilot will climb / descend to the target altitude and level off. The vertical speed in this phase can be selected by using the + / – buttons below the vertical speed indicator . When the target altitude is changed by tapping the + / – buttons below the altitude indicator, the autopilot will initiate a climb / descent to the new altitude. The vertical speed for this will be the last selected vertical speed, provided it has the right direction. If a descent would be required to reach the new altitude and the last selected vertical speed was a climb at 1000 ft/min, this would be changed to a default of -1500 ft/min and vice versa.
Vertical speed (V/S)
Climb / descend at a constant rate. When engaged, the autopilot will try to climb / descend at the selected vertical speed. If the aircraft cannot climb at the selected vertical speed, it will loose airspeed until the autopilot disengages at minimum speed. This mode can be selected by tapping the vertical speed indicator. The v/s mode will override the altitude mode, so this can be used to leave an altitude that was previously held constant by the autopilot. On the other hand, if the altitude mode is active, the vertical speed mode will disengage 500 ft before reaching the target altitude to allow levelling off and avoid crossing a selected altitude.
Two axis stabilisation (ROL + ALT)
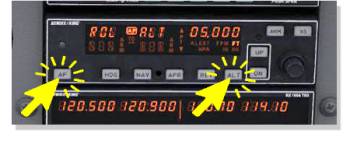
The easiest way to use the autopilot is the ROL/ALT mode. The ROL mode is per default enabled if you start the autopilot via the “AP” button on the autopilot panel or pressing Key “A”.
After that press “ALT” at the panel. Now the aircraft will be stabilized automatically.
Heading mode (HDG)
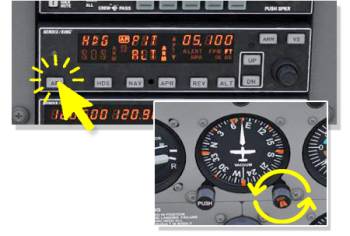
- Click at the autopilot panel on “AP” to activate the autopilot
- Click on “HDG” right beside to activate the Heading Mode. You also will see “HDG” at the panels display
- Click “I” to display the virtual cockpit at the top of the screen for a easy check of presetted course.
- To change the course manually move the mouseover the “HDG” select knob and use the mouse wheel.
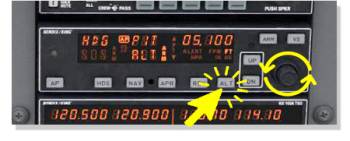
- Preset the altitude via the select knob (mouseover and mousewheel) at the autopilot panel (e.g. 5.100 FT)
- Click on “Arm” to activate the selected height
- Click once again on “ALT” to activate the Pitch, displayed by “PIT”
- Click repeatedly on “UP” to select the climb rate (or “DN” for down)
By this way the autopilot will be target the presetted height and will hold the flight level automatically. From now you can change the flight level by presetting a new high and click on “up” or “down” once again.
Vertical speed mode (VS)
 The vertical speed (VS) mode allows variable vertical speed climbs and descents.
- Click at the autopilot panel on “AP” to activate the autopilot
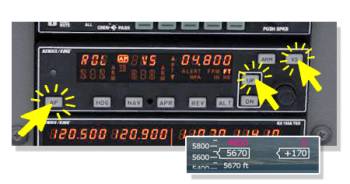
- Click on “VS” to activate the vertical speed Mode
- Click on “UP” or “DN” to select vertical speed rate
- Control the rate by the vertical speed indicator at the panel or climb rate at the virtual cockpit (+170 ft/min on the illustration beside)
From now you can e.g. add the heading mode by clicking on “HDG”. By this way you can control the course via the “HDG” select knob (2.4) and climb rate via the “UP” or “DN” buttons.
2. Autopilot (Mobile)
As we steadily improve the depth system of all airplanes in Aerofly FS 2, we noticed that it was getting a lot more difficult to operate the autopilot in most airplanes as we are simulating them ‘almost’ like their real counterparts. We soon noticed that this is just not an option for the mobile version because the PC version is already giving novice users a headache. So we created the copilot which is nothing else than a highly sophisticated user interface for the autopilot in the airplane.
The new version of the computer pilot will use the aircraft’s autopilot if available, so that the selected values displayed in the cockpit are in sync with the copilot’s settings.
Engaging the copilot will enable the autopilot and set it to the current heading and vertical speed. Heading and vertical speeds can be changed using the +/- buttons. When ALT is enabled, the autopilot is set up to fly to the selected altitude.
The selected altitude can be changed while ALT is active. If the aircraft has to climb to get to the selected altitude, the copilot will either climb with a constant vertical speed or climb by maintaining the selected airspeed, depending on the aircraft type and autopilot. Descents are always done by maintaining a vertical speed.
Press the ROUTE button when close to the green navigation route to follow this route. The copilot will either fly manually or configure the aircraft’s autopilot to follow the route and climb and descend accordingly. The airspeed is controlled by the copilot using the throttle control or the aircraft’s autothrottle if available. The copilot will disengage the autopilot or stop controlling the airplane 0.2 NM before the destination runway threshold. From this point on you have to perform the landing manually.


