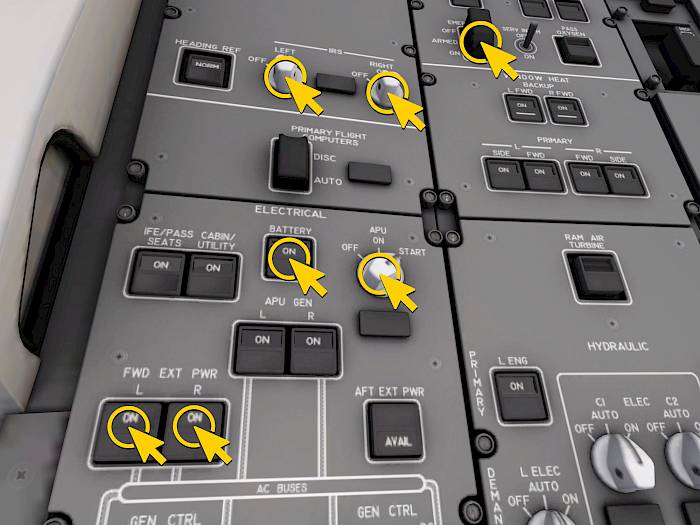
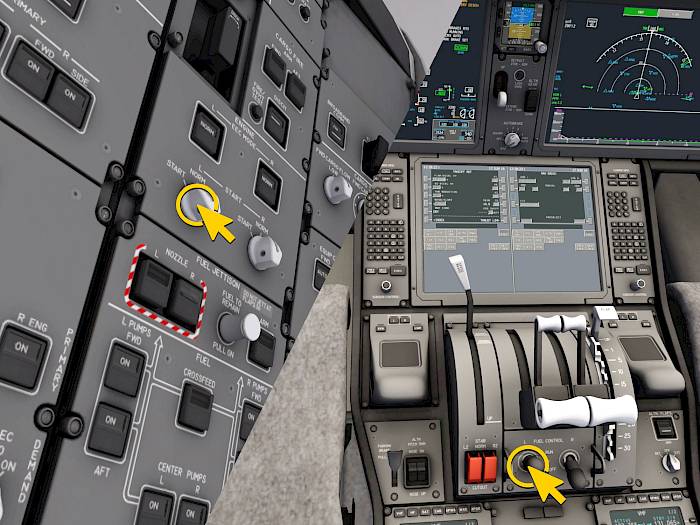
IPACS

Boeing 787 Dreamliner "Cold and Dark" Startup

Aerofly FS now can simulate full start up procedures from cold and dark for almost all of the aircraft, this includes all airliners. The cold and dark configuration is an aircraft state with all engines shut down and cooled down (cold) and all systems turned off, lights off (dark). This is the aircraft state that would be found after the aircraft has been parked for a while or over night and the aircraft is now prepared for the first flight of the day.

To select the cold and dark setting first select the aircraft in the aircraft menu and then select a parking position using the location menu. After selecting a parking position you will see options for “ready for taxi”, “before engine start” and “cold and dark”. Select the latter to start with all engines and systems off.

Preflight

Power On

Lets power up the aircraft. In the overhead panel on the left hand side you can find the electrical panel

  • Push the BATTERY master to ON
  • If you see the forward external power left and right (FWD EXT PWR L, R) “AVAIL” lights then go ahead and push the two switches in to use the external power supply to ON.
  • Start the Auxiliary Power Unit by rotating the APU selector to the START position, it spring-loads back to ON

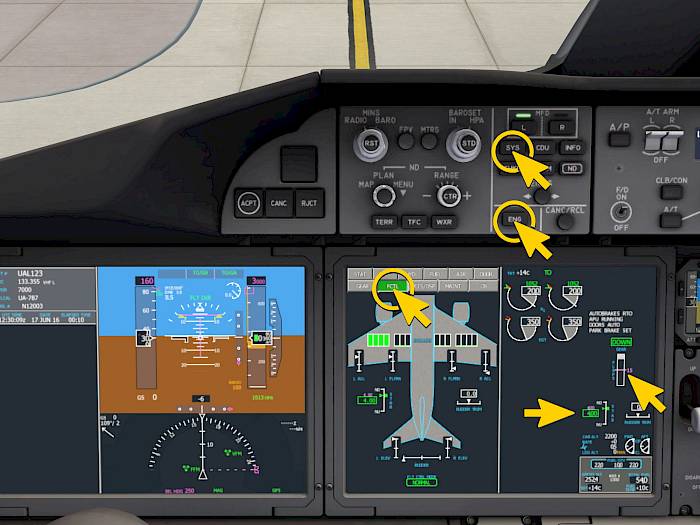
After some time the APU generators will come online. And while we are still in the overhead panel

  • Turn on the inertial reference systems by rotating the IRS switches from OFF to LEFT / RIGHT
  • Arm the passenger emergency exit signs and lights by closing the black EMER EXIT switch guard.

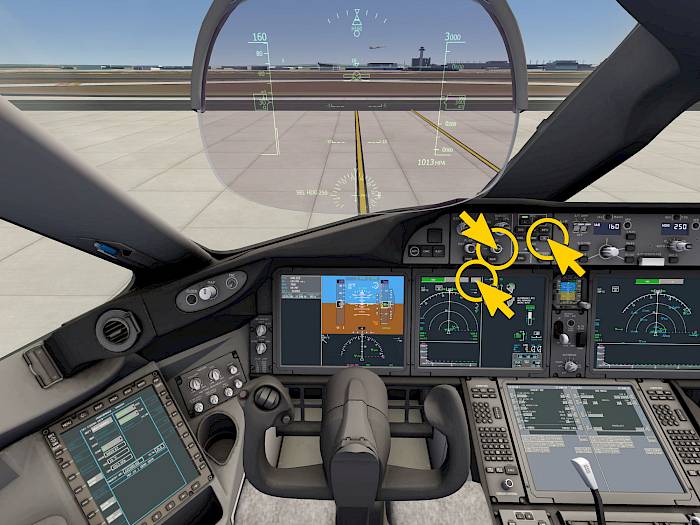
Now the aircraft displays are starting to show the first values like airspeed and altitude and after the IRS has aligned we can also see the aircraft position on the navigation displays.

Note - The alignment process takes up to ten minutes in the real world, we have reduced this time to just one minute for you.

Flight Management System

We’re now entering the necessary values for the flight management system (FMS) with the Multi-Function Display (MFD) “CDU” page.

Note - You can cheat and get enter useful values by double clicking each empty field.

  • Press INIT REF to display the initialization reference pages
  • Select INDEX in lower left and select POS to display the POS INIT page. Enter the ICAO code of the airport that you are currently at
  • Select INDEX again, go to PERF to display the PERF INIT page. Enter the zero fuel weight (ZFW) of the flight
  • Enter reserves, cost index, cruise center of gravity and cruise altitude
  • Go to the THRUST LIM page and select an engine thrust limit for takeoff. We’re leaving it at normal takeoff (TO) thrust for now.
  • Go to the TAKEOFF REF page and fill out the takeoff flap setting, V1, VR and V2 speeds as well as the center of gravity. For this tutorial we’re using flaps 15, V1 = 150, VR = 155 and V2 = 160.
  • Press the EXEC button to confirm the changes and activate the entered values
Full Boeing 787 FMC Preflight

Now look at the autopilot mode control panel (MCP) and rotate the selected airspeed knob to set 160 knots as the initial climb airspeed.

Electronic Checklists - Preflight

The 787 Dreamliner comes with handy electronic checklists that allow us to check all mandatory items. In the glareshield below the highlighted MFD button “L” press the CHKL button to display the electronic checklist on your MFD screen in front of you. Press it again to hide it later.

  • Press the CHKL button to display the electronic checklist
  • Click the RESETS button and press the RESET ALL button
  • Click the NORMAL MENU button in the top left corner and from the drop down menu select the first item to select the PREFLIGHT checklist
  • Click on the highlighted checklist item to toggle its state or press the NORMAL button to complete all items on the page at once
  • Some items are completed automatically by sensing the switch positions. Either complete the task or use the ITEM OVRD button to skip the item

When the text CHECKLIST COMPLETE appears at the bottom of the page we use the NORMAL button to go to the next checklist

Before Engine Start

Turn remaining systems on

The so called EICAS display (engine indication and crew alerting system) combines the engine parameters and a text warning area, called the crew alerting system (CAS). This text shows all systems that are not yet working and should be turned on before the flight.

  • In the overhead panel turn all systems on that currently show an amber FAULT light.
  • Set the four hydraulic pumps to AUTO by rotating the knobs
  • Set all fuel pumps to ON by pressing the respective push buttons in
  • Set the passenger signs to AUTO
  • Turn on the NAV, BEACON and LOGO lights
  • Below the landing gear lever set the AUTO BRK switch to the RTO position to arm the autobrake for a potential rejected takeoff

Ideally we should only see a single amber “ENG SHUTDOWN” message now and a few white lines like “APU RUNNING”, “PARK BRAKE SET”, etc. We can ignore these reminders (Memos).

Set autopilot for takeoff

On the autopilot mode control panel (MCP) now turn on the flight director and set the speed, heading and altitude.

  • Set both F/D switches on the MCP to ON
  • Turn the selected speed knob to set the V2 speed of 160 knots
  • Set the runway heading or ATC assigned heading, in our case 250°
  • Set the initial altitude as assigned by ATC or 2000/3000 feet above the airport elevation, in our case 3000 feet. You can also set the cruise altitude right away if you are flying a route.
  • Do not press any buttons or if you do by accident turn both flight director switches F/D off and then back on
  • Check that the primary flight display shows TO/GA and TO/GA for the lateral and vertical modes. If it doesn’t turn F/Ds off and back on.
  • Set the autothrottle (A/T) switches to ARM (upper position)

If you set up a flight plan route

  • Push the LNAV and VNAV buttons to arm the lateral and vertical navigation

Before start checklist

Open the electronic checklist on the MFD

  • Press the CHKL button on the MFD control panel to display the electronic checklists
  • On the screen select NORMAL MENU and then BEFORE START
  • Complete the before start checklist items by clicking on them
  • Hide the electronic checklist by pressing the CHKL button again
  • Adjust the navigation display range as required, if you zoom in all the way you can see an airport diagram that helps to find the way to the runway
  • Press the “ENG” button on the MFD control panel to display all engine parameters on the EICAS display, we’ll need these for the engine start

On the lower MFD

  • Press INIT REF then select INDEX and TAKEOFF to display the TAKEOFF REF page, if it’s not already visible

We can keep this page open for reference during takeoff.

FYI: Fully Electric Aircraft

The Full Authority Digital Engine Controller (FADEC) manages the engine for us and it can start the engine automatically as well. Unlike other airliners the Dreamliner does not have a bleed air system and instead electrical power is used to start the engines. You can also start both engines simultaneously when you have enough electrical supply power.

Requirements for a successful start:

  • Make sure all fuel pumps are running and there is sufficient fuel
  • APU should be running or external power should be connected
  • Push the ENG button to display all engine parameter on EICAS

We have now reached the “before engine start” aircraft state

Note - You can easily skip all of the steps above or return to this state if you select the “before engine start” preset in the location menu.

Starting Engines And Taxi

Autostart

To start an engine

  • Set the engine start switch of the engine you want to start (L/R) to the START position
  • Move the engine master switch (L/R) from CUT OFF to the RUN position
  • Monitor the engine start on the EICAS

When the EICAS shows a green RUNNING text above the N2 indication the engine has successfully been started and the starter has disengaged.

  • Repeat the process for the other engine.

Before taxi checklist

Display the BEFORE TAXI checklist on the MFD

  • Set the flaps for takeoff
  • Check pitch trim is set for takeoff, in our case 4.0 units
  • Check the flight controls.

You can see the control deflections if you push the SYS button and select the FCTL page in the MFD. Press CHKL again to return to the checklist afterwards. We’re now ready for taxi with both engines running

  • Turn on the taxi and runway turn off lights (if required)
  • Release the parking brake
  • Add a bit of thrust to start rolling
  • Test the wheel brakes briefly
  • Turn the APU off by rotating the APU knob to OFF

Taxi to active runway

Use the electronic checklist to review the BEFORE TAKEOFF checklist.

  • Display the navigation display (ND) by pressing the ND button
  • Press the ENG button to hide the engine parameters on the EICAS
  • Use the navigation display zoom function to visualize the taxi route on the airport diagram
  • Use the navigation display menu drop down to toggle display of waypoints, airports, etc.
  • Toggle the Vertical Situation Display (VSD) as required
  • Check flight instruments during taxi

When entering the runway

  • Turn on the landing and runway turnoff lights
  • Turn on the strobe light

Takeoff!

You completed the startup tutorial and are now ready for departure! Remember, you can always reach this takeoff state by just selecting a runway position in Aerofly FS. Then you are ready to go with just one click :)

  • Apply takeoff thrust manually or just push the TO/GA buttons on the thrust levers once line up with the runway and let the autothrottle do the work for you
  • Maintain the runway centerline
  • Rotate at 155 knots
  • Retract the landing gear
  • Increase the selected airspeed once you pass acceleration height (e.g. 1000 feet above ground)
  • Retract flaps
  • Turn off lights as required
  • Turn on the autopilot as desired

Have a good flight.

Flight Tutorials

Tutorials