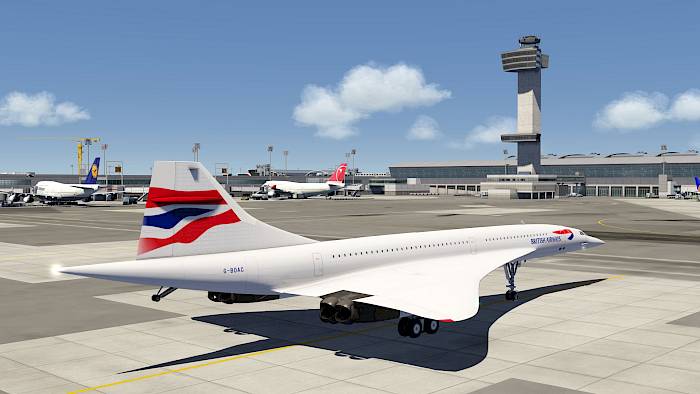
IPACS

Concorde Flight Tutorial

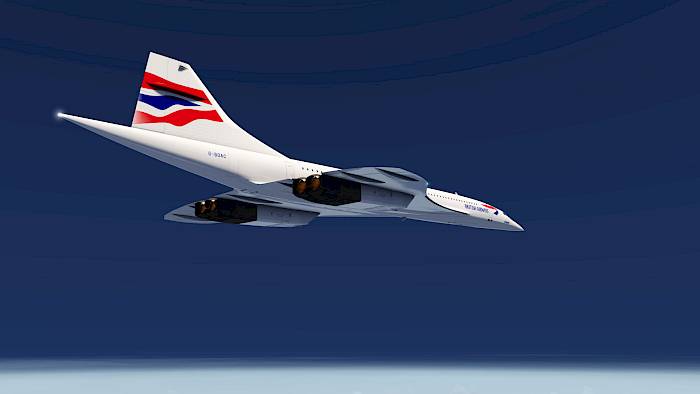
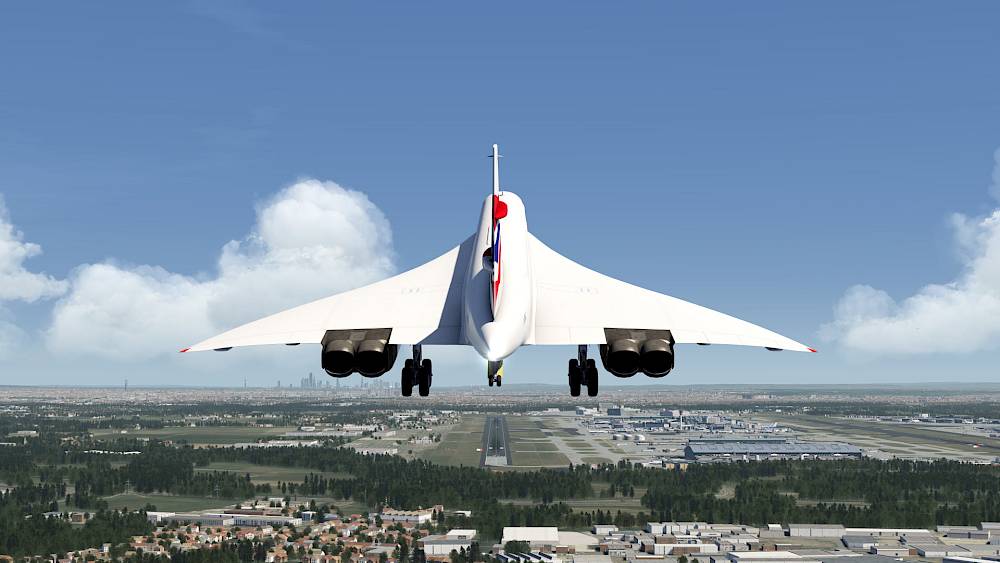
The legendary Concorde was a supersonic jet airliner that could fly twice the speed of sound or Mach 2.0. This high speed made it possible to cross the Atlantic and fly from New York to London in just 3.5 hours saving a lot of time for people who could afford to travel with the Concorde. Ticket prices were quite high due to the very high fuel demand of the aircraft and the prestige nature of the flight. Concorde’s first flight took place in 1969 and unfortunately after only 20 aircraft were ever built. The Concorde already retired in 2003.

But now the Concorde is part of the Aerofly Flight Simulator fleet and you can experience how it is to pilot this beautiful looking and very unique delta wing aircraft.

Unique Challenges Flying the Concorde

Due to the delta wing design with no horizontal stabilizer the Concorde has some unique flying characteristics. The delta wing design is inefficient for flying at low speed but great for high speed cruise. Because it’s not possible to add flaps to increase lift a high angle of attack is needed. The lift is generated from large vortices originating at the sharp leading edge of the wing rolling over the top of it. This vortex lift increase is non-linear and produces a lot of drag as well.

  • For takeoff and landing a very high angle of attack is needed (up to 14-15 degrees)
  • To allow pilots to have a better visibility during of the runway takeoff and landing the nose of the aircraft can be lowered
  • Each takeoff is performed with reheat (afterburner) which consumes a lot of fuel
  • The engines are very loud and noise abatement procedures have to be flown
  • Below 10,000ft Concorde needed to fly below 250 knots, just like everyone else
  • Below 27,000ft and above land Concorde was flying just below the speed of sound

To avoid blasting everyone on the ground with a loud sonic boom Concorde was not allowed to fly faster than Mach 1.0 over land. That is because any object flying faster than the speed of sound constantly creates a shockwave around itself. And this shockwave expands and hits the ground a bit later than when the aircraft flew over it. So, for everyone on the ground the passing of a supersonic flying jet is heard by a loud bang that sounds like an explosion and can potentially break windows as well.

  • When reaching open seas Concorde could accelerate above Mach 1.0
  • To break the sound barrier the engine reheaters (afterburners) are used from Mach 0.95 to Mach 1.7, which costs a lot of fuel
  • But once it got up to high speed Concorde was piercing through the air like a needle, flying quite ‘efficiently’
  • Special engine intake ramps allowed Concorde to cruise at such a high speed without the need for reheat (afterburners), also referred to as super-cruising.

Tutorial Flight Setup

Tip: With the Concorde selected you can go to the Missions menu and select one of several pre-made Concorde flights. This allows you to skip a few steps.

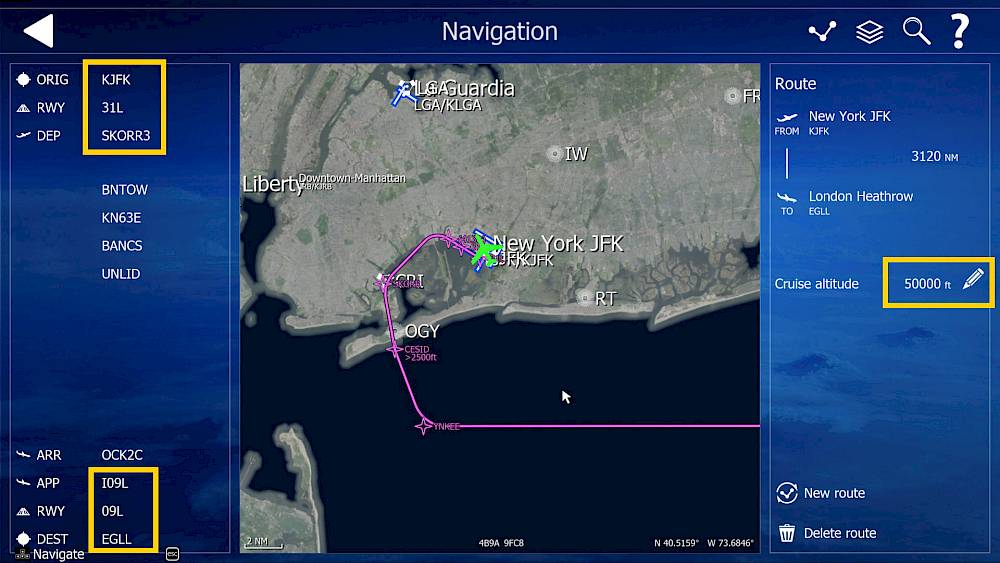
We’ve selected the route from New York John F. Kennedy Intl. Airport (KJFK) to London Heathrow Intl. (EGLL). But you can of course also fly the other way around or from Paris to JFK for example. For the flight conditions we’ve selected a few clouds and almost no wind.

  • Create a new route from KJFK to EGLL
  • Select runway KJFK 31L and SKORR3 for departure
  • Select runway EGLL 09L, ILS 09L and OCK2C for arrival
  • Add multiple waypoints in between that keep your flight path well above open sea so we can fly supersonic. You don’t have to use the exact same ones like we did.
  • Select a cruise altitude of at least 50,000ft. Concorde often cruised at FL580 for this route.

Preflight

Start Location

In the location menu select the parking position next to the New York JFK airport reference point, you may need to zoom in to see it. It’s on the south-eastern side of the apron.

Set Parking Brake

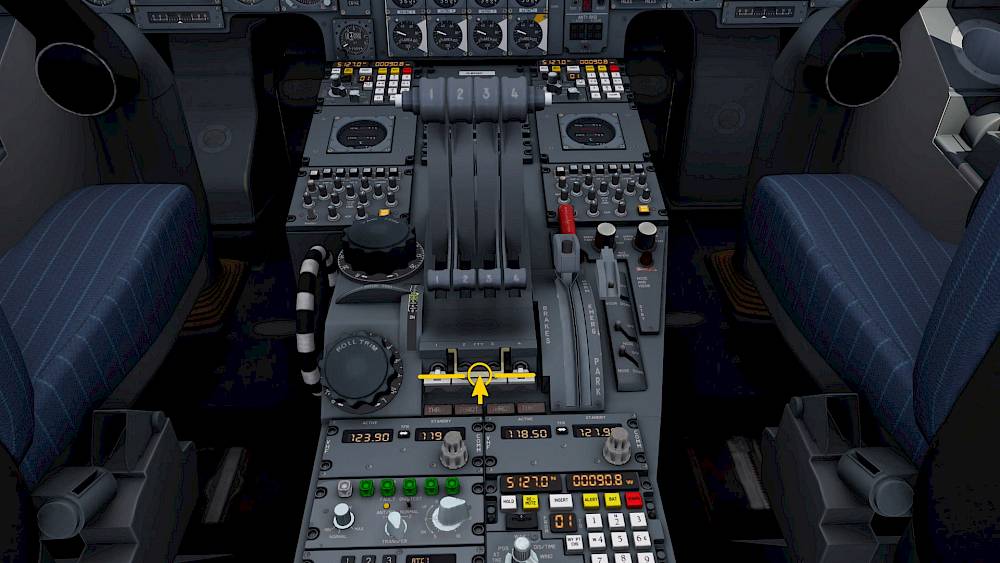
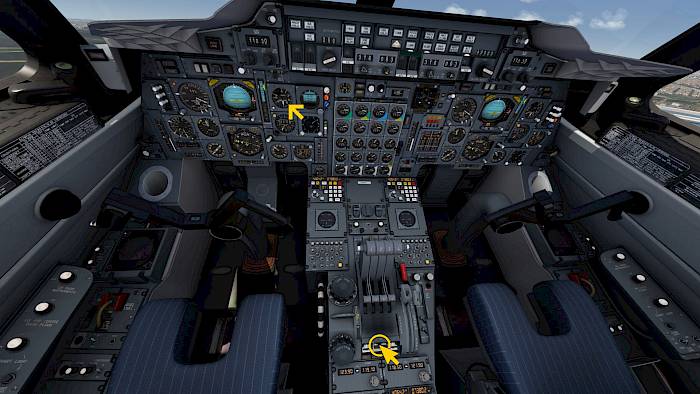
Next to the thrust levers you can find the brake handle.

  • Pull the BRAKES lever back to the PARK position to set the parking brake

Reheat and Transponder

  • Set all four reheat switches to the center position, that should already be the case in the default taxi configuration
  • Rotate the transponder mode (ATC) to TA/RA

Overhead Panel Scan

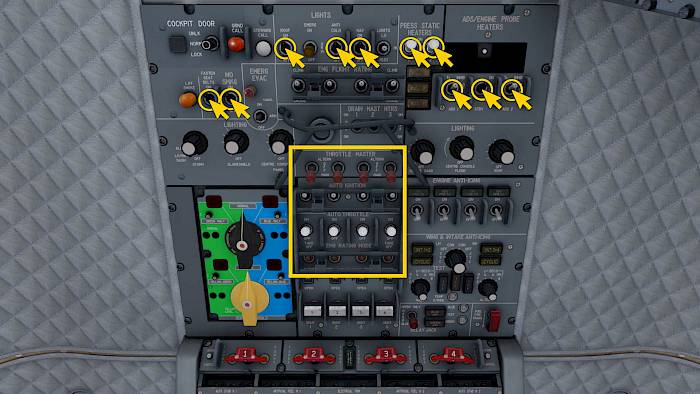
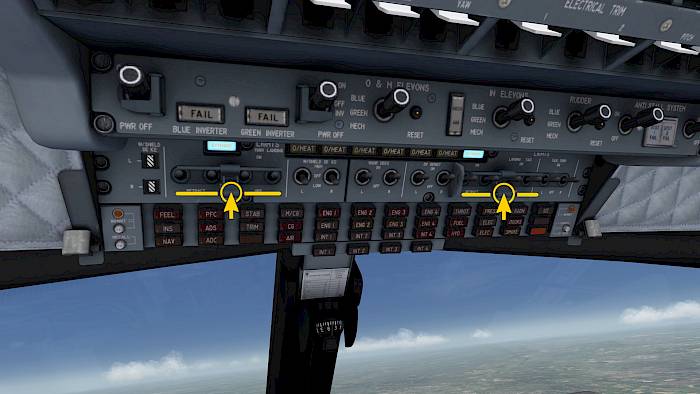
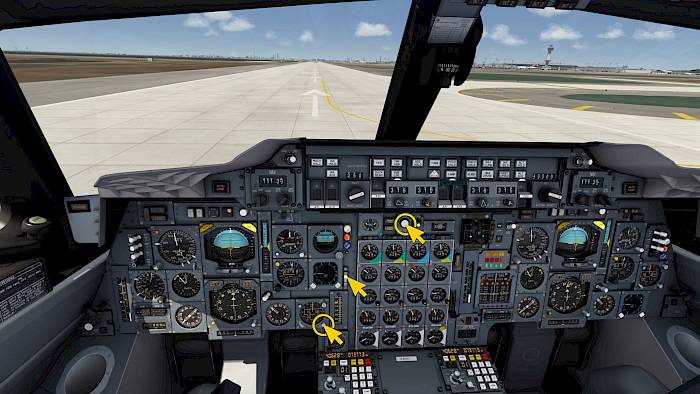
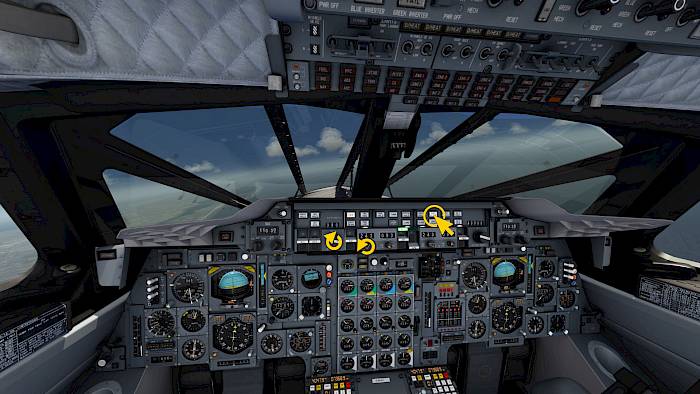
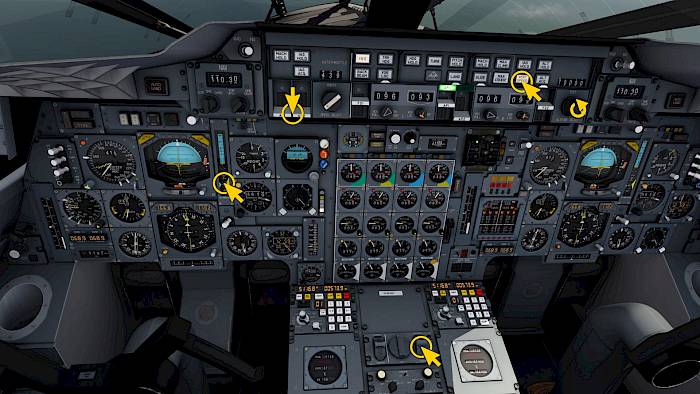
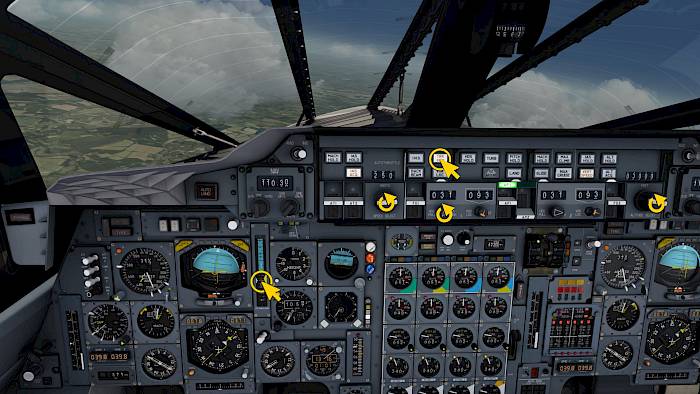
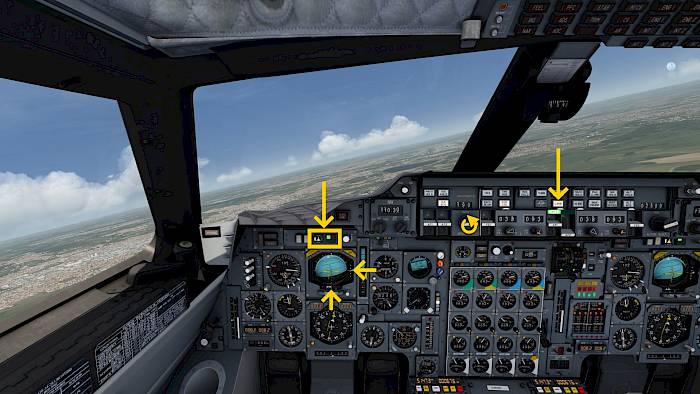
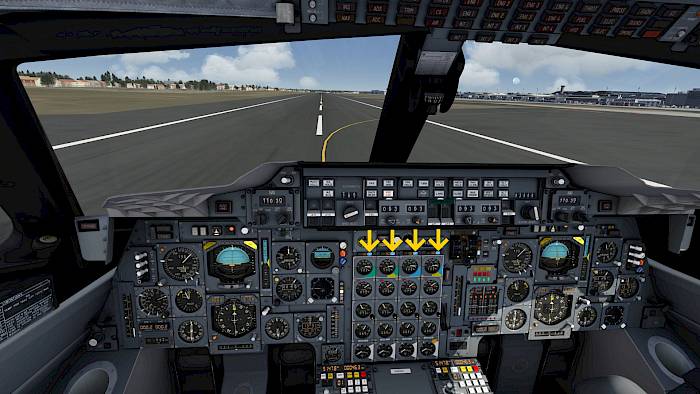
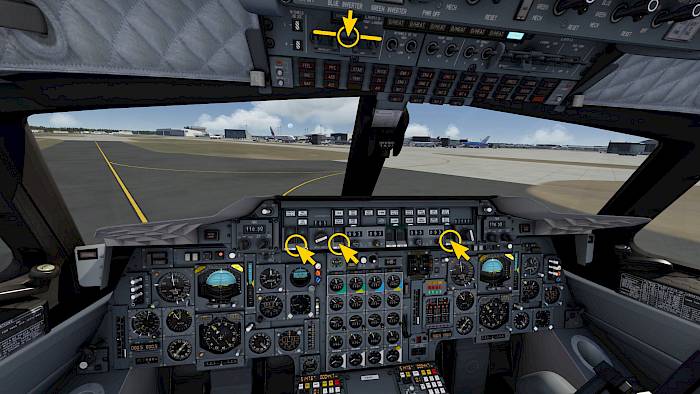
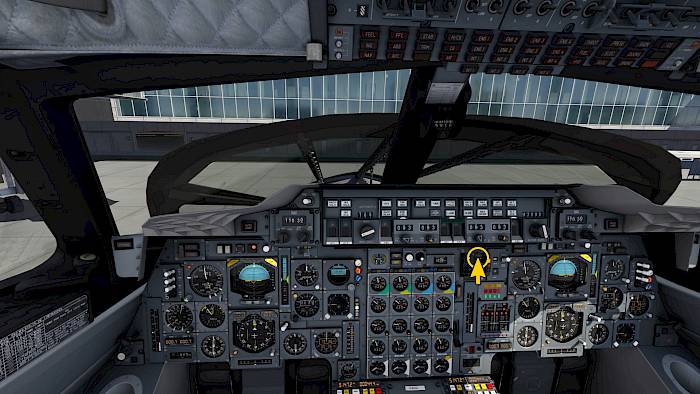
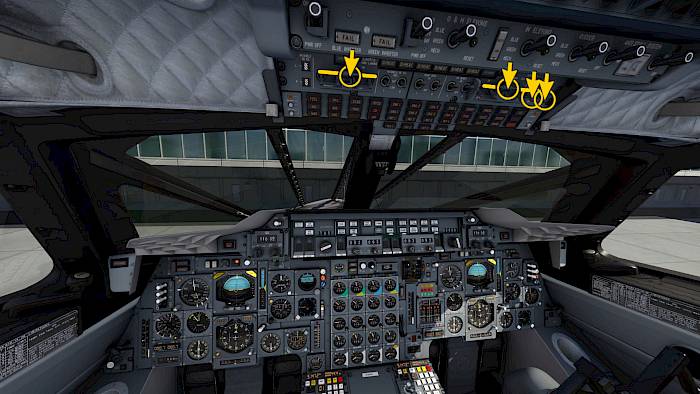
Scan the overhead panel and check that these switches are set correctly (which they should already be)

  • Passenger seatbelts and no smoking sings ON
  • ROOF beacon light ON
  • Anti-collision light ON
  • Navigation lights ON
  • Pitot static heaters ON
  • All probe heat switches ON
  • Throttle masters all on MAIN
  • Auto ignition switches all ON
  • Auto throttle switches all ON
  • Engine rating mode all TAKEOFF

Autopilot

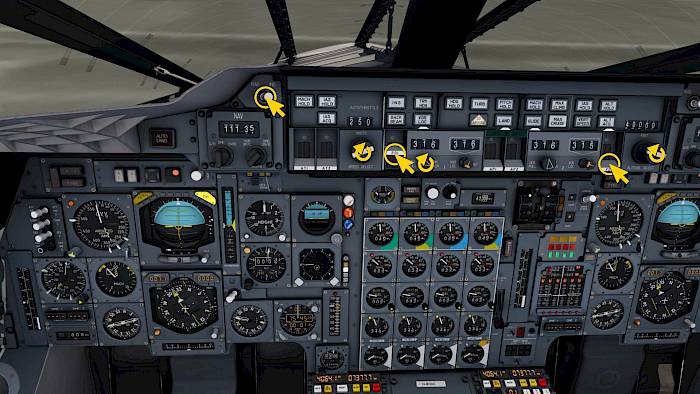
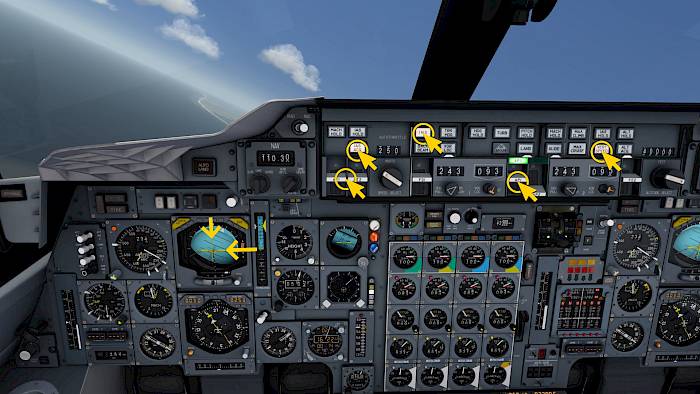
On the autopilot panel

  • Set on the flight directors 1 and 2
  • Set an initial climb airspeed of e.g. 220kt or 250kt
  • Rotate the selected heading to the planned runway course (316° for our runway)
  • Rotate the selected altitude to set the initial climb altitude. We’re setting 40,000ft for now but you can also set 60,000ft
  • Set the RAD/INS switch to INS so that the HSI displays our planned route direction and lateral offset.

Nose Droop

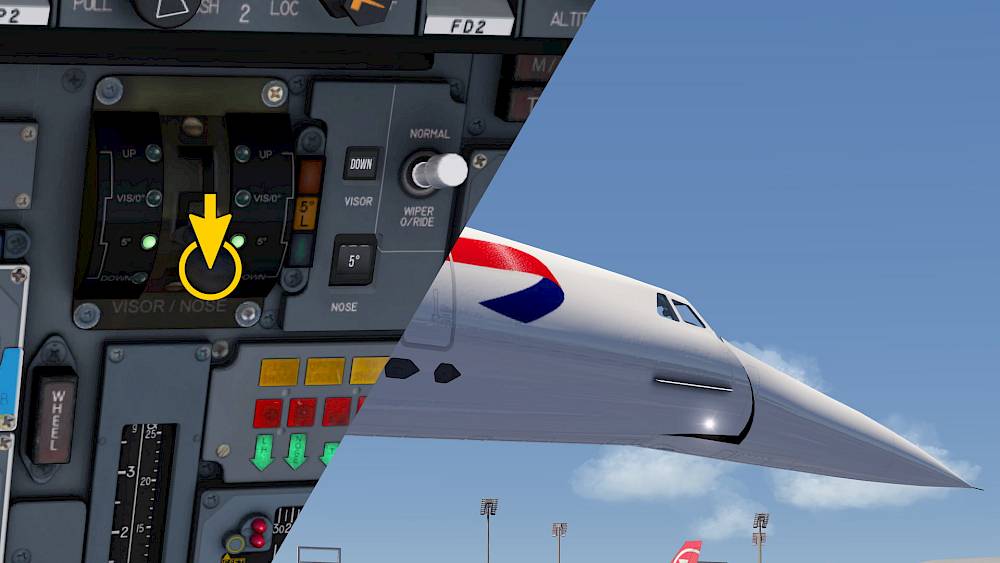
For takeoff and landing the nose of the Concorde has to be lowered to allow for better visibility. According to the flight manual the nose must be in 5° or greater when flying below 250kt. During pushback the position 0° with visor down is used to allow for enough clearance with the tractor. After equipment is clear the nose is lowered to 5° for takeoff. For landing the nose is set to 12.5° which is needed to be able to see the runway on final approach.

Because the Concorde does not have flaps we are re-using the flap commands to change the nose and visor position. From an operational point of view the droop nose is used very similar to flaps, only that it does not increase lift coefficient pretty much at all. But each nose position has a certain maximum speed and a lower setting is used for takeoff than for landing. So, to fly fast we need to retract the nose and to fly slow we need to extend it, just like with flaps.

  • To set the nose use the flaps overlay menu on mobile or key or button assignments (default key ‘F’ to extend flaps/nose and ‘Shift+F’ to retract flaps/nose)
  • You can also use the nose/visor lever in the cockpit to extend or retract the nose and visor.

Engine Reheat (Afterburner)

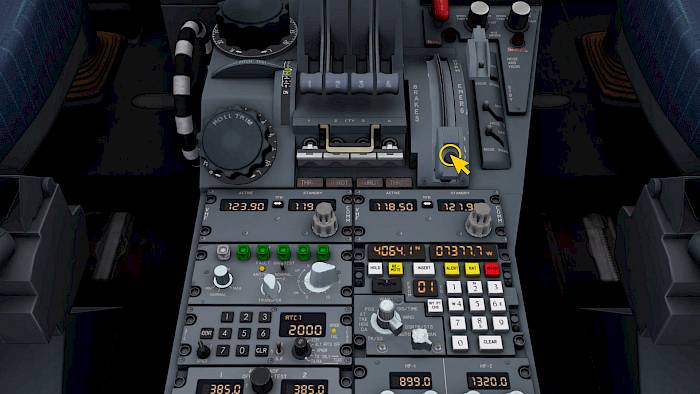
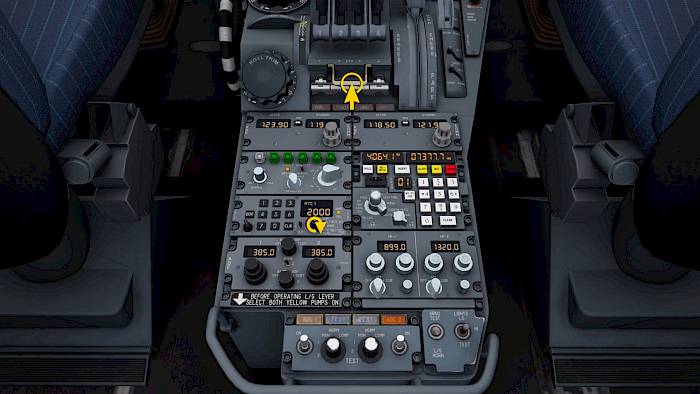
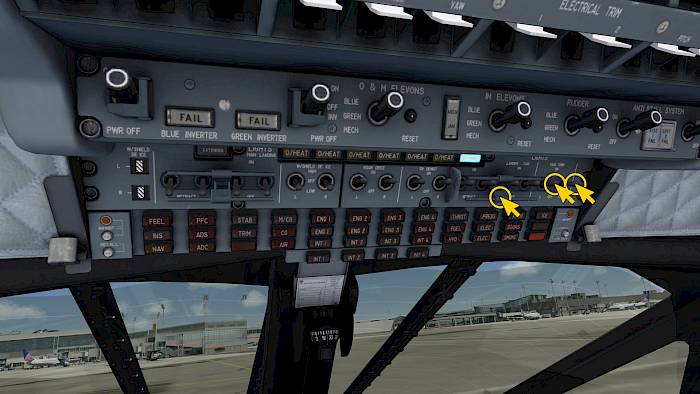
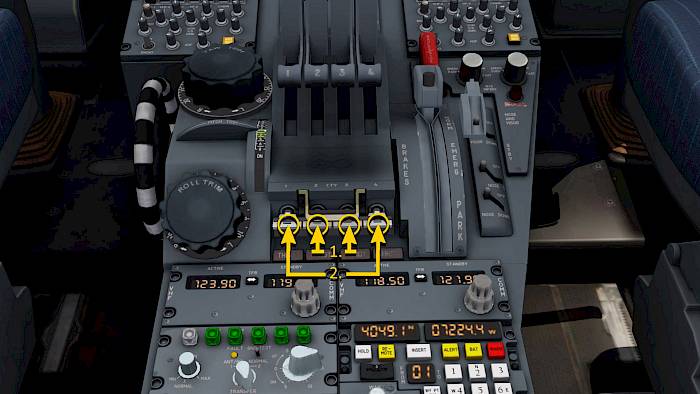
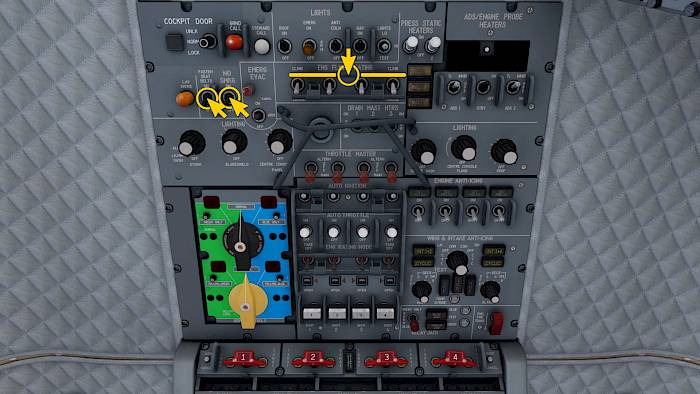
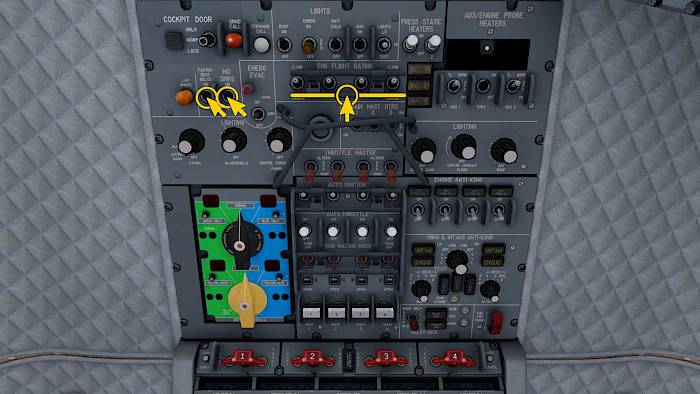
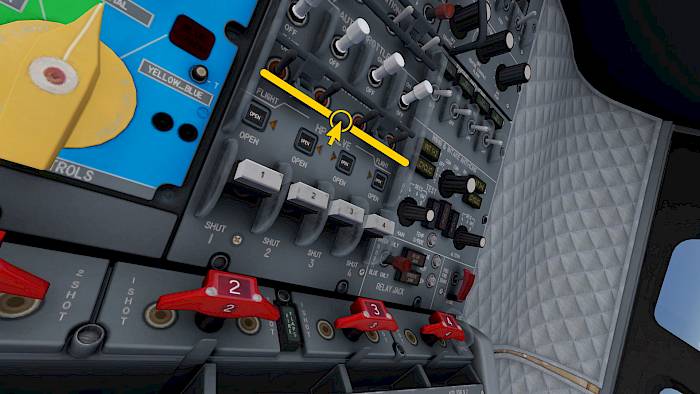
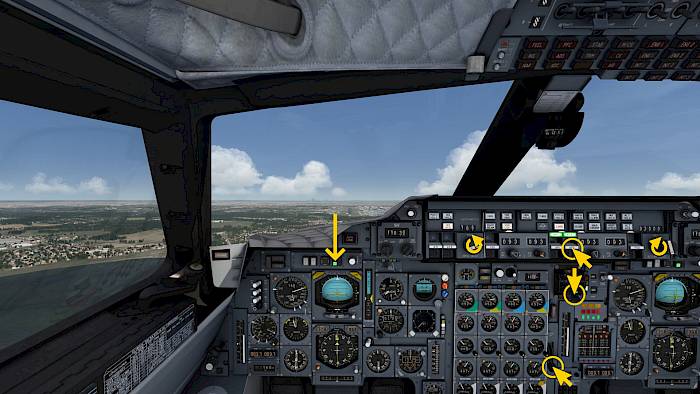
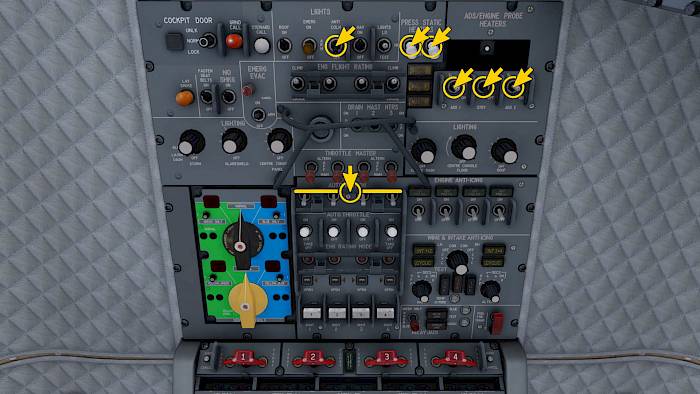
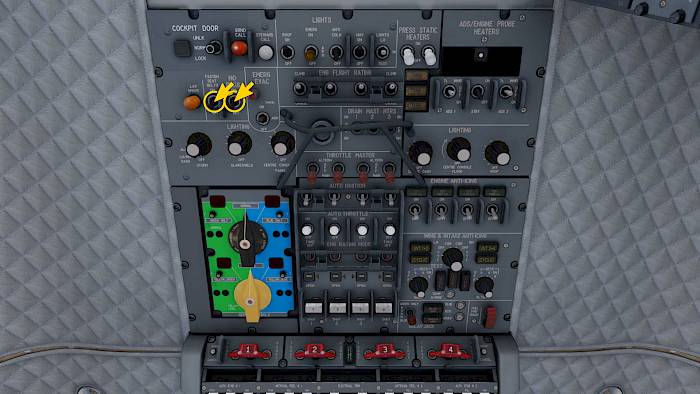
For takeoff we need full takeoff thrust with engine reheat (afterburner). For this we need to set all four reheat switches in the center position. The full down position is reheat off, the center position is reheat on and the upper position is for contingency thrust used in an emergency.

You can use the left click on the bar top push all of them down to off at once or push the green circle highlight forward when using touch inputs. Similarly, you can use right click or sliding the green highlight circle aft to pull all switches up by one step.

  • Set the reheat switches to REHEAT (center position) before takeoff and before landing
  • Set them OFF after takeoff and during cruise
  • The CTY (most upper) position is used to enable the contingency rating in case of an emergency such as an engine failure during takeoff. This setting is not used in normal flight.

Taxi

Taxi Route

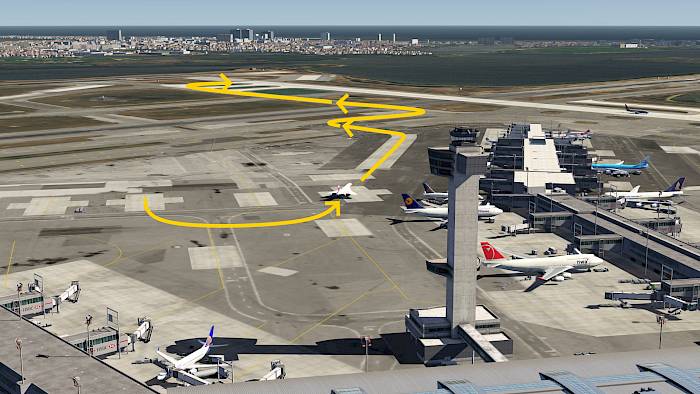
From the parking position near the tower of JFK we make two consecutive left turns and follow the taxiways to the holding position for runway 31L.

As always, before crossing a runway check that both directions are clear of traffic.

Flight Control Check

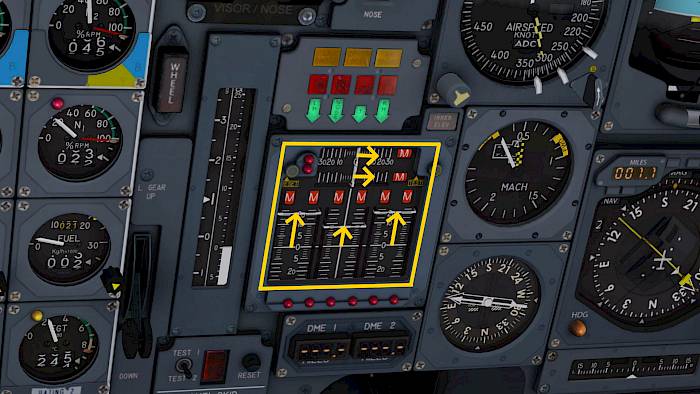
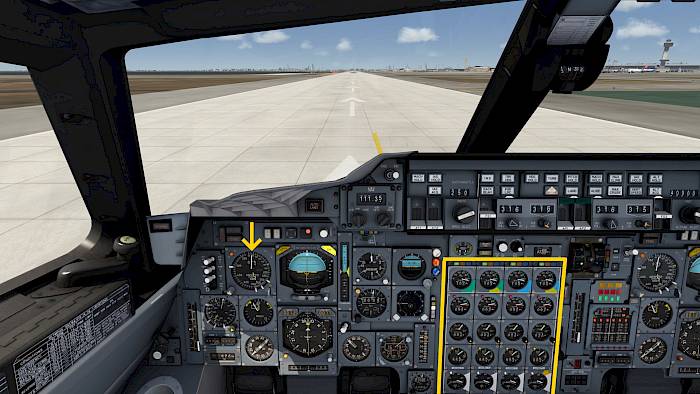
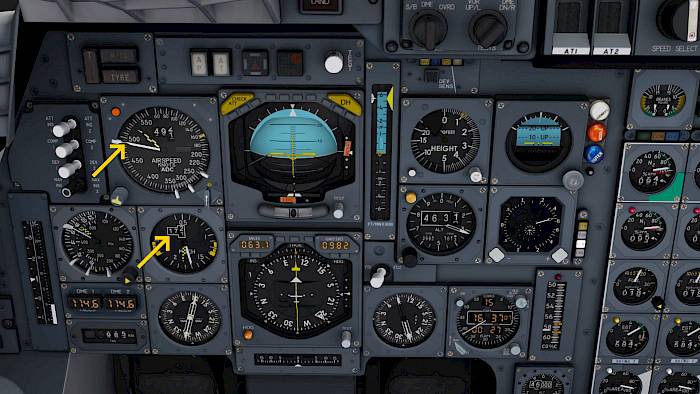
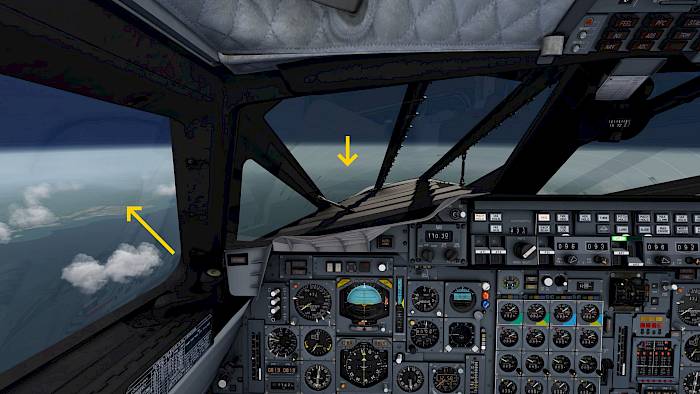
Let’s test the flight controls before we start the taxi. In the front panel you will find a set of needles underneath the landing gear indicators

  • Deflect the elevator up and down and monitor a response from all six elevons (inner, middle and outer elevons for each side)
  • Deflect the ailerons left/right and check for a response from all six elevons
  • Check the rudders left/right

Taxi Lights

Let’s start to taxi to runway 31L.

  • Set the nose to 5° down if you haven’t done so yet
  • Set on the taxi lights in the overhead panel
  • Release the parking brake
  • Add a bit of thrust to start rolling
  • Perform a short brake test

Takeoff

Landing Lights On

We’ve received clearance for takeoff

  • Turn on the landing lights in the overhead panel
  • Check that the anti-collision light is set to on (rear overhead panel, shown earlier)
  • Line up with the runway centerline

Start Takeoff

  • Push the white button above the engine instruments to arm the takeoff monitor function
  • Count down 3. 2. 1. NOW
  • Start the chronometer by pressing the lower right button on the timer
  • Apply full thrust on all four engines
  • Verify all engines are spooling up simultaneously
  • Engine fuel flow should advance to the pre-determined takeoff fuel flow position of about 2100-2200kg/hr

Takeoff Roll

At 60kt the airspeed indicators should come alive.

  • Maintain the runway centerline with rudder inputs
  • Check the engine instruments

Takeoff Monitor Function

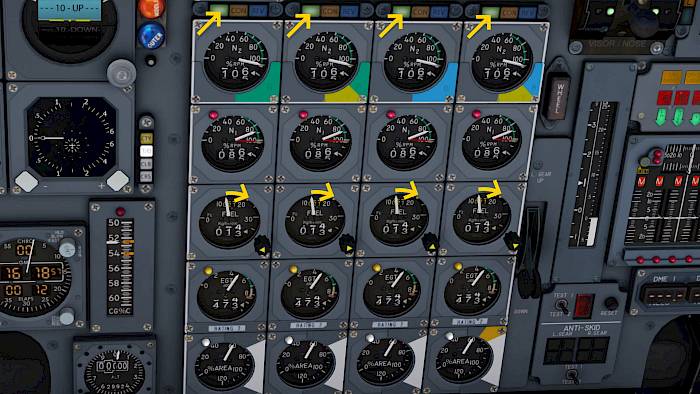
The takeoff monitor checks all four engines and if an engine fails it automatically engages contingency thrust on all remaining engines, provided the engine reheat switches are not in the off position.

  • Check that there is a green “good-to-go” light illuminated for each engine before reaching 100kt
  • Callout “Takeoff thrust set”
  • Callout “100 knots” once that airspeed is reached

Rotation and Gear Retraction

  • At about 165kt you can initiate the rotation

Initially the nose may take a bit of effort to lift off but once it has come off the ground it becomes much easier to lift the nose further.

  • Gently pitch up to about 13 degrees.
  • With positive rate of climb retract the landing gear
  • At 400ft initiate the left turn to turn away from the residential area in front of us

Noise Abatement

When you are above 200kt and 2000ft or at 1min on the chronometer (whichever comes first)

  • Callout 3. 2. 1. NOISE
  • Turn off the reheat switches
  • Reduce engine thrust to about 100% N2
  • Pitch down to about 8-10 degrees
  • Disarm the takeoff monitor function by pulling the takeoff monitor knob
  • Keep turning left onto a heading of about 210°

Departure

Departure Turn

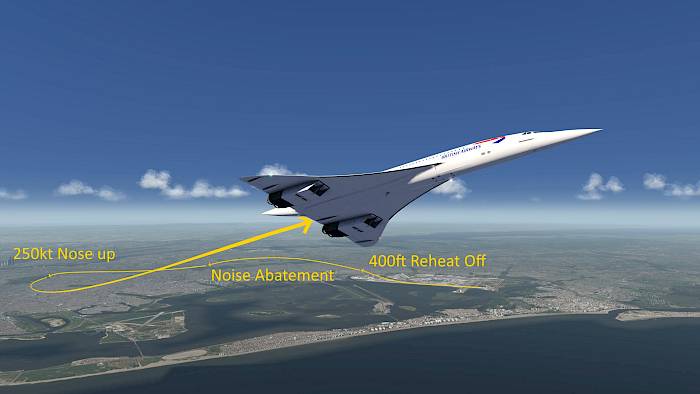
Our departure route takes us away from the coast as part of the noise abatement procedure.

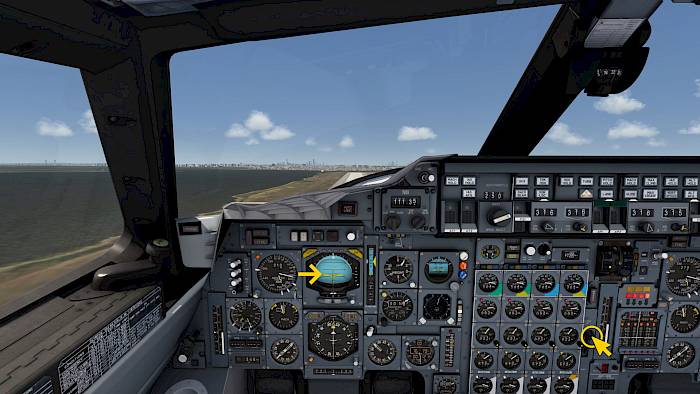
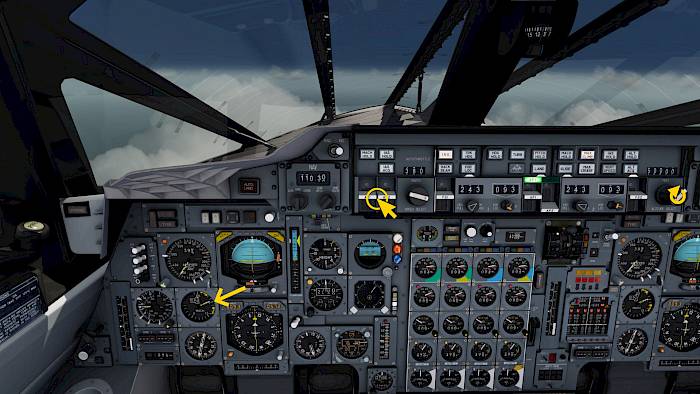
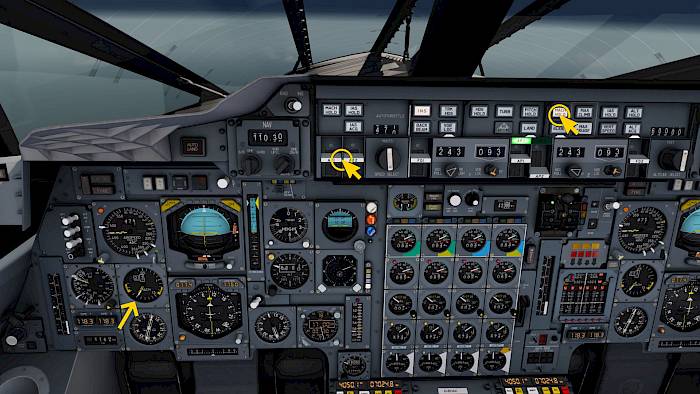
We’ve set the HSI to the INS source earlier, now we can see where the navigation route is taking is to on the HSI.

  • Follow the INS route guidance laterally
  • Accelerate to 250kt and maintain that airspeed

Autopilot On

  • Check that the flight directors are switched on and that the selected altitude is above the current altitude
  • Push the INS button on the autopilot panel
  • Push the VS button on the autopilot panel
  • Rotate the selected airspeed knob to 250kt
  • Click the auto-throttle (AT) switches to turn them on
  • Push the IAS ACQ button to tell the auto-throttle to maintain speed
  • Follow the flight director commands on the attitude indicator and once they are centered:
  • Turn on the autopilot (AP1)

Engine Rating Flight

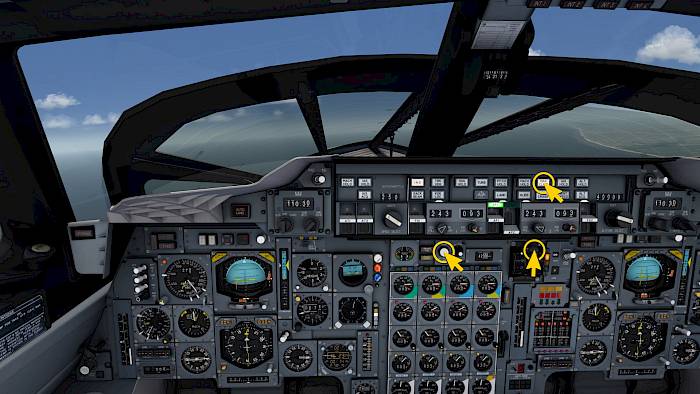
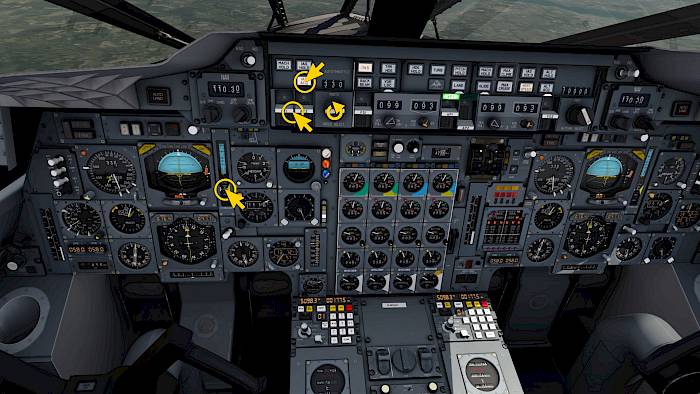
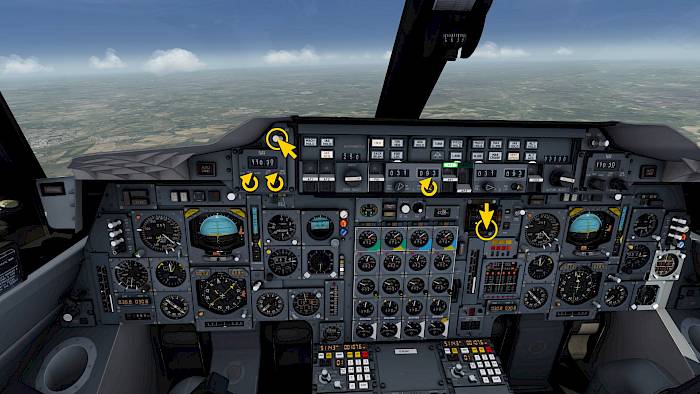
In the overhead panel we can now change the engine rating from takeoff to flight.

  • Push the crash bar to set the engine rating switches to flight.
  • Check that CLB light in the engine rating annunciator (left of the engine instruments) is now illuminated.

Note: The takeoff rating switches return to the takeoff position automatically when the landing gear is extended.

Nose & Visor Up, Lights off

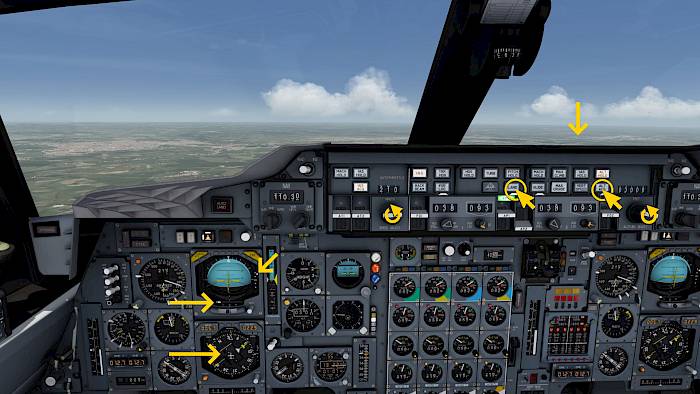
Reaching 250kt * Push the IAS HOLD button on the right side of the autopilot panel. * When you are above the water and away from the city you can turn off the auto-throttle and increase thrust again to 100% * Set the nose and visor lever to the up position to retract the nose and raise the visor, streamlining them * Turn off and retract the retractable exterior lights to reduce drag * You can keep the Taxi/Turn lights on until reaching 10,000ft

Subsonic Climb

After reaching 10,000ft we can finally speed up further.

  • Rotate the airspeed knob to set the maximum allowed airspeed on the airspeed indicator (380kt in our case)
  • Adjust the selected heading to match the current INS course to the next waypoint
  • Push the MAX CLIMB button on the autopilot panel
  • Turn off the seatbelt and no smoking signs switches in the overhead panel as required In the MAX CLIMB mode the autopilot will pitch to maintain an airspeed close to the maximum operating airspeed or maximum operating Mach number (VMO/MMO).

Breaking the Sound Barrier

Acceleration Above Mach 1.0

At about 27,000ft and at or near VMO we’ve almost reached the speed of sound of Mach 1.0. Until now we’ve been climbing using maximum dry climb thrust without engine reheat. To push through the sound barrier we need a bit of extra thrust we get from activating the reheats (afterburners). We keep the reheats on during the acceleration from Mach 0.95 to Mach 1.7 where we can turn them off and keep accelerating thanks to the engine intake ram air effect.

Maximum Climb

  • Increase the selected altitude to 60,000ft
  • Use the MAX CLIMB mode to let the autopilot accelerate
  • Turn off the auto throttle and apply 100% thrust (if not already set)

Mach 0.95 - Reheat On

Turn on the reheat switches. In the real world we would turn them on in pairs, first the inner engines 2+3, then the outer engines 1+4. For simplicity we’ll turn them all on at once here.

  • Right click the bar above the engine reheat switches or on mobile tap the bar to bring up the green circle highlight and pull the green center down
  • Check the engine instruments, the lowest row for the engine area should now show an increase in nozzle area as the reheat kicks in

Mach 1.7 - Reheat Off

Near Mach 1.0 we can observe some fluctuations on the airspeed, vertical speed and altimeter. These are caused by the airflow going supersonic near the fuselage which creates shockwaves that hit our air data static probes and pitot tubes.

  • Keep accelerating until reaching Mach 1.7
  • Turn off the reheat switches by pushing the bar above the reheat switches down

Mach 2.0 - Supersonic Climb

We can now accelerate the rest of the way to our targeted Mach 2.02 cruising speed without the help of the reheat (afterburners).

When the Mach indicator reaches Mach 2.02

  • Set the auto throttle switch to on
  • Push the MACH HOLD button on the autopilot

Engine Rating Cruise

Above 50,000ft we’re approaching the cruise altitude and can now change the engine rating to the cruise rating.

  • In the overhead panel click the crash bar to set the engine rating from CLIMB to CRUISE.
  • To the left of the engine instruments the engine rating should now show CRS for cruise engine rating.
  • Turn off the seatbelt signs and no smoking signs (if not done earlier)

Supersonic Cruise

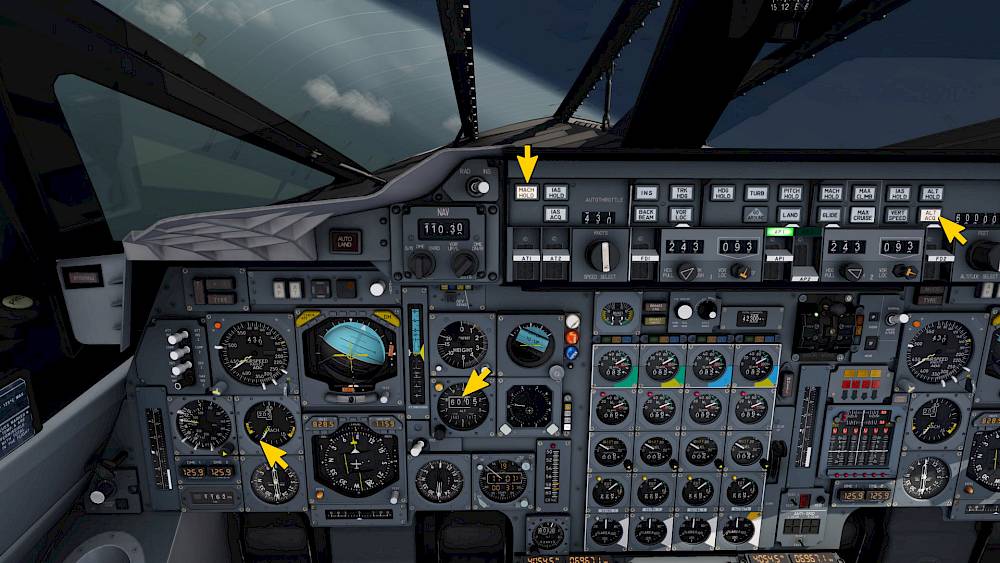
We’ve made it to the top of the climb. - 60,000ft at Mach 2.02.

  • Check that the autopilot captures the selected 60,000ft and that ALT ACQ (altitude acquire mode) or ALT HOLD modes are active.
  • Check that the auto-throttle is on and in MACH HOLD mode

Sit back and relax or use the Aerofly FS time skip function to skip ahead until about 300 to 250NM to destination.

Descent Planning

For the deceleration and descent we can assume we’ll need at least 200NM from our current 60,000ft altitude. A good rule of thumb is taking the difference between current altitude and destination elevation in feet, divide it by 300ft/NM and add 20NM for the approach plus any distance we need to travel over land where we cannot go supersonic, as we already know.

So, in our case from 60,000ft descending to London at near sea level we need to descent a delta of 60,000ft. Using the rule of thumb that gives us 60,000ft / 300ft/NM + 20NM = 220NM for a normal descent. We’re adding 60NM for the distance over land for a total of 280NM.

Descent

Reaching Top Of Descent

We’re about 280NM from our destination London Heathrow and need to start our descent. The other way around, approaching New York we could wait another 60NM or so before we need to descent.

Initiate Descent

  • Select a lower altitude to descent to. We’re selecting 10,000ft for now
  • Turn off the auto-throttle system
  • Gently reduce thrust to 50%
  • Push the V/S button on the autopilot to engage vertical speed mode
  • Use the rocker switch in the pedestal to set a vertical speed of -1000ft/min or grab the vertical speed needle directly (which is not possible in the real aircraft but much more convenient for us)
  • Decrease airspeed to about 350kt.

Engine Rating Climb

As you are descending through 50,000ft

  • Set the engine rating mode from cruise back to climb by clicking the bar in the overhead panel
  • Turn on the seatbelt and no smoking signs as required

Subsonic descent

There are two methods for controlling your descent. You can either keep the autopilot in vertical speed mode with auto-throttle in airspeed mode or you can use the autopilot airspeed hold and manually control thrust and therefore descent rate.

1) Method with A/T and VS

  • Set on the auto-throttle switch
  • Push the IAS hold button on the auto-throttle side
  • Select an airspeed of 350 or 330kt and push the IAS ACQ button
  • Manually adjust the vertical speed to change the rate of descent

2) Method IAS HOLD and manual thrust

  • Keep auto-throttle off
  • Push the IAS HOLD button on the right side of the autopilot panel
  • Use your throttle input to adjust the desired rate of descent

Deceleration to 250kt

Reaching 12,000ft you should be about 45-60NM from your destination. If you are too high you can use idle reverse thrust on the two inner engines to increase drag as sort of an airbrake replacement, which the Concorde doesn’t have. Idle reverse is permitted in flight as long as you are subsonic (below Mach 0.95). If you are too low then reduce the descent rate to zero until you reach less than 60NM but keep your speed up for now.

  • Turn on the seatbelt and no smoking signs in the overhead now (if not already set)
  • Switch to vertical speed mode (VS button) on the autopilot panel (if not already set)
  • Set on the auto-throttle and push the IAS ACQ button (if not already set)
  • Decrease the selected airspeed to 250kt
  • Reduce the rate of descent by either using the rocker switch in the pedestal or by dragging the vertical speed needle directly. You can increase the rate of descent again when you get close to 250kt and the auto-throttle starts feeding in more power.

Approach

Engine Rating Takeoff

  • Click the bar in the overhead panel to set all four engine flight rating switches to TAKEOFF
  • Turn on the landing/taxi lights
  • Decrease the selected altitude to the final approach fix altitude, in our case 2500ft
  • Keep descending at 250kt and a vertical speed of around 1200-1500ft/min with autopilot in VS mode and auto-throttle in IAS HOLD or IAS ACQ mode

We should be passing 10,000ft at 250kt at a distance of about 30-40NM from the destination. If you are already closeer than this you need to increase the descent rate. If you are too far away you can stop the descent and resume it when within about 35NM.

Droop Nose 5°

  • When passing 10,000ft set the nose to 5 degrees
  • Switch the HSI source from INS back to RAD to be able to see signals from radio navigation receivers
  • Set the ILS approach frequency and course (110.30Mhz and 093°)
  • Monitor the localizer and glide slope needles on the attitude indicator, they should start to show a deflection really soon

Reheat Armed

  • Move all four reheat switches to the middle REHEAT position.

This arms the reheat for a potential go-around. We’re approaching our destination quickly and are about 15-20NM out at an altitude of about 2500-5000ft.

Reducing to Approach Speed

  • At 15NM DME distance from the localizer decrease the selected airspeed to 210kt
  • If both the LOC and G/S needle on the attitude indicator have no more OFF flags push the LAND button on the autopilot panel
  • Ideally you should now be at 2500ft but not higher than 3000ft (if you are too high consider dropping the landing gear for extra drag and increase your descent rate)

The Concorde can land fully automatically which is also implemented in Aerofly FS. If we don’t want to perform an automatic landing we should push the GLIDE button instead of the LAND button.

Localizer Capture

The autopilot now captures the localizer for us. This can be seen on the autopilot panel when the VOR/LOC button illuminates.

  • Decrease the selected airspeed to 190kt

When the autopilot captures the glide slope you should see a green annunciator above the attitude indicator showing LAND 2.

Final Approach

  • Select the landing gear down
  • Set the second autopilot (AP2) on as well.
  • Change the selected altitude to the go-around altitude, e.g. 3000ft
  • Decrease the selected airspeed to the final approach speed, in our case 165kt
  • Set the nose to the landing position to down
  • Verify that the landing gear is down with four green lights and that the nose and visor indicators show down as well
  • Extend and turn on all landing lights

Autoland

The autopilot in the Concorde is capable of automatically landing the aircraft provided that both flight directors are on, both navigation receivers are set to the same frequency and course and that the auto-throttle is in IAS ACQ mode. During the landing flare the auto-thrust automatically reduces the thrust to idle and the autopilot flies the aircraft onto the ground maintaining a positive descent rate.

With both autopilots engaged one of them can immediately take control in case the other system fails - a fail operational design.

In case of a go-around you disconnect the autopilot and just slam the throttle forward which triggers the flight director to go into the go-around mode. Manually pitch up to about 13 degrees, retract landing gear, retract nose to 5° and reduce thrust again as needed to maintain 210kt as you come around for a second attempt.

After Landing

Reverse Thrust

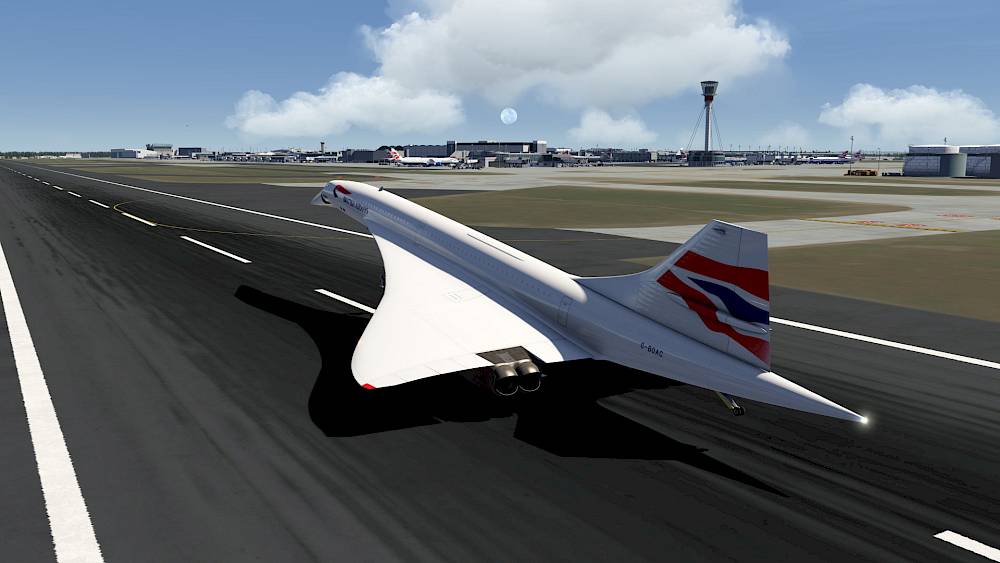
After touch down, when flying manually, you can apply maximum reverse thrust right away. During an autoland we recommend waiting until the nose has touched down before applying reverse thrust.

  • Select reverse thrust on all four engines
  • Monitor how the blue lights above the engine instruments are blinking at first and then remain steady, showing the full deployment of the reversers
  • Applying brakes is recommended below 100kt but if the runway is short you may have to use manual brakes earlier
  • Before reaching 60kt reduce the reverse thrust to idle reverse
  • Then cancel the reverse thrust and use wheel brakes to slow down to taxi speed

After Landing

  • Disconnect the autopilot with the takeover button on the yoke. If the autopilot disengaged on its own that button also cancels the aural warning sound.
  • Use tiller inputs to turn off the runway. Without a tiller assigned you can use your rudder input
  • When you vacated the runway turn off the landing lights
  • Turn off the auto-throttle switches
  • Turn off both flight directors

Probe Heat Off

To avoid overheating we are now turning off the heaters for the static and pitot probes.

  • In the overhead panel switch off the probe heat switches
  • Turn off the anti-collision light
  • Set the engine auto ignition switches to off

Transponder Standby

Turn off the transponder (ATC)

  • Rotate the transponder mode to standby

Nose and Visor Up

When reaching the parking position retract the nose and visor.

  • Use the lever in the cockpit or your flap menu or flap key/button assignments

Lights Off

Turn off the external landing and taxi lights and retract them

  • Click the bars to set them all off at the same time.

Passenger Signs Off

When you have come to a complete stop

  • Set the parking brake
  • Set the passenger seatbelt and no smoking sign switches to off

Welcome to London!

We hope you liked flying with us at twice the speed of sound and we welcome you to try the next flight from London back to New York.

Or maybe you want to fly the Concorde manually for a bit, then you can just position it back on final approach for a manual landing or back onto a runway for takeoff to your next destination.