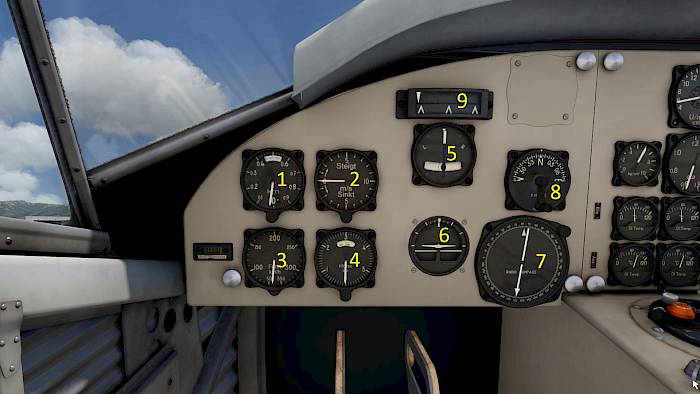
IPACS

Junkers Ju-52/3m Flight Tutorial and Startup from Cold And Dark

The Junkers Ju-52 is an old airliner with three engines (Ju-52/3m) with the German nickname Tante Ju. She was developed from 1932 onwards and was already brought into regular service by Deutsche Luft Hansa in May 1932 and was used primarily in Europe and South America. One characteristic of many Junkers aircraft is the corrugated sheet metal planking. The patented Junkers double wing enabled takeoffs and landings on short runways.

The Ju-52 required three pilots to be flown and wasn’t as comfortable for passengers as todays airliners, one of the reasons being the taildragger configuration with a slanted floor during boarding. Flight controls are mechanical using cables and pullies and throttle levers are also linked directly to the engines but also to the wheel brakes when pulled aft.

Main Panel Instruments

Pilot Instruments

Directly in front of the two pilots are the main instruments. On the pilot’s side, these are:

  1. Fine Altimeter
  2. Vertical Speed Indicator
  3. Airspeed Indicator
  4. Coarse Altimeter
  5. Turn Indicator
  6. Artificial Horizon
  7. Radio Compass (ADF - Automatic Direction Finder)
  8. Heading Indicator/Remote Compass
  9. Course Indicator

Center Panel

In the center there are the gauges for the three engines.

  1. Engine RPMs
  2. Engine Manifold Pressure
  3. Oil Inlet Temperature
  4. Oil Outlet Temperature
  5. Oil Pressure
  6. Fuel Pressure
  7. Fire Pressure
  8. Brake Pressure

Copilot Instruments

On the co-pilot’s side, only the most important instruments airspeed indicator, variometer, coarse altimeter, turn indicator and the course indicator can be found as backup. In addition there are:

  1. Magnetic Compass
  2. Outside Air Temperature
  3. Exhaust Gas Temperature
  4. Exhaust Gas Temperature engine select switch

Preflight and Engine Start

Power On

First let’s turn on the various electrical power supplies. The electrical panel is located behind the copilot’s head, when sitting in the left seat look to the right and up.

  • Turn on the main switch
  • Set the generator switch to on
  • Turn the instrument lights (Instr. Bel.) on
  • Turn on the beacon light (Blitzer) and
  • Navigation Lights (Nav. Lichter) as well as the
  • Electrical Instruments (El. Anzeigen)

Engine Start

In the Ju-52/3m the center engine is started first. The center engine’s generator then supplies power to start the remaining engines so that the batteries are only needed for the first start.

To start the center engine

  1. Central ignition switch pressed in
  2. Engine specific ignition switch pushed in
  3. Magneto switch to BOTH (center position)
  4. Throttle IDLE
  5. Pull starter switch to engage the starter, observe engine RPM rising and release it as soon as engine is running

Repeat 2. to 5. for the remaining two engines.

Takeoff Flaps and Trim

The flaps can be extended with the handwheel to the right of the pilot’s seat. Flaps and trim are normally linked, so that almost no further trimming is required when changing the flap position in flight. Takeoff can be flown with flap positions 1 or 2.

  • Rotate the handwheel on the right hand side of the pilot seat to set the flaps to takeoff
  • Trim is linked to the flaps and doesn’t need to be adjusted

Taxi, Takeoff, Cruise and Landing

Differential Throttle and Brakes

The Ju-52 has a free castering tailwheel with no steering control. To steer left and right pilots use differential throttle and brakes. A little more throttle on the right engine will cause it to turn to the left and vice versa. Rudder becomes more effective if you increase throttle on the center engine.

  • Use minimal power during taxi and use gentle brake inputs combined with rudder to steer along the taxiway
  • Use a short throttle boost with fully deflected rudder, followed by a short brake input to ‘kick’ the plane around for tighter turns
  • If you feel like the aircraft is not responding to inputs come to a full stop with the brakes, then add full rudder to the side you want to go and a brief increase in throttle to get the nose turning. Then add a short brake input to avoid a ground loop.

Set Takeoff Power

The Ju-52 has a throttle limiter that is used during climb. We have to make sure it is disengaged before takeoff.

  • Set the throttle limit lever fully backwards in preparation for a full power takeoff

Once aligned with the runway

  • Gently move all throttles fully forward
  • Use rudder to maintain direction
  • Elevator neutral will raise the tail and you’ll be able to see forward a lot better
  • At approximately 100km/h indicated airspeed gently pull on the elevator to get airborne

Climb And Cruise

At a safety altitude of about 500ft (150m), the flaps can be retracted.

  • Rotate the flap wheel to retract flaps

After a maximum of 5 minutes the power needs to be reduced to protect the engines.

  • Set climb power of about 85% throttle
  • Reduce power for the cruise flight to about 70%

Enjoy your relaxing scenic flight!

Approach

  • Reduce power to initiate the descent.
  • Fly a normal approach pattern at about 120-140km/h with flaps half
  • On final approach set full flaps and reduce to 106km/h approach speed

Two Point Landing

You can land the Ju-52 with a two point or three point landing.

  • For the two point landing you reduce the power and gently put the two main wheels on the ground, then let the airplane settle onto the tail wheel
  • Use small amounts of wheel brake to slow down.
  • Use rudder input and differential wheel brakes (if you have them assigned)

Three Point Landing

For the three point landing:

  • Reduce power to idle and hold the aircraft off the ground as long as possible, floating only a tiny bit off the ground
  • Ideally all three landing gear contact the ground at the same time.
  • Use small amounts of wheel brake to slow down.
  • Use rudder input and differential wheel brakes (if you have them assigned)