Aerofly FS simulates the autopilots of the Boeing 737 Classic, 737 NG and 737 MAX, 747-400, 777-300ER and 787-10 to a very high level of realism. Pretty much all autopilot modes used every day by airline pilots are simulated and interactions with the mode control panel (MCP) works just like the real thing.
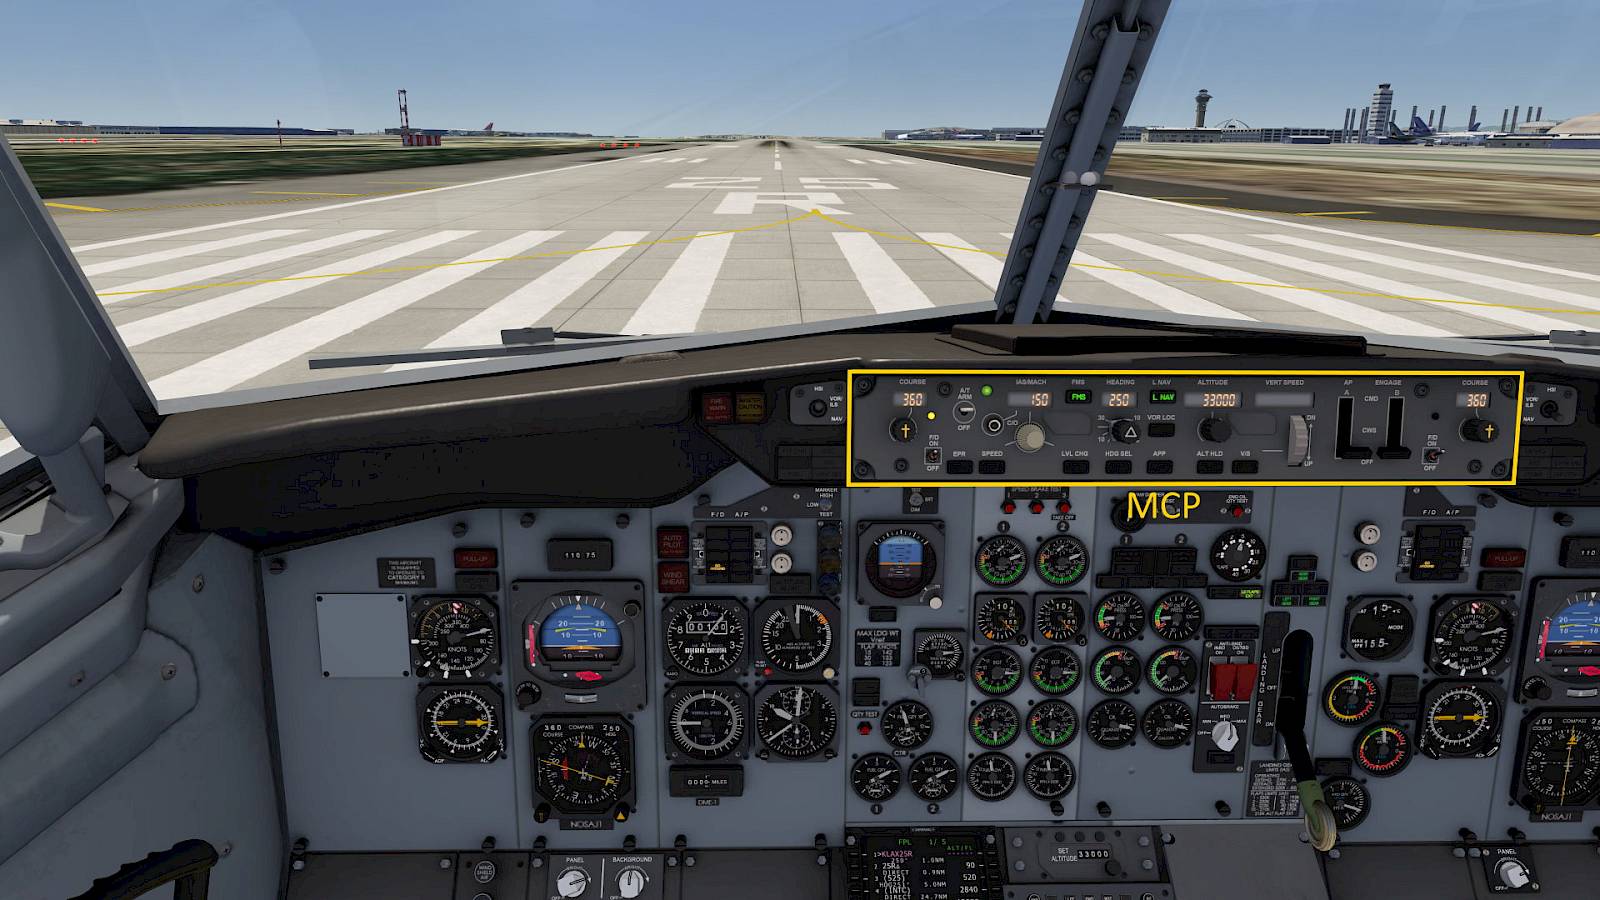
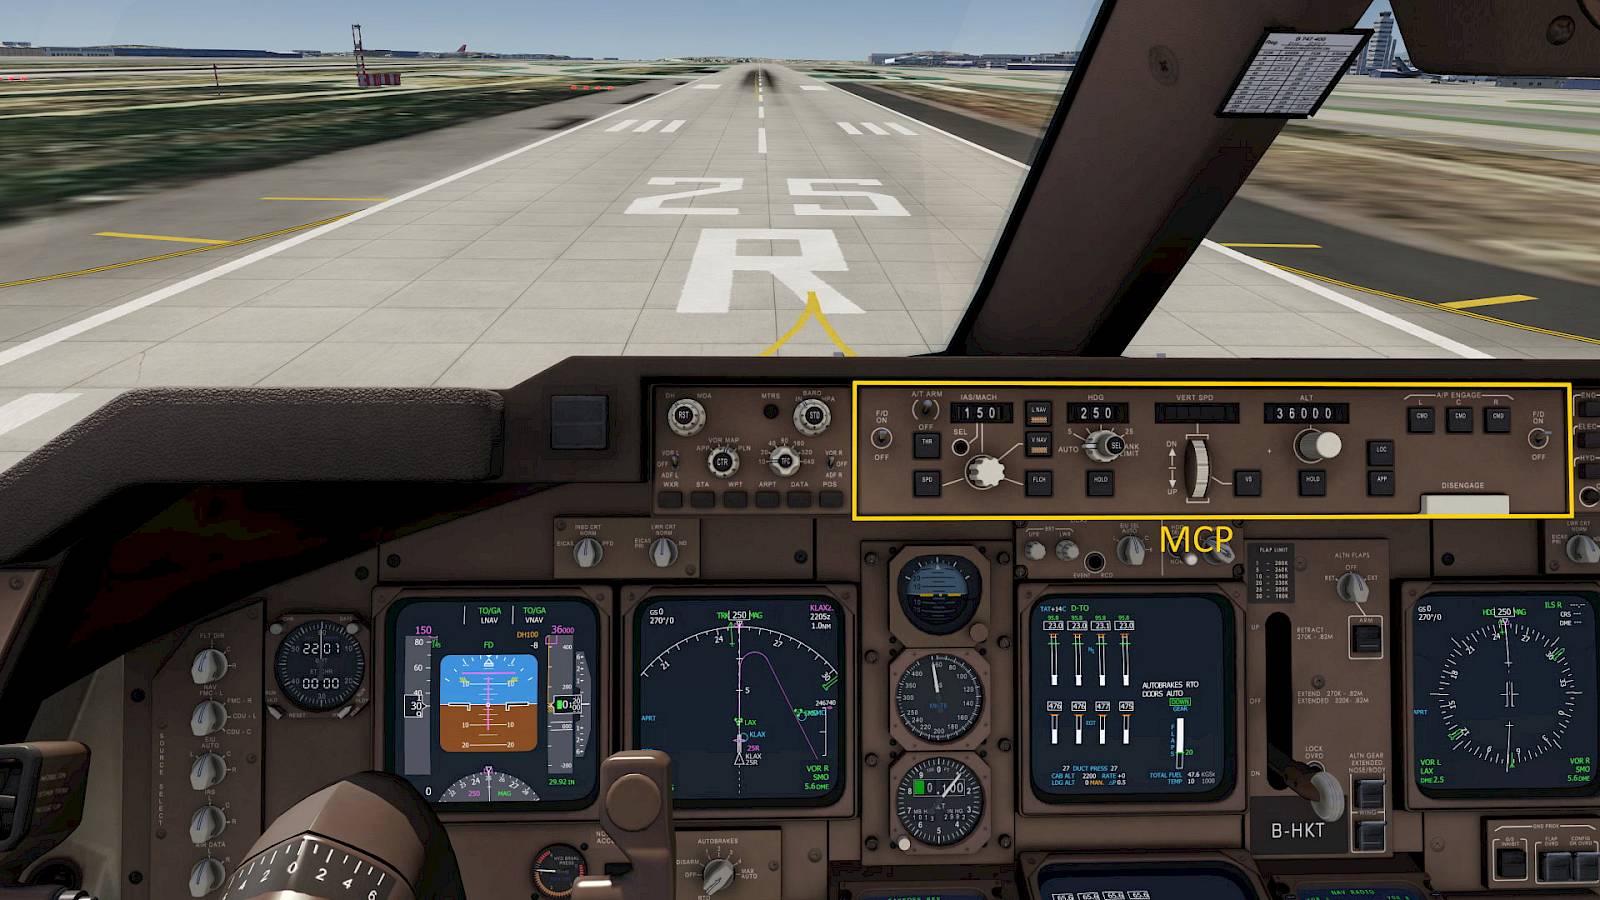
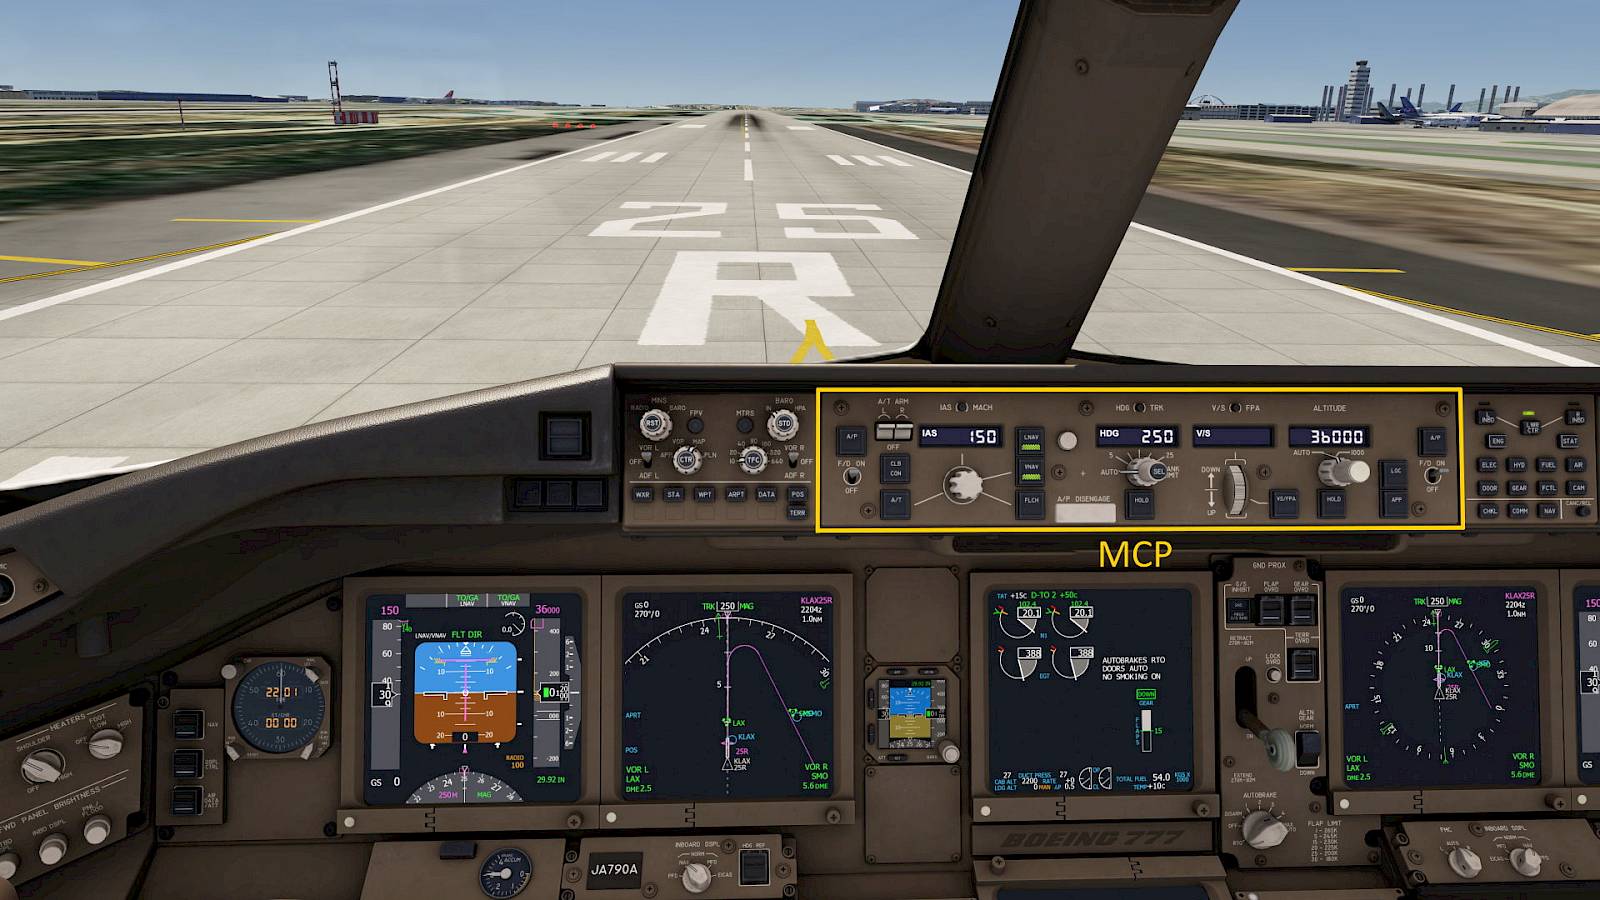
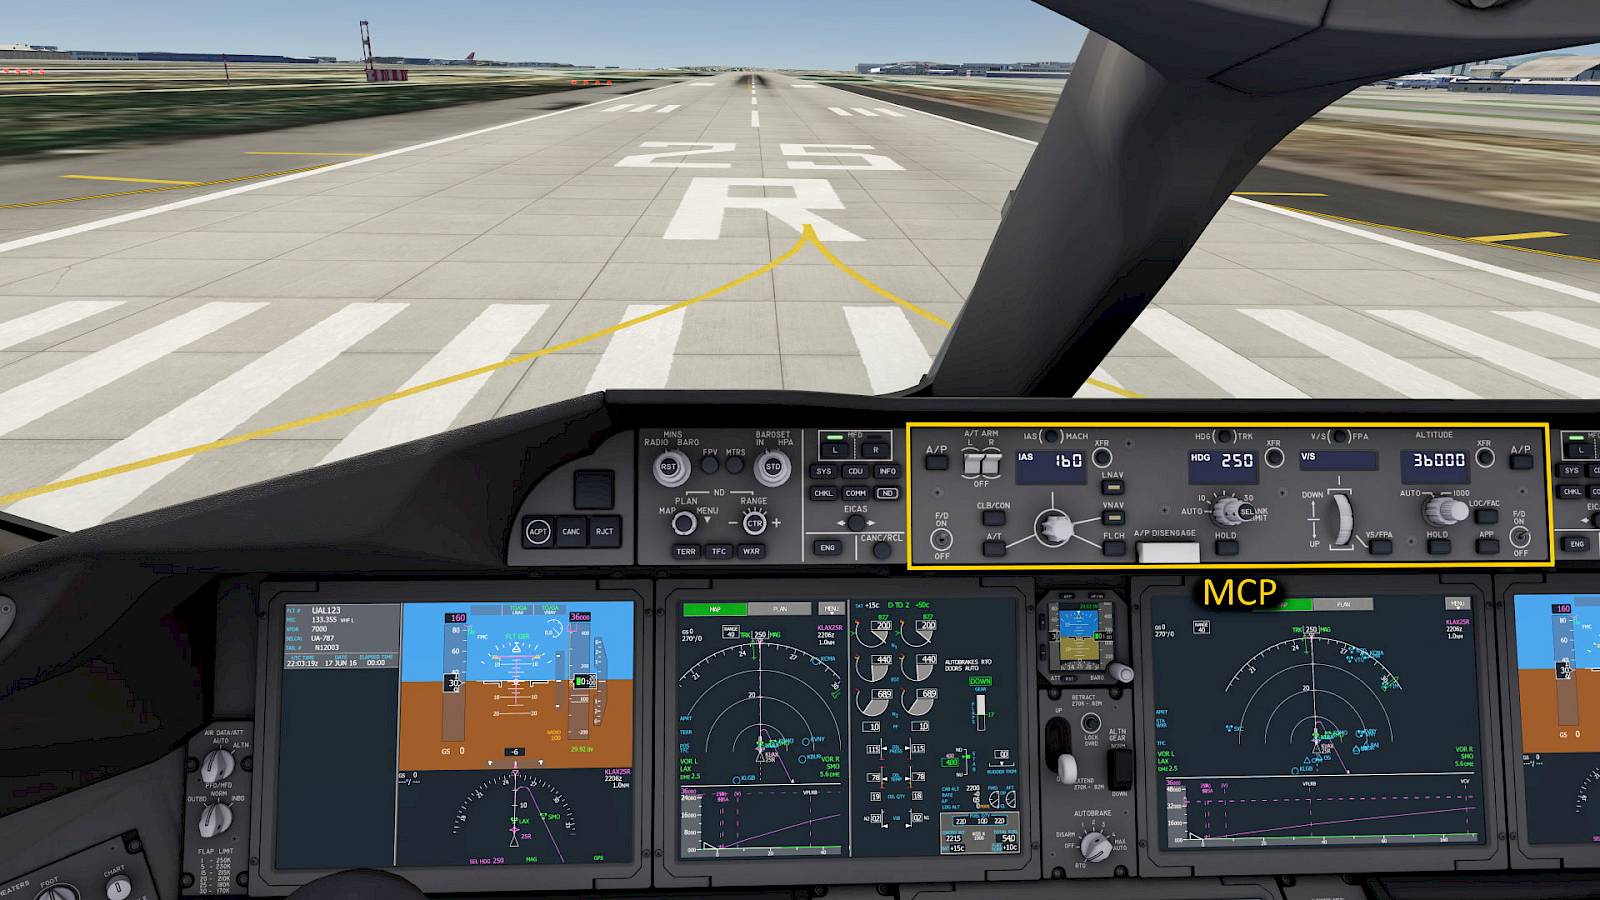
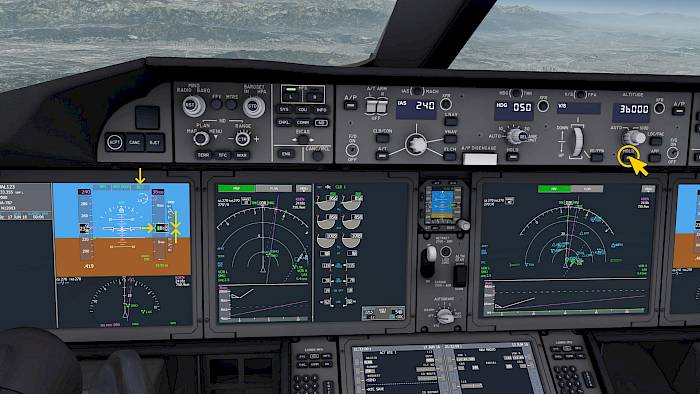
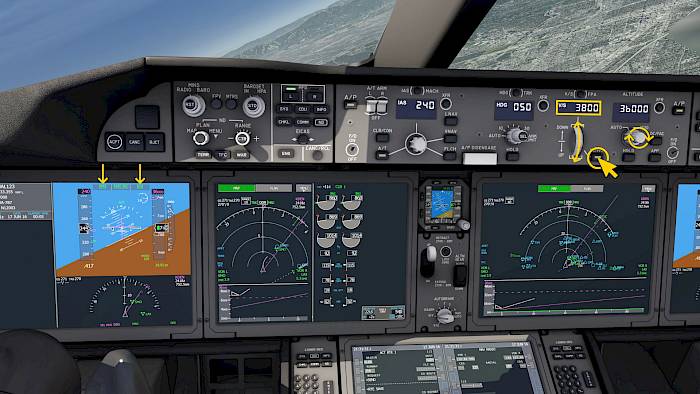
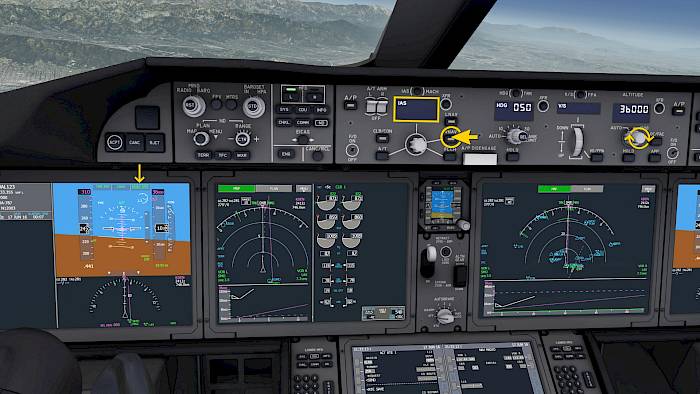
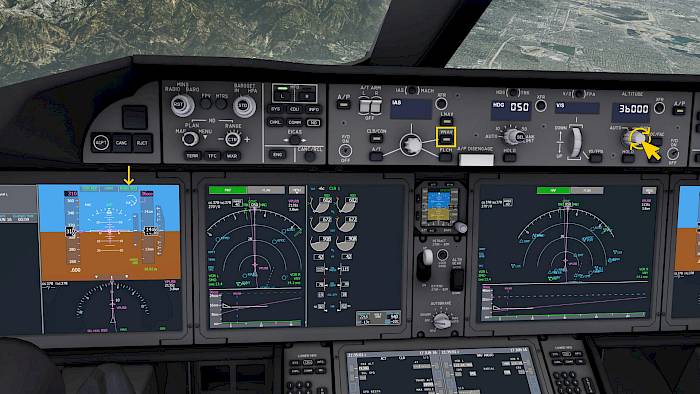
The autopilot panel in Boeing aircraft is called Mode Control Panel (MCP). It allows pilot to select new autopilot modes and change selected values.
From left to right the knobs in the latest Boeing aircraft are used for
Speed
Heading
Vertical Speed
Altitude
The knobs for speed and altitude can be pushed in and the heading knob has a button on it that can be pushed as well.
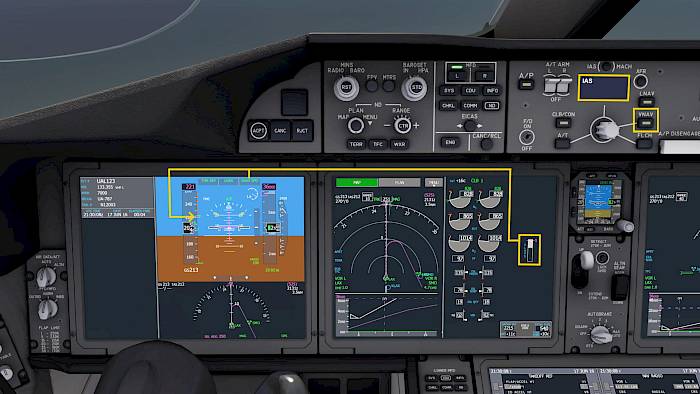
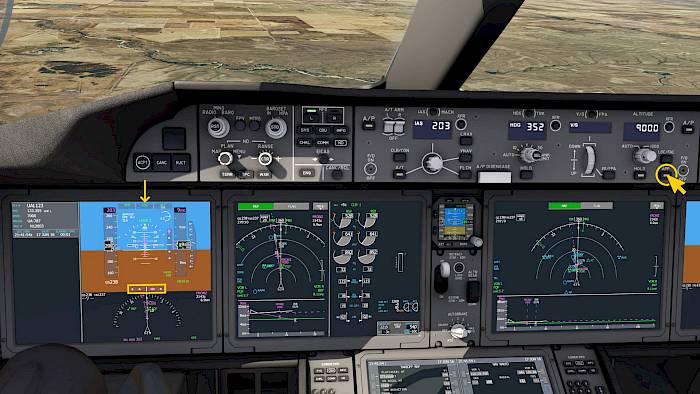
Flight Mode Annunciator (FMA)
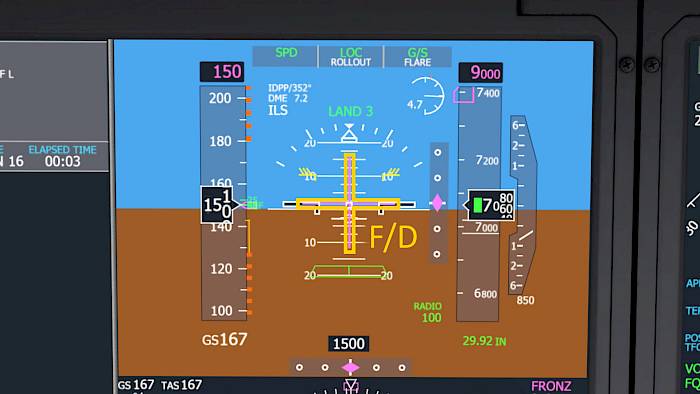
The Flight Mode Annunciator (FMA) is the most important instrument when using the autopilot. The FMA is the upper section of the primary flight display (PFD) and it displays to the pilot what the autopilot is currently doing and what modes have been activated.
The FMA is split into three columns:
Active Auto-Throttle (A/T) mode
Active and armed lateral mode
Active and armed vertical mode or approach mode
Below the FMA we find a status indication for the flight director (FLT DIR) and autopilot (AP, LAND 2 and LAND 3).
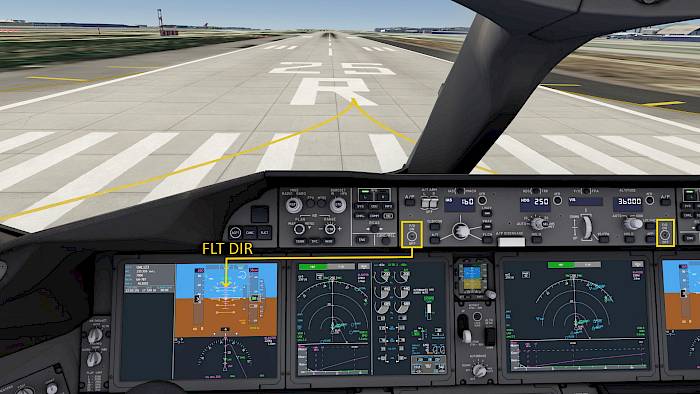
Flight Director (F/D)
Superimposed on the attitude indicator of the primary flight display (PFD) we can see the flight director (F/D), visible as a horizontal and vertical magenta line. The flight director can be turned on and off for by setting both F/D switches on either side accordingly. When both flight directors are off and the autopilot is also off the entire system is turned off and is reset.
The horizontal flight director bar moves up and down to indicated the target pitch attitude. When the bar moves up you should pitch up to catch the bar with the current attitude. The bar moves back to the center when you are at the target pitch angle.
The vertical flight director bar moves left and right to show a target bank angle. When you roll to the side of the deflection the flight director bar moves back towards the center to indicate that you are at the target bank angle.
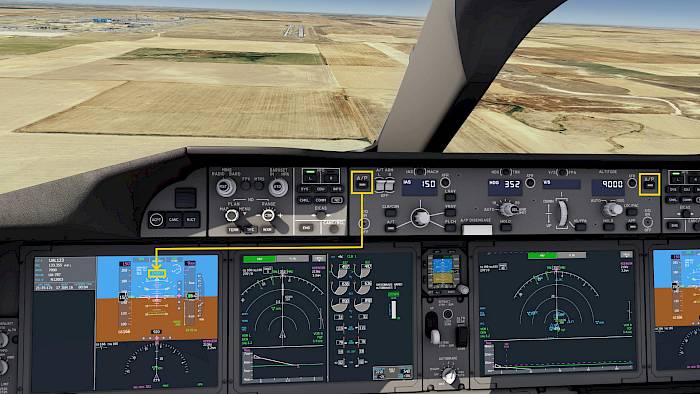
Autopilot (AP)
The autopilot a actuates servos that move the control column, control wheel and rudder pedals to steer the plane. This provides direct feedback to the pilots. Pilots can override the servo to take manual control and the autopilot disengages. But this usually requires some force and the disengagement isn’t soft and isn’t the preferred method.
To successfully engage the autopilot a couple of conditions have to be met first:
Airspeed above stall speed and below maximum speed, check that you are not currently flying too fast for the flap setting you have
Pitch angle between about 25° and -15° and bank angle less than 45°
Flight control inputs neutral and aircraft trimmed out
Aircraft in the air at least 100 feet above the ground after takeoff or above 400 feet prior to landing
To engage the autopilot
Push the AP engagement button (or set the AP switch on in the 737)
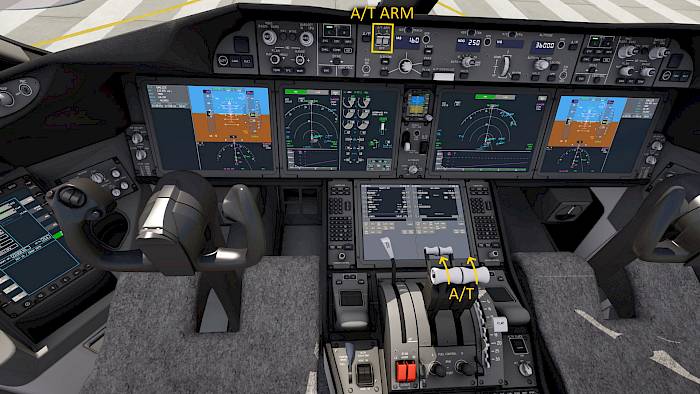
Auto-Throttle (A/T)
The Auto-Throttle System (A/T) drives servos on the thrust levers in the cockpit to adjust engine thrust when engaged. Pilots can overpower the servos and manually take control at any time, the Auto-Throttle then disengages but stays armed unless the A/T ARM switches are turned off as well. A/T is usually armed before takeoff and disarmed after landing. During landing the A/T system automatically pulls back the thrust levers to idle during flare and disengages when reversers are selected.
To engage A/T
Set the A/T switches to the ARM position (upper position)
When on the runway: Push the TO/GA switches on the thrust levers
In the air: Push the SPD or A/T button
Flight Management System (FMS)
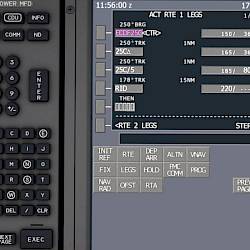
For route planning and long-term complex navigation functions the aircraft is equipped with a Flight Management System (FMS) that stores the flight plan and pre-programmed performance values and computes the most economical flight profile. Pilots can change the flight plan or enter values through either a Control-Display-Unit (CDU) or a Multi-Function-Display (MFD) in the cockpit.
Note - In Aerofly FS you don’t have to program the FMS yourself, you can also use the navigation menu for this.
Similarities between Boeing Autopilots
Over the years several changes have been introduced to real world Boeing autopilots. The core functionality remained but some components of the MCP were moved around or redesigned. The most modern aircraft like the 777 and 787 are near identical but still have a lot in common with the older 747-400 and the even older 737-500 with classic cockpit in Aerofly FS.
F/D switches in the lower left and lower right of the MCP
A/T switches in the top left
IAS/MACH window with knob underneath
Arrangement of SPD, FLCH, VNAV buttons
LNAV/VNAV buttons in similar position
Heading knob with bank angle limit selection and heading hold button (except 737)
Vertical speed wheel and button
Altitude knob with altitude hold button
LOC (VOR/LOC in 737) and APP buttons
Main Differences
B737 Classic FMA: Several lights above the attitude indicator turn green when the autopilot is engaged or amber when only flight-director is in use.
B737 Classic MCP: Course knobs and flight director priority lights, HDG SEL button underneath heading knob and no HDG HOLD button, vertical speed wheel on the right and with 50ft/min increments, autopilot levers and not pushbuttons
B747: Three individual autopilot CMD buttons
B777 and B787: Two buttons for autopilot
B777 and B787: TRK - HDG switch, V/S - FPA switch and altitude increment selector
B787: XFR buttons added to transfer ATC instruction to active values
On the MCP set the left and right FD switches on the upper position (ON)
Per default the flight directors are usually already turned on for your convenience.
Heading Hold Mode
Push the HOLD button underneath the heading knob to engage heading HOLD mode
The lateral flight director mode switches to HOLD mode and the commands lateral steering inputs to stay on the heading at the time when the wings were leveled after mode engagement.
Altitude Hold Mode
Push the HOLD button underneath the altitude knob to engage altitude HOLD mode
The flight director vertical mode changes to HOLD and commands vertical steering inputs to stay at the altitude at the time the button was pushed.
Autopilot Engagement/Disengagement
To engage the autopilot
Confirm modes on the FMA
Follow the F/D guidance manually at first
Check speed and attitude
Trim the aircraft
Push the AP engagement button (or set the AP switch on in the 737 Classic)
Release controls
To disengage the autopilot
Push the autopilot disconnect button on the yoke
Or push the autopilot disengage bar on the mode control panel (MCP)
Auto-Throttle On/Off
To engage A/T
Set the A/T switches to the ARM position (upper position)
When on the runway: Push the TO/GA switches on the thrust levers
In the air: Push the SPD or A/T button to engage SPD mode, LVL CHG for climb or descent or VNAV for automatic route mode
Push the V/S button or ALT HOLD button to force the Auto-Throttle into speed hold mode if necessary
To disengage the A/T temporarily
Manually move the thrust levers quickly and opposite of the A/T commands
To turn off the A/T system
Set the A/T ARM switches to the OFF position
Or push the instinctive buttons on the thrust levers
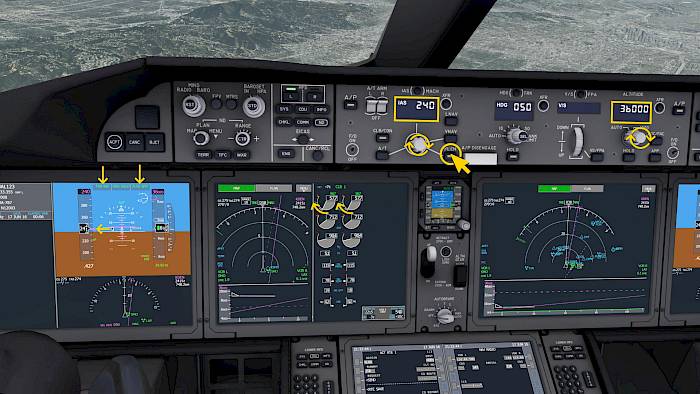
Heading Select Mode
Rotate the heading knob to set a desired heading
Push the SEL button at the tip of the heading knob to engage HDG mode
The autopilot turns the aircraft to the new target heading. When you adjust the heading knob the aircraft will turn in the direction that you rotated the heading knob and near 360° turns are possible.
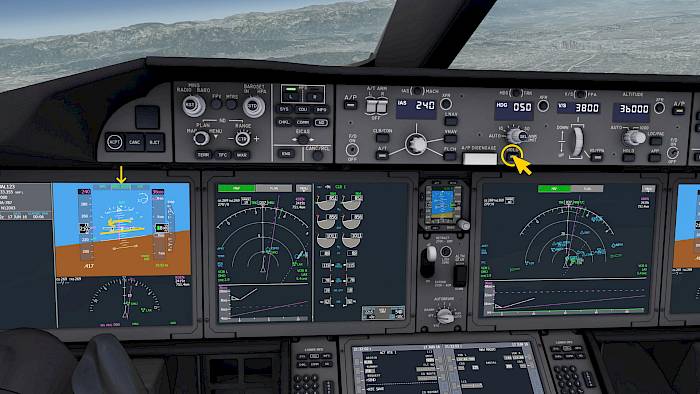
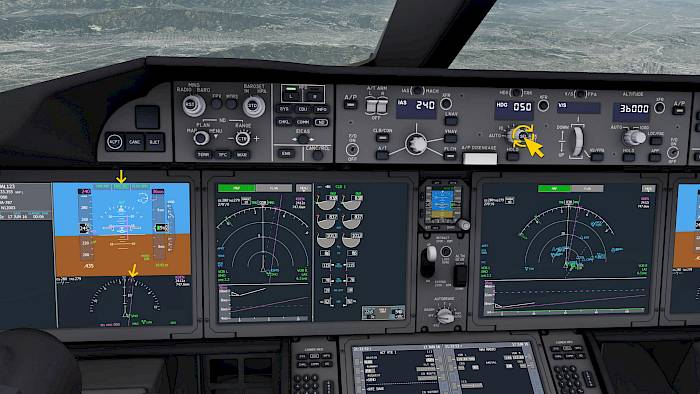
Vertical Speed Mode
Rotate the altitude knob to set a new target altitude
Push the V/S button to engage vertical speed mode
Rotate the vertical wheel next to the V/S button to change the selected vertical speed
The rotation direction of the knob simulates the desired pitch rotation of the aircraft (nose up/down). To select a higher climb rate the wheel has to be moved down. For a descent the wheel has to be moved up.
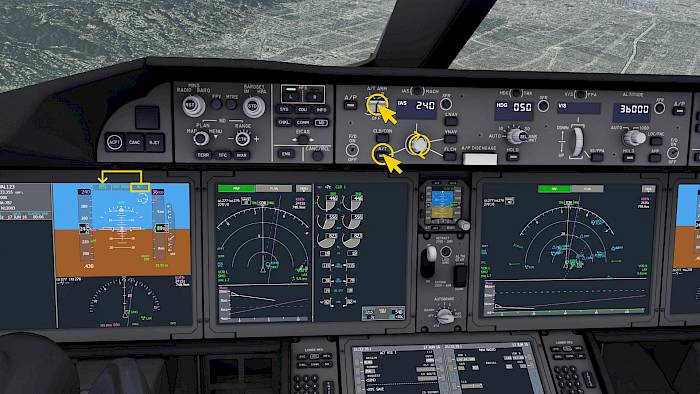
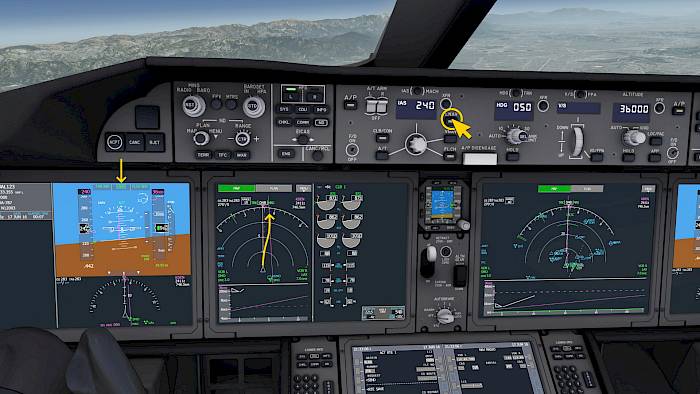
Flight Level Change
Rotate the altitude knob to set a new target altitude
Push the FLC button to engage flight level change mode
Rotate the airspeed knob to set a target airspeed
During FLC mode the autopilot pitches up or down to acquire the selected airspeed. Meanwhile the auto-throttle commands climb thrust if the target altitude is higher than the current altitude or idle thrust for the descent.
Lateral Navigation (LNAV)
LNAV uses the flight management system (FMS) to follow the entered flight plan laterally (left and right). The LNAV mode can be armed on the ground before takeoff or in the air.
The LNAV mode can engage when the route path is intercepted or when you are close to the route (within about 2NM either side).
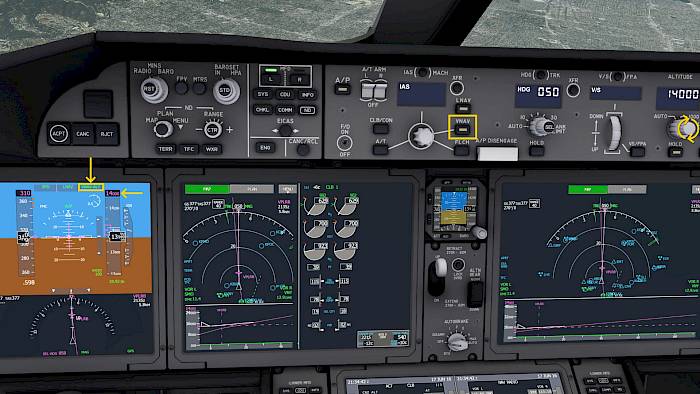
Vertical Navigation (VNAV)
VNAV is a combination of vertical steering and automatic airspeed adjustments. It factors in the altitude and speed constraints on the route as well as the aircraft performance and economical factors. VNAV can be armed on the ground before takeoff or in the air.
VNAV engages directly during the climb, it then commands a climb airspeed and levels off at altitude constraints.
When the cruise altitude is reached (VNAV armed) VNAV PATH engages. Before the top of descent (TOD) you can set a lower altitude, then the autopilot will descent automatically at the TOD.
During the descent VNAV PATH engages when you intercept the planned vertical profile of the route.
VNAV SPD
After takeoff the vertical navigation target airspeed (VNAV SPD) is kept below the maximum allowed flap speed with a 5 knot margin.
When above flap retraction speed retract the flaps by one setting to allow a higher VNAV SPD target
Repeat until flaps are retracted
During approach phase VNAV tries to slow down to approach airspeed. The airspeed is kept above the minimum speed for the next lower flap setting.
Extend flaps by one setting to allow airspeed to drop to the next lower airspeed
Set landing flaps when you are getting below about 2000ft RA
When you capture the glide slope VNAV disengages and you have to manually adjust airspeed again.
Takeoff Guidance
Setting Takeoff Thrust
The Auto-Throttle (A/T) can be used to set takeoff thrust automatically.
Set A/T switches to ARM
Check that V2 has been set in the MCP
When on the runway: Push the TO/GA switches on the thrust levers
On the FMA we can see the auto-throttle engagement in the mode THR REF. The thrust levers are moved forward to the selected takeoff thrust setting.
If you need full TO/GA thrust you can push the TO/GA switches a second time
Lateral Mode TO/GA
When the flight directors are turned on when on the ground the lateral mode TO/GA automatically engages. It also engages when you push the TO/GA switches on the thrust levers.
This lateral TO/GA mode is used after lift off to maintain the runway heading. In case of a go-around the heading at the time of the mode engagement is used.
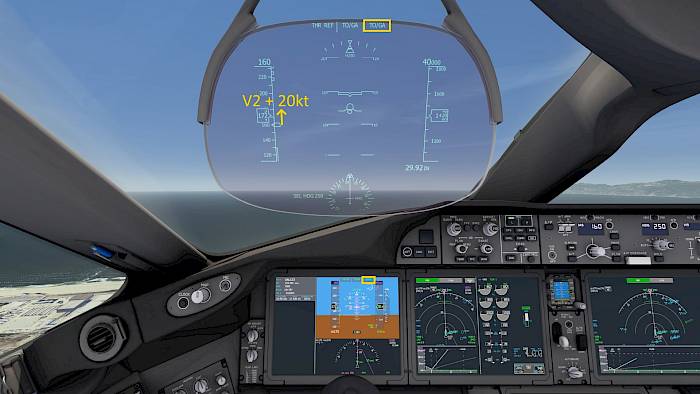
Vertical Mode TO/GA
Similar to the lateral TO/GA mode the vertical TO/GA mode also engages when F/Ds are engaged on the ground or when TO/GA switches are pressed.
The vertical TO/GA mode is used after lift off to pitch for a speed of V2 plus 20 knots or the current speed when go-around is performed.
When the vertical TO/GA disengages the selected airspeed is set to the current airspeed to avoid a sudden thrust decrease.
Following the Route
Follow Lateral Route (LNAV)
Push the LNAV (FMS) button to arm LNAV
Fly on an intercept heading to the flight plan or fly near the route
Once the mode engages (above 50 feet RA) the autopilot follows the route laterally to the destination.
Follow Vertical Route (VNAV)
Rotate the altitude knob to set the cruise altitude or a new target altitude for the descent
Push the VNAV button to arm VNAV
When the aircraft is above acceleration height the VNAV mode can engage right away for the climb and the speed window blanks. VNAV SPD is shown in the FMA.
At cruise altitude or when the vertical descent profile is intercepted VNAV PATH engages and the aircraft descents to the selected altitude on the computed vertical route profile.
Follow Route Speed
When VNAV is engaged the airspeed window blanks and the target airspeed is computed automatically.
After takeoff
Retract flaps to increase target airspeed
During approach
Increase flaps to decrease target airspeed
Speed Intervention
When VNAV is engaged we can take manual control of the airspeed and manually set an airspeed or Mach Number.
Push the airspeed knob to perform a speed intervention
Rotate the airspeed knob to set a manual target airspeed
VNAV ALT
When VNAV is engaged the autopilot will still level off at the selected altitude. When the selected altitude is not the cruise altitude then VNAV ALT mode will be shown.
Rotate the altitude knob to set a new target altitude
Push the altitude knob to continue with the climb or descent
Altitude Intervention
During the climb or descent VNAV will stick to the altitude constraints programmed in the route. In the real world you can intervene and push the altitude knob to delete the next altitude constraint on the route and to continue the climb or descent. Note - The constraint deletion is not yet implemented in Aerofly FS.
Push the altitude knob if you want to start descending before the top of descent
Fully Automatic Landing (Autoland)
Capturing Localizer
In the 737: Set CRS and NAV1 frequency for the localizer or ILS
In other aircraft: Auto-Tuning is enabled when you programmed a route, otherwise set the CRS and ILS frequency using the CDU
Push the APP button to arm the localizer and glide-slope
Or push the LOC, LOC/FAC or VOR/LOC button to arm only the localizer capture
Fly on an intercept course
When the localizer moves towards the center the autopilot turns to the selected course and captures the localizer.
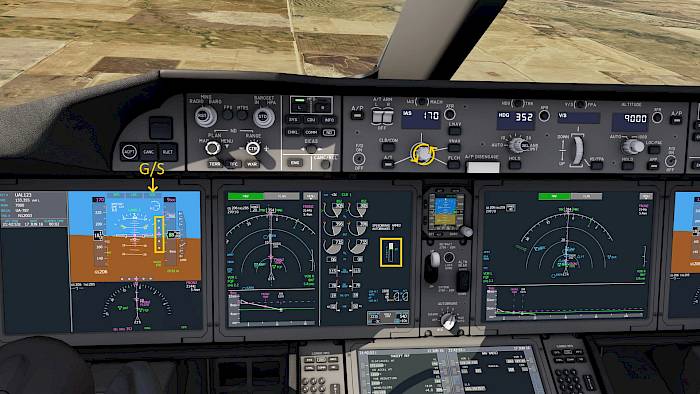
Capturing Glide-Slope
After localizer capture, when flying an ILS, we can capture the glide-slope (G/S).
Push the APP button if you haven’t done so yet
Use vertical speed mode or altitude hold mode to intercept the glide-slope
When localizer mode is active and when the glide-slope moves towards the center then the autopilot can capture it.
Note - When VNAV was engaged before you now have to manually adjust the selected MCP speed.
Configure for Landing
Configure the aircraft systems like for a normal landing.
Extend flaps and landing gear
Arm ground spoilers
Set Auto-Brake
Set airspeed to final approach speed (e.g. VREF or VREF+5kt)
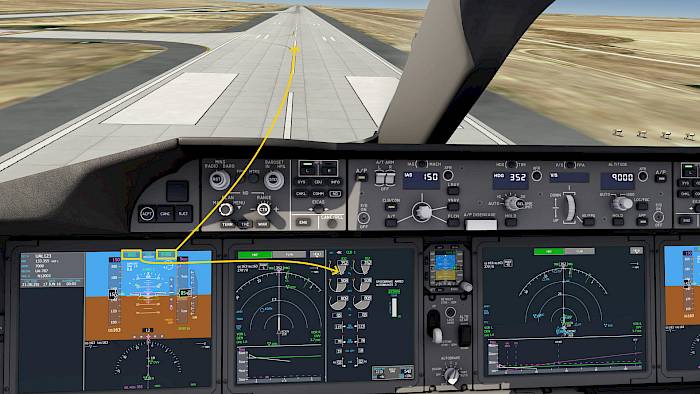
Landing Flare
Below about 1200ft RA you should see a white ROLLOUT and FLARE mode being armed in the FMA. If the modes are not showing up you cannot perform an automatic landing and have to land manually. Autoland is not possible with our 737 Classic but it is available for the NG and MAX.
When FLARE is armed it automatically engages at about 50ft RA. The autopilot arrests the descent rate and flies the aircraft onto the runway.
Rollout
At about 20ft RA the A/T reduces thrust to idle and then goes to HOLD mode, releasing the servos for a potential go-around.
When the aircraft has touched town the autopilot uses the rudder to stay on the localizer and maintain the centerline.
Disengage the autopilot to vacate the runway
Press the brakes to disengage AUTO BRK
Summary of a Typical Flight With a Boeing
Before Takeoff
Set target altitude
Set MCP speed to V2 speed
F/D off, then on to set TO/GA, TO/GA modes
Arm LNAV, VNAV if route planned
A/T ARM
Set autobrake to RTO
Set takeoff flaps, trim, etc. as usual
Takeoff
Push TO/GA switches on thrust levers once
A/T sets takeoff thrust for us, then goes to HOLD
Maintain centerline with rudder
Rotate at VR
Pitch for V2 + 20 knots, following TO/GA pitch commands
Retract gear
LNAV engages at about 50 ft, THR REF engages at 400 ft
Engage autopilot
VNAV engages at acceleration height and airspeed blanks
Retract flaps
Climb, Cruise, Descent
When autopilot levels off at selected altitude VNAV ALT engages, to continue climb set higher altitude and push ALT knob in for altitude intervention
Continue climb to cruise altitude
At cruise altitude autopilot goes from VNAV SPD to VNAV PATH
Before flying over the top of descent, when cleared lower
Rotate altitude knob to set lower altitude for approach
VNAV PATH remains engaged and descent automatically starts at computed Top Of Descent (T/D)
When VNAV ALT engages set a lower altitude and push the altitude knob in for an altitude intervention
Use speedbrakes as needed
Approach and Landing
Intercept the planned ILS localizer with LNAV or HDG SEL
Descent to the initial approach altitude
Push APPR button to arm ILS approach
Capture LOC and G/S
Set final approach speed and configure for landing
ROLLOUT and FLARE modes arm below about 1200 feet
FLARE engages at about 50 feet
Auto-Throttle pulls back levers to IDLE at about 20 feet, then goes to HOLD mode
ROLLOUT engages after touchdown
Disconnect autopilot to vacate runway
Using Different Target Values
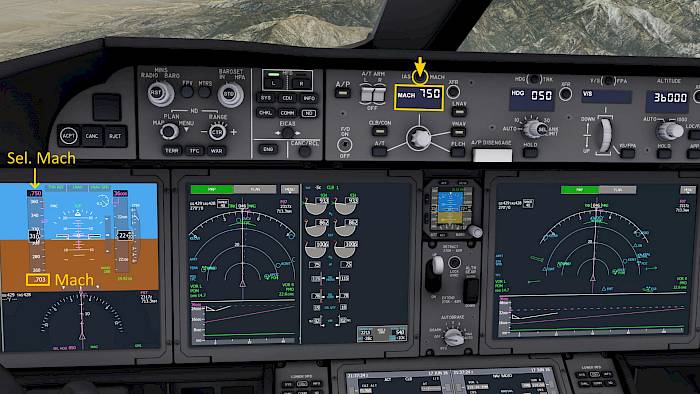
Mach Number
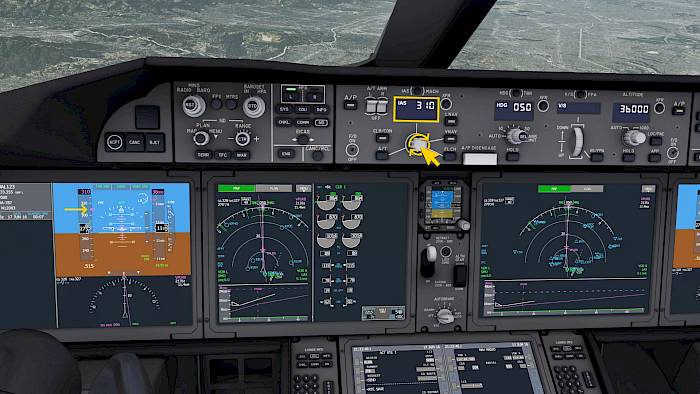
Instead of flying an indicated airspeed we can choose to fly a Mach Number, a fraction of the speed of sound.
When you are flying faster than Mach 0.45:
Push the airspeed knob to display the airspeed in the speed window if you are using VNAV
Push the IAS/MACH button above the speed window or SEL button below it to select MACH
Rotate the speed knob to adjust the target Mach Number
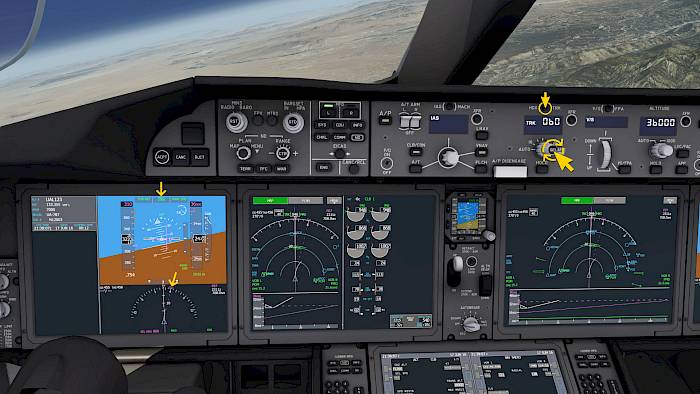
Ground Track
Note - This mode is only available in the newer Boeings like the 777 and 787.
Instead of a magnetic compass heading we can fly a magnetic or true track across the ground. The autopilot compensates for the wind drift in this mode.
Push the HDG/TRK button to select TRK
Rotate the heading knob to set a track target
Push the SEL button on the heading knob to engage TRK mode
To use a true heading or true track
Push the HDG REF button in the B777 or set the HDG REF switch in the B747
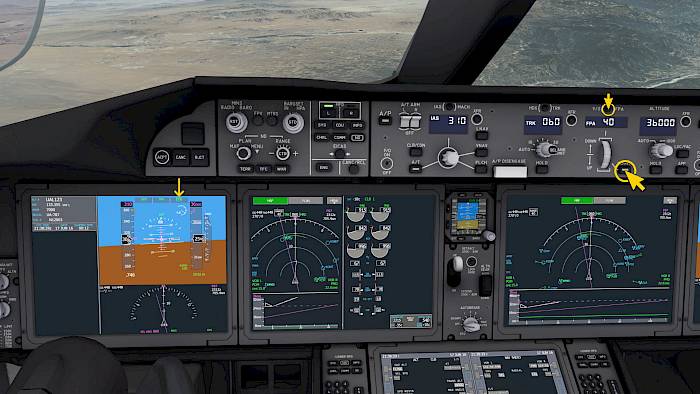
Flight Path Angle
Note - This mode is only available in the newer Boeings like the 777 and 787.
To fly at a fixed climb/descent angle relative to the ground we can use the flight path angle (FPA) mode. The autopilot then compensates for the wind drift.

 English
 Deutsch