Table of Contents
Basic Autopilot (Found in Cessna 172 and Baron B58)
General information
Note Autopilot functionality can be different between aircraft. Some of the AP functions are not final in the early access version.
You can control the autopilot by two different ways.
- You can control the autopilot from the cockpit using the mouse and mouse wheel, or with your VR controller (VR Mode). Note - VR motion controls are preliminary and in a basic state. This will be improved over time.
- You can bind autopilot controls to your keyboard keys or controller buttons for convenience (Settings/Controls/Autopilot).
The autopilot can stabilize the heading, airspeed, altitude as well as the vertical speed. The autopilot cannot be switched on/off and will disengage when one of the following limits is exceeded:
- bank angle larger than 60 degrees
- pitch angle larger than 45 degrees
- airspeed less than 1.2 times the stall speed
- when the aircraft is on the ground.
Autopilot modes
WINGS LEVEL (ROL)
In this mode the autopilot will attempt to keep the wings level (ROL)
PITCH ALTITUDE HOLD (PIT)
The Pitch Attitude Hold (PIT) mode allows constant attitude climbs and descends.
AIRSPEED (SPD)
The airspeed mode / auto-throttle will adjust the engine power to keep the selected airspeed. The target airspeed is shown in magenta at the virtual cockpit and can be changed by individually programmed buttons or keys.
HEADING HOLD (HDG)
The heading hold mode can be activated and deactivated by tapping on the heading indicator. The box around the heading will change its color to green to indicate the heading is controlled by the autopilot. If no heading was selected, the current heading will be selected and shown in magenta. The target heading can be changed by tapping the + / – buttons below the heading indicator. Pressing these buttons repeatedly will change the selected heading by 5 degrees. The target heading can be changed while the heading mode is engaged, the autopilot will then turn the aircraft to the selected heading.
ALTITUDE HOLD (ALT)
Hold a constant altitude. This mode is perfect for cruise flight at a constant altitude. Tap the altitude indicator to activate this mode. When engaged, the autopilot will climb / descend to the target altitude and level off. The vertical speed in this phase can be selected by using the + / – buttons below the vertical speed indicator . When the target altitude is changed by tapping the + / – buttons below the altitude indicator, the autopilot will initiate a climb / descend to the new altitude. The vertical speed for this will be the last selected vertical speed, provided it has the right direction. If a descent would be required to reach the new altitude and the last selected vertical speed was a climb at 1000 ft/min, this would be changed to a default of -1500 ft/min and vice versa.
Vertical speed (V/S)
Climb / descend at a constant rate. When engaged, the autopilot will try to climb / descend at the selected vertical speed. If the aircraft cannot climb at the selected vertical speed, it will loose airspeed until the autopilot descends at minimum speed. This mode can be selected by tapping the vertical speed indicator. The v/s mode will override the altitude mode, so this can be used to leave an altitude that was previously held constant by the autopilot. On the other hand, if the altitude mode is active, the vertical speed mode will disengage 500 ft before reaching the target altitude to allow levelling off and avoid crossing a selected altitude.
Two axis stabilization (ROL + ALT)
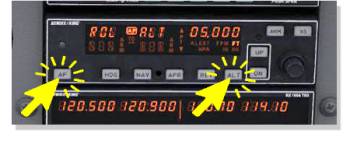
The easiest way to use the autopilot is the ROL/ALT mode. The ROL mode will be enabled automatically if you start the autopilot via the (AP) button on the autopilot panel.
After that press the (ALT) button on the panel. Now the aircraft will be stabilized automatically.
Heading mode (HDG)
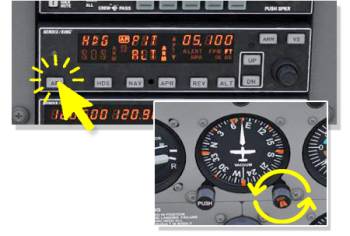
- Click the (AP) button to activate the autopilot
- Click on (HDG) button to activate the Heading Mode. You also will see “HDG” on the panels display
Note - To change your heading manually, turn the heading indicator bug until your new heading is achieved. You can use your mouse wheel to turn the heading bug.

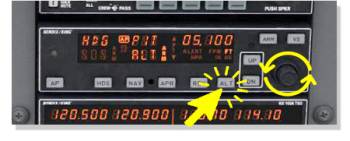
- You can change the altitude by turning the select knob (mouseover and mouse wheel).
- Click on “Arm” to activate the selected height
- Click once again on “ALT” to activate the Pitch, displayed by “PIT”
- Click repeatedly on “UP” or “DN” to select the climb/descend rate
Note - Setting up the autopilot in this way will target the preset height and will hold the flight level automatically. At this point you can change the flight level by pressing the “up” or “down”.
Vertical speed mode (VS)
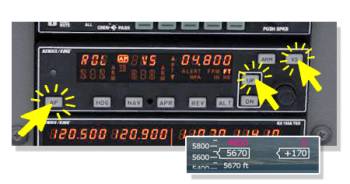
 The vertical speed (VS) mode allows variable vertical speed climbs and descents.
- Click on (AP) to activate the autopilot
- Click on (VS) to activate the vertical speed Mode
- Click on (UP) or (DN) to select vertical speed rate
- Control the rate by the vertical speed indicator or climb rate on your instrument panel
Note - You can now add the heading mode by clicking on (HDG) if preferred. You can control the course via the “HDG” select knob and climb rate with the “UP” or “DN” buttons.


