Table of Contents
**REDIRECTION NOTICE**
Airbus A320-214
A320 Beginners Tutorial
The Airbus A320 is a very complex modern airliner which is quite common on airports around the globe. Chances are high that you already flew with this aircraft in the past. The Aerofly simulation of this aircraft is very complex but due to the aircraft's automation it is very suitable for beginners as well.
We split this tutorial into several parts, first we are going to do a short flight explaining just the essential things that you have to do in Aerofly to fly the A320 from one place to another. After that we are going to go into more detail about this aircraft to explore all the features that are offered.
First we are going to do a very short flight from Sacramento to San Francisco. This flight only takes a few minutes and there aren't actually that many things we need to do fly this quick hop. So this first flight is clearly aimed at beginners and leaves out many things that a real pilot would need to do as well. We're just doing the bare minimum for now.
We recommend setting all wind sliders to zero, removing all clouds and setting daytime for the beginner tutorial.
Before the Flight
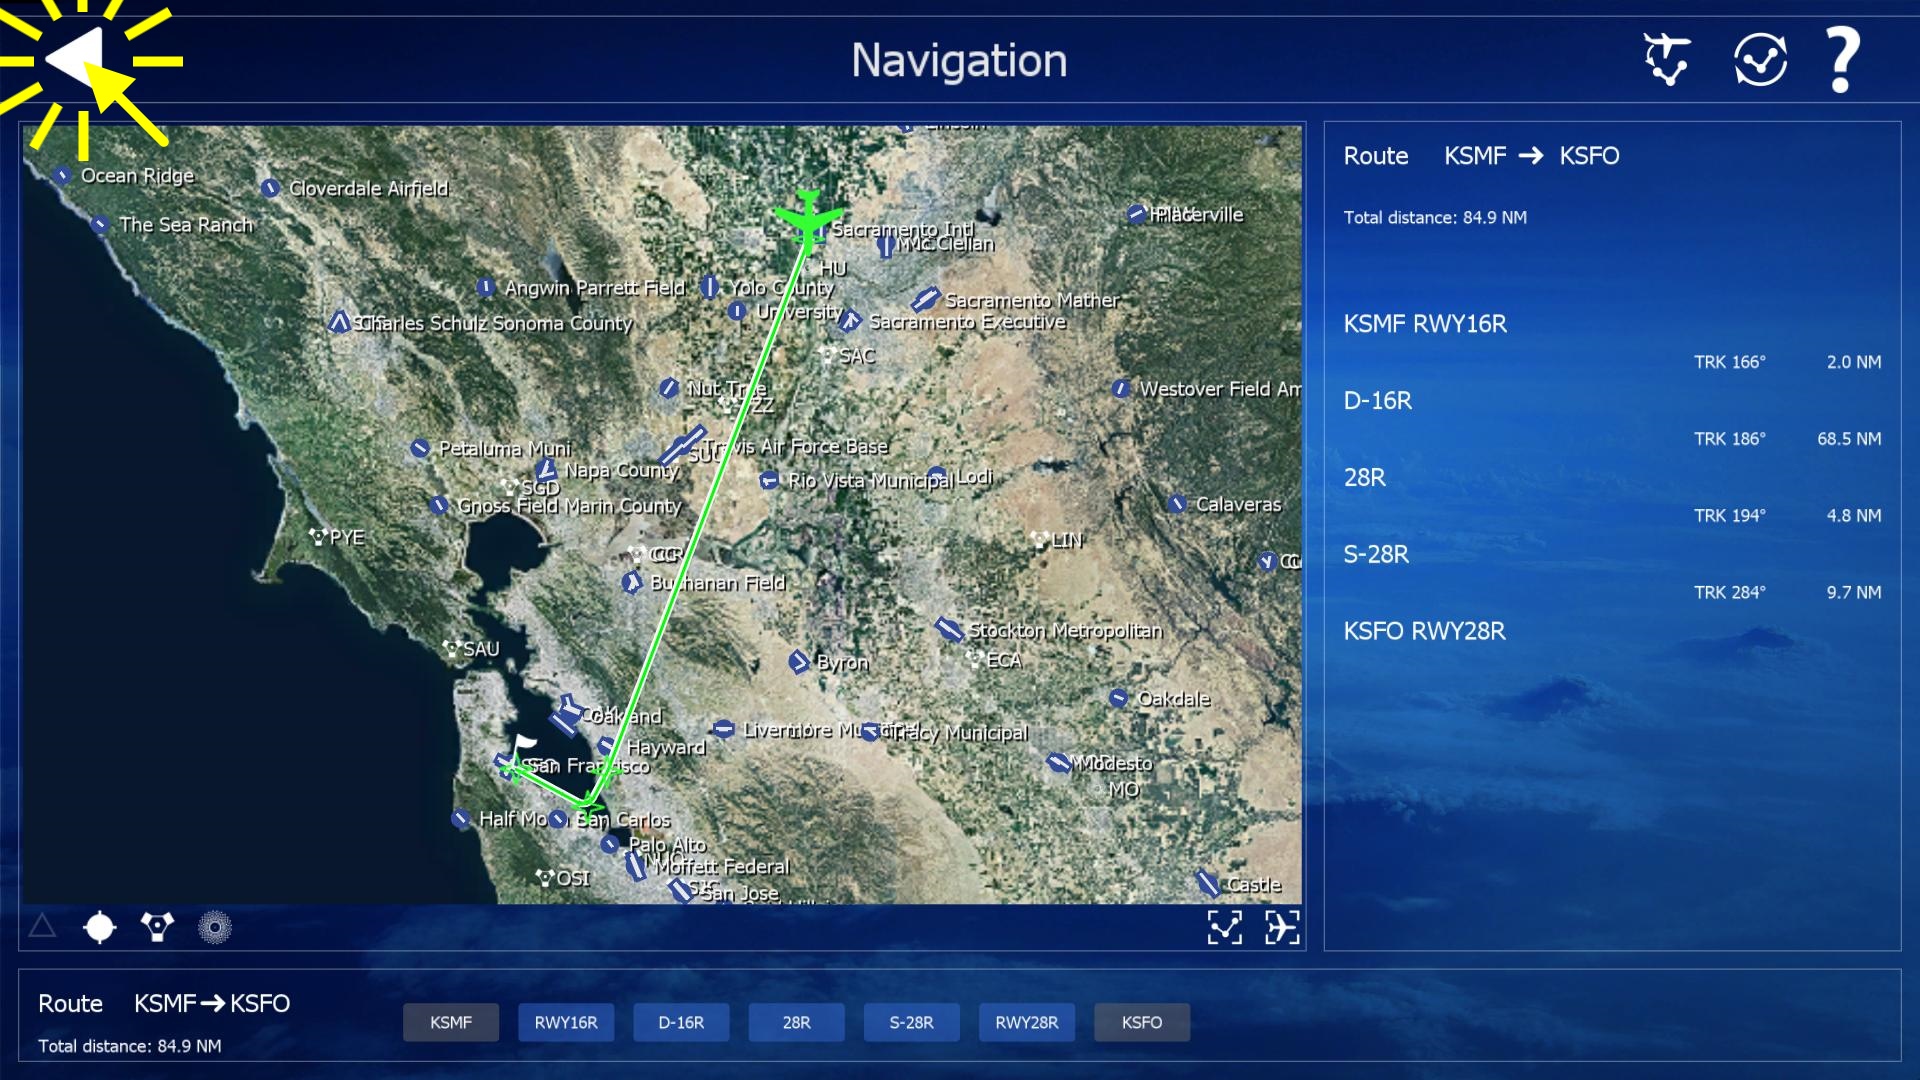
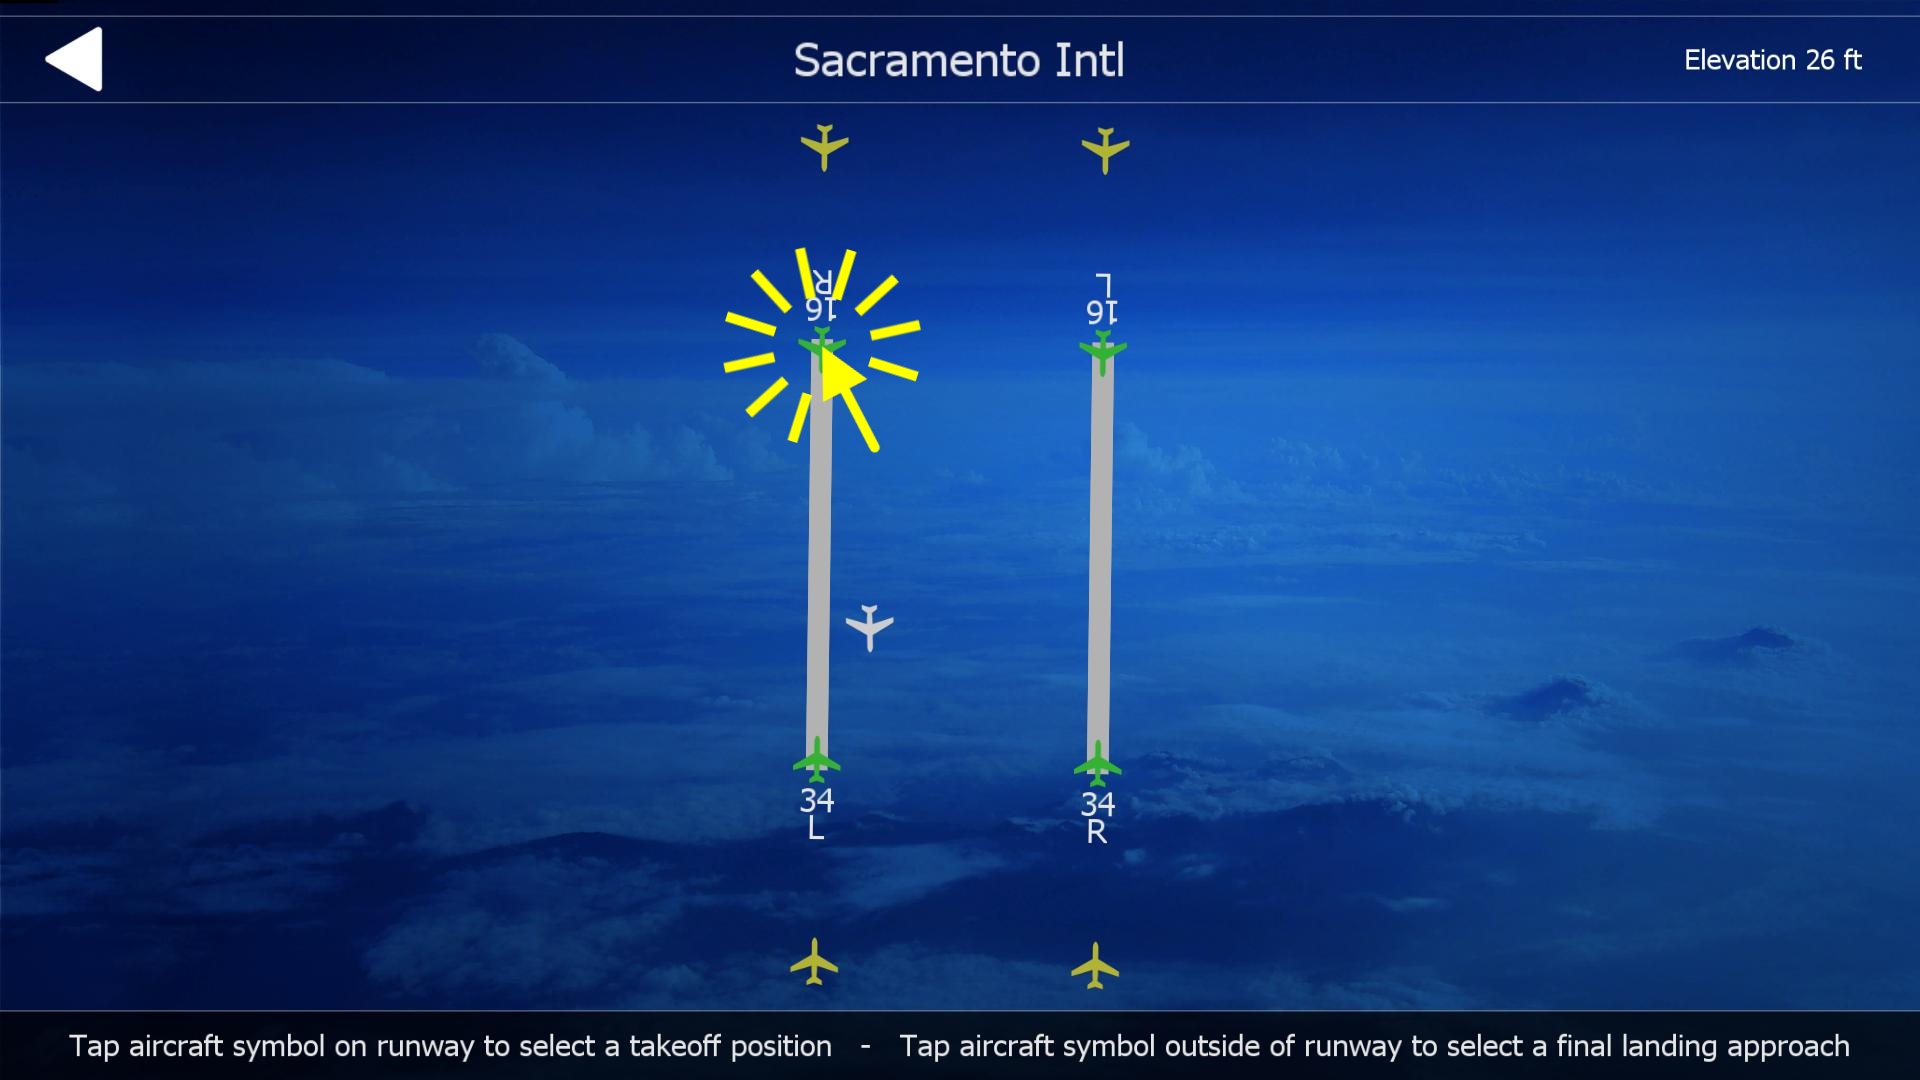
Please select your A320 from the aircraft menu and set up a route from Sacramento (KSMF) runway 16R to San Fransisco (KSFO) runway 28R using the navigation menu. Select the ILS I28R for the approach into San Fransisco. Then position the aircraft on the departure runway.
In the main menu click the “Start” button to begin the flight.
Takeoff
Before Takeoff Checks
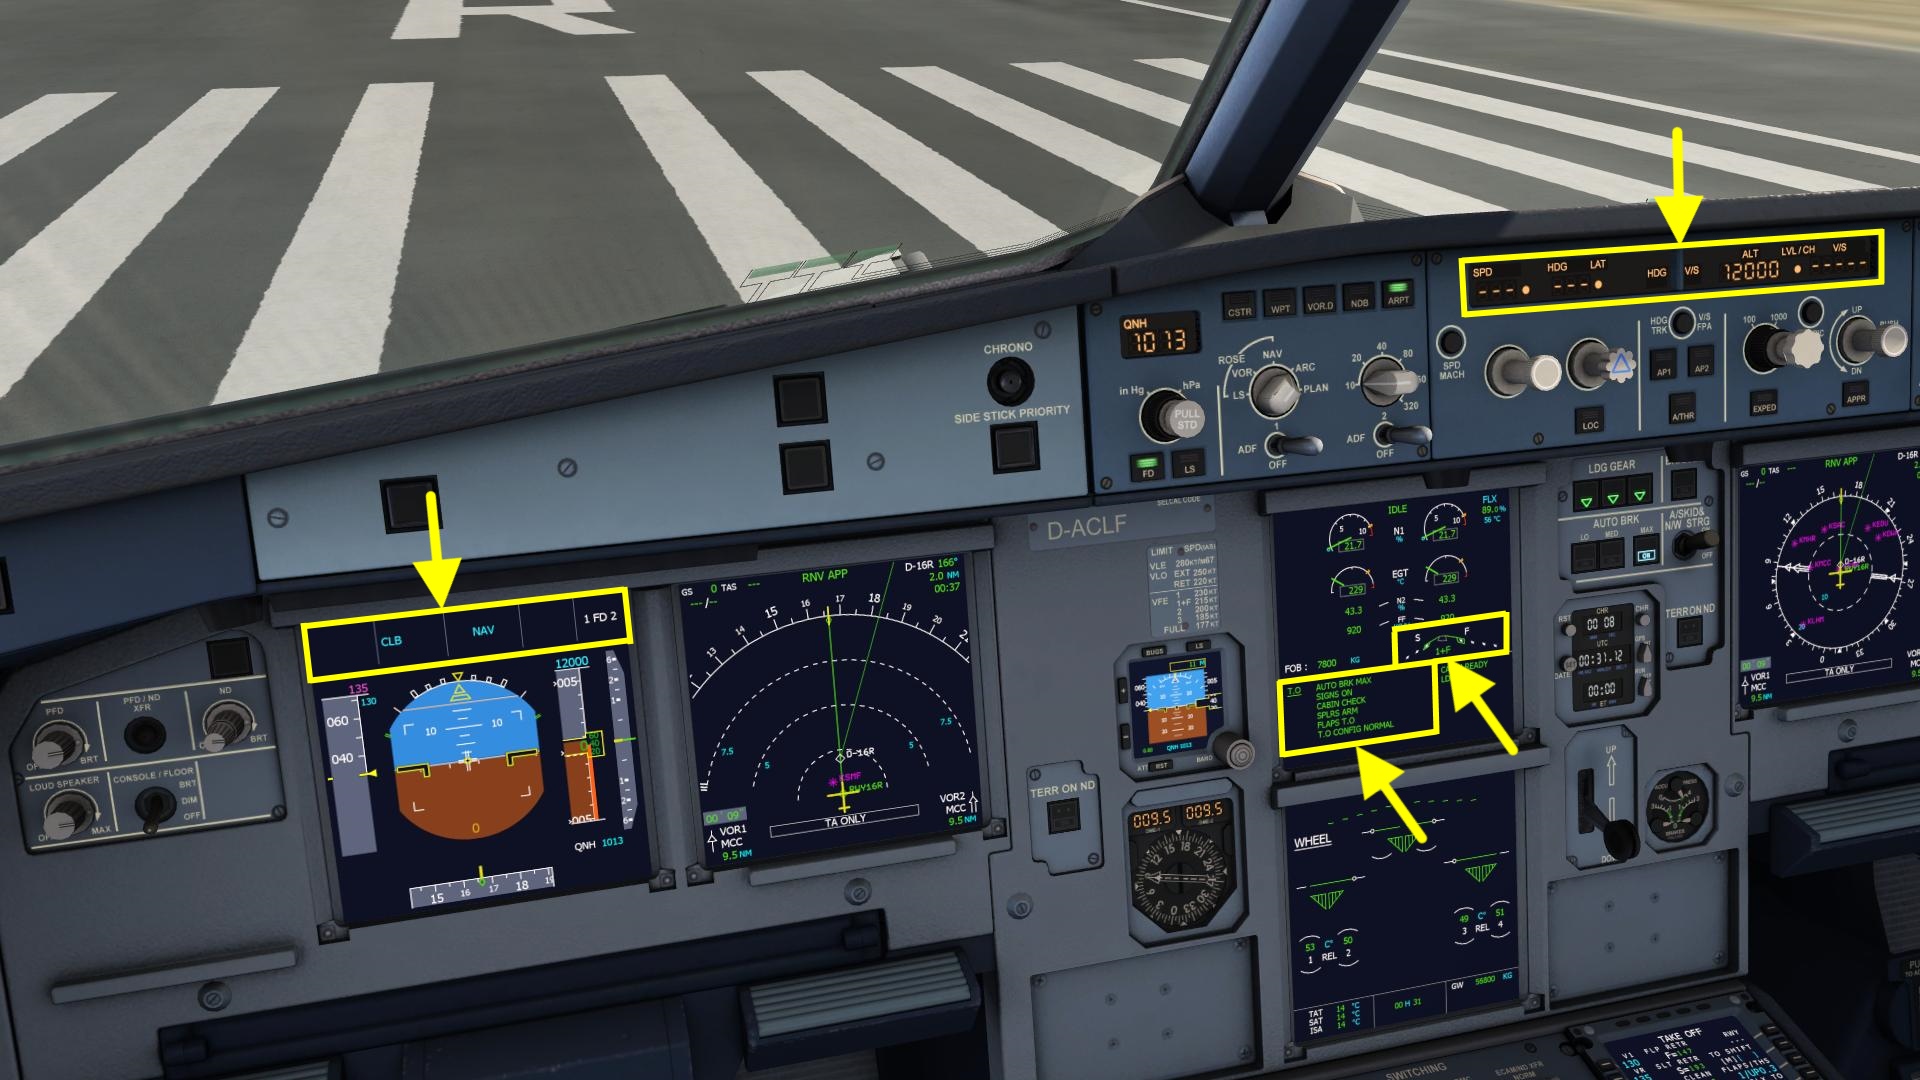
You should now see the cockpit of the A320 and everything should be ready to go. Please compare the aircraft state that you have with the highlighted areas of the screenshot below. Please quickly verify the following items:
- The Display in front of you shows “CLB” and “NAV” in blue.
- Flaps are set to “1+F” as seen on the center display
- The T.O. Checklist is all green, no blue item
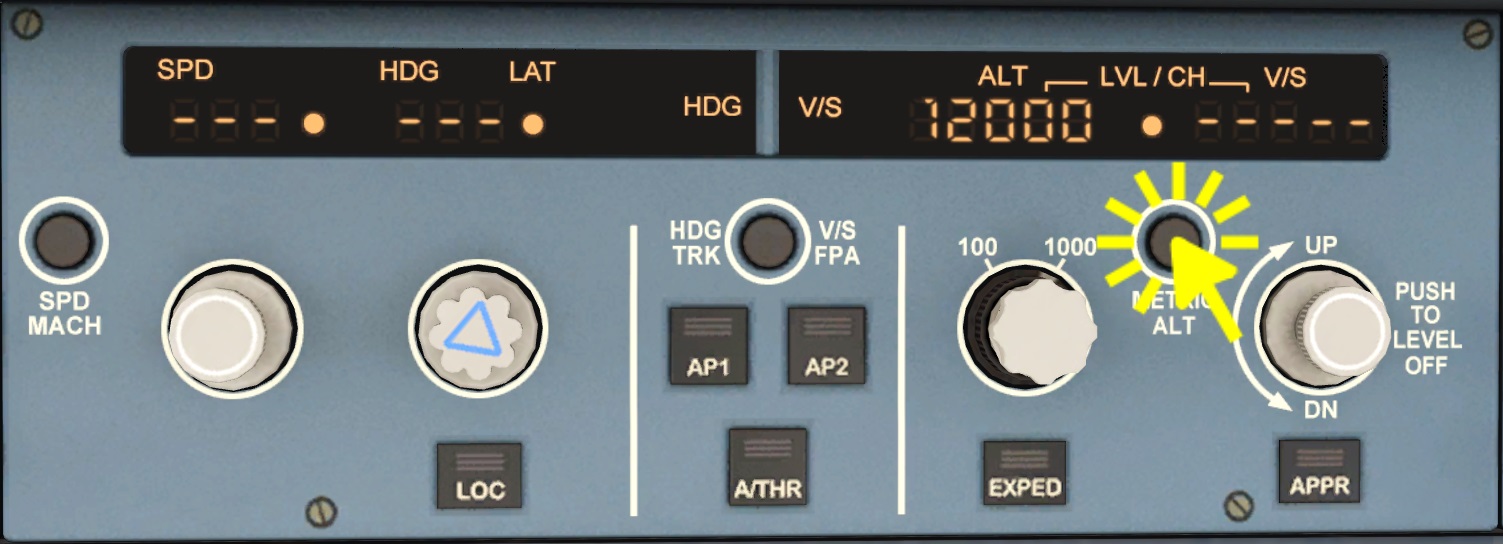
- In the autopilot panel everything is dashed (—*) and 12000 (give or take 2000 ft) is shown in the altitude window.
This should all be completed when placing the aircraft on the runway. If anything does look off please set the aircraft to the runway starting position again, as shown earlier. Make sure that if you have analog inputs for flaps or spoilers, that these are set to the takeoff position!
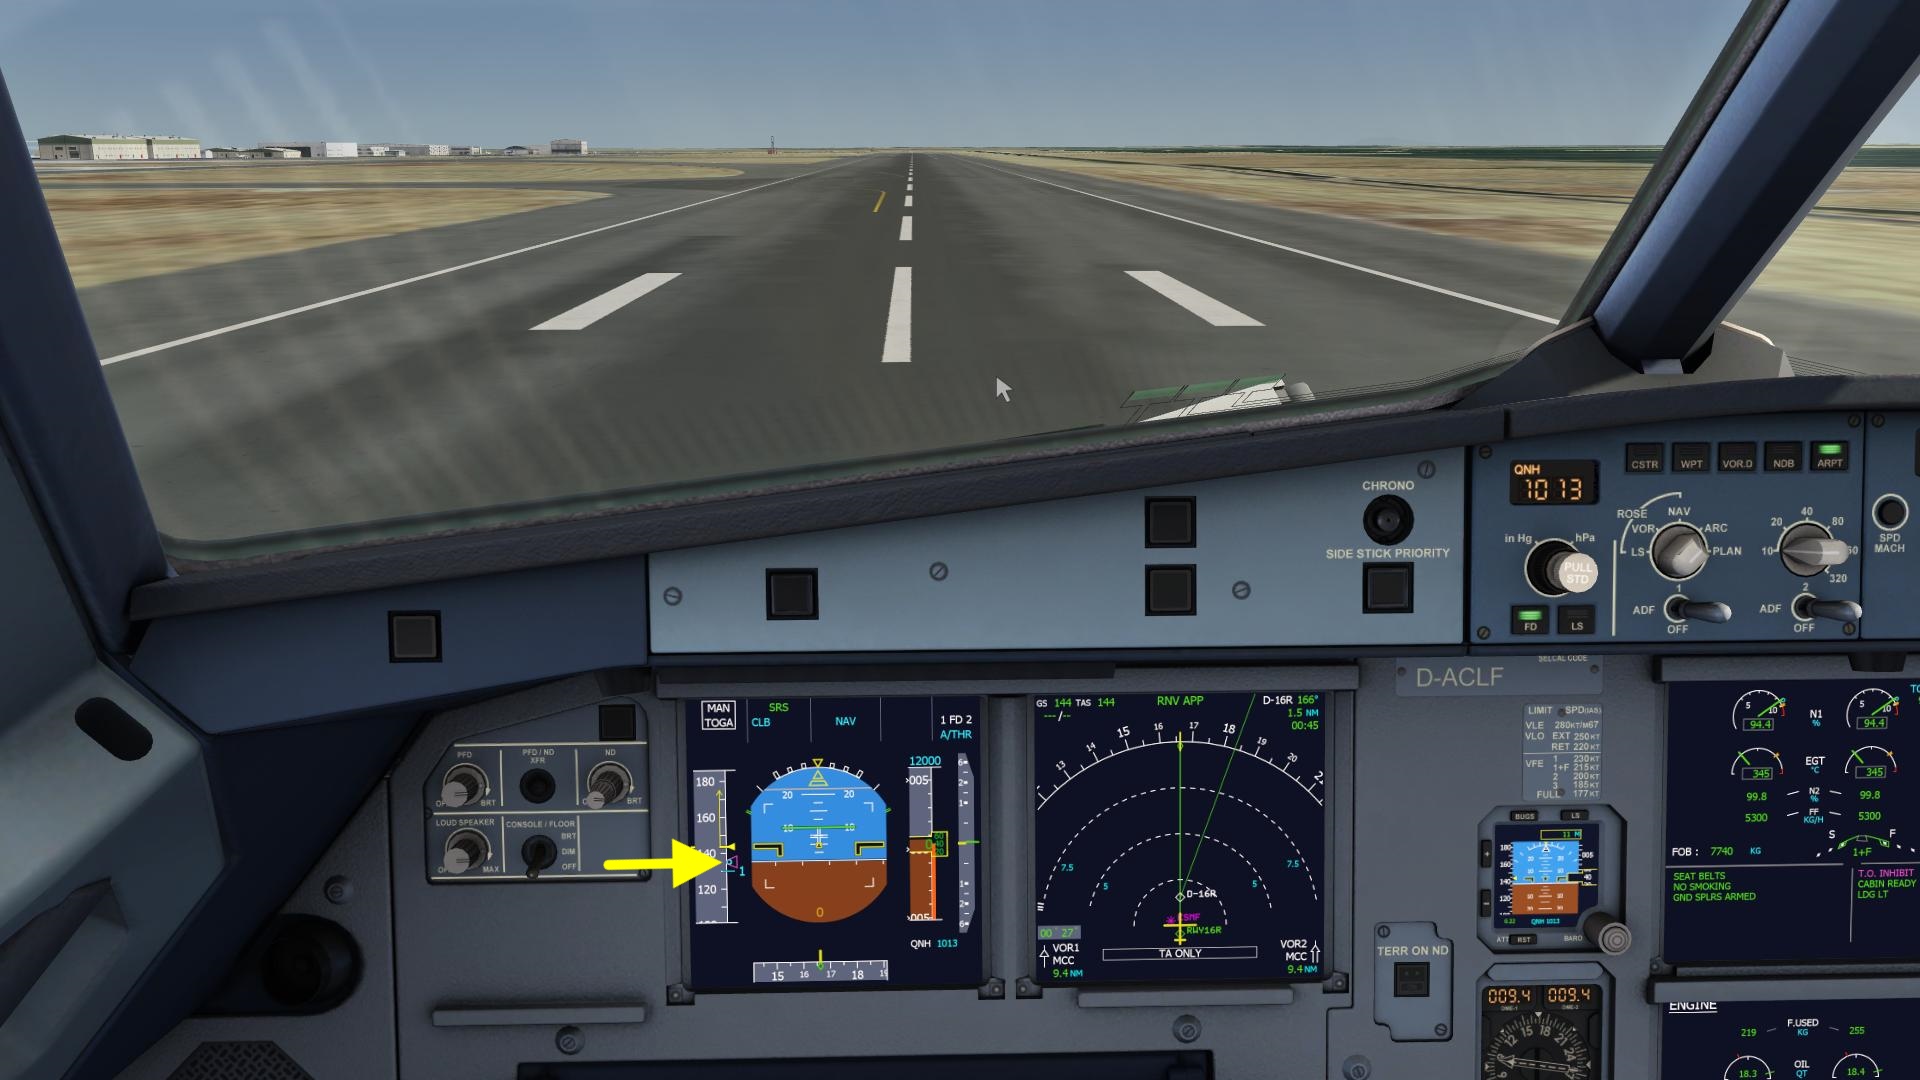
The aircraft should look like this now. If it doesn't even after repeated attempts please contact our support or visit the forums for help.
Taking Off
The takeoff has to be flown manually.
- Advance your throttle input to full forward.
- Use rudder to maintain the center line, very little inputs should be required for this.
When the airspeed reaches the blue circle gently pull back on the elevator to lift the nose up. Continue gently pulling up until the green horizontal bar is centered, at about 18 degrees nose up.
Gear Up
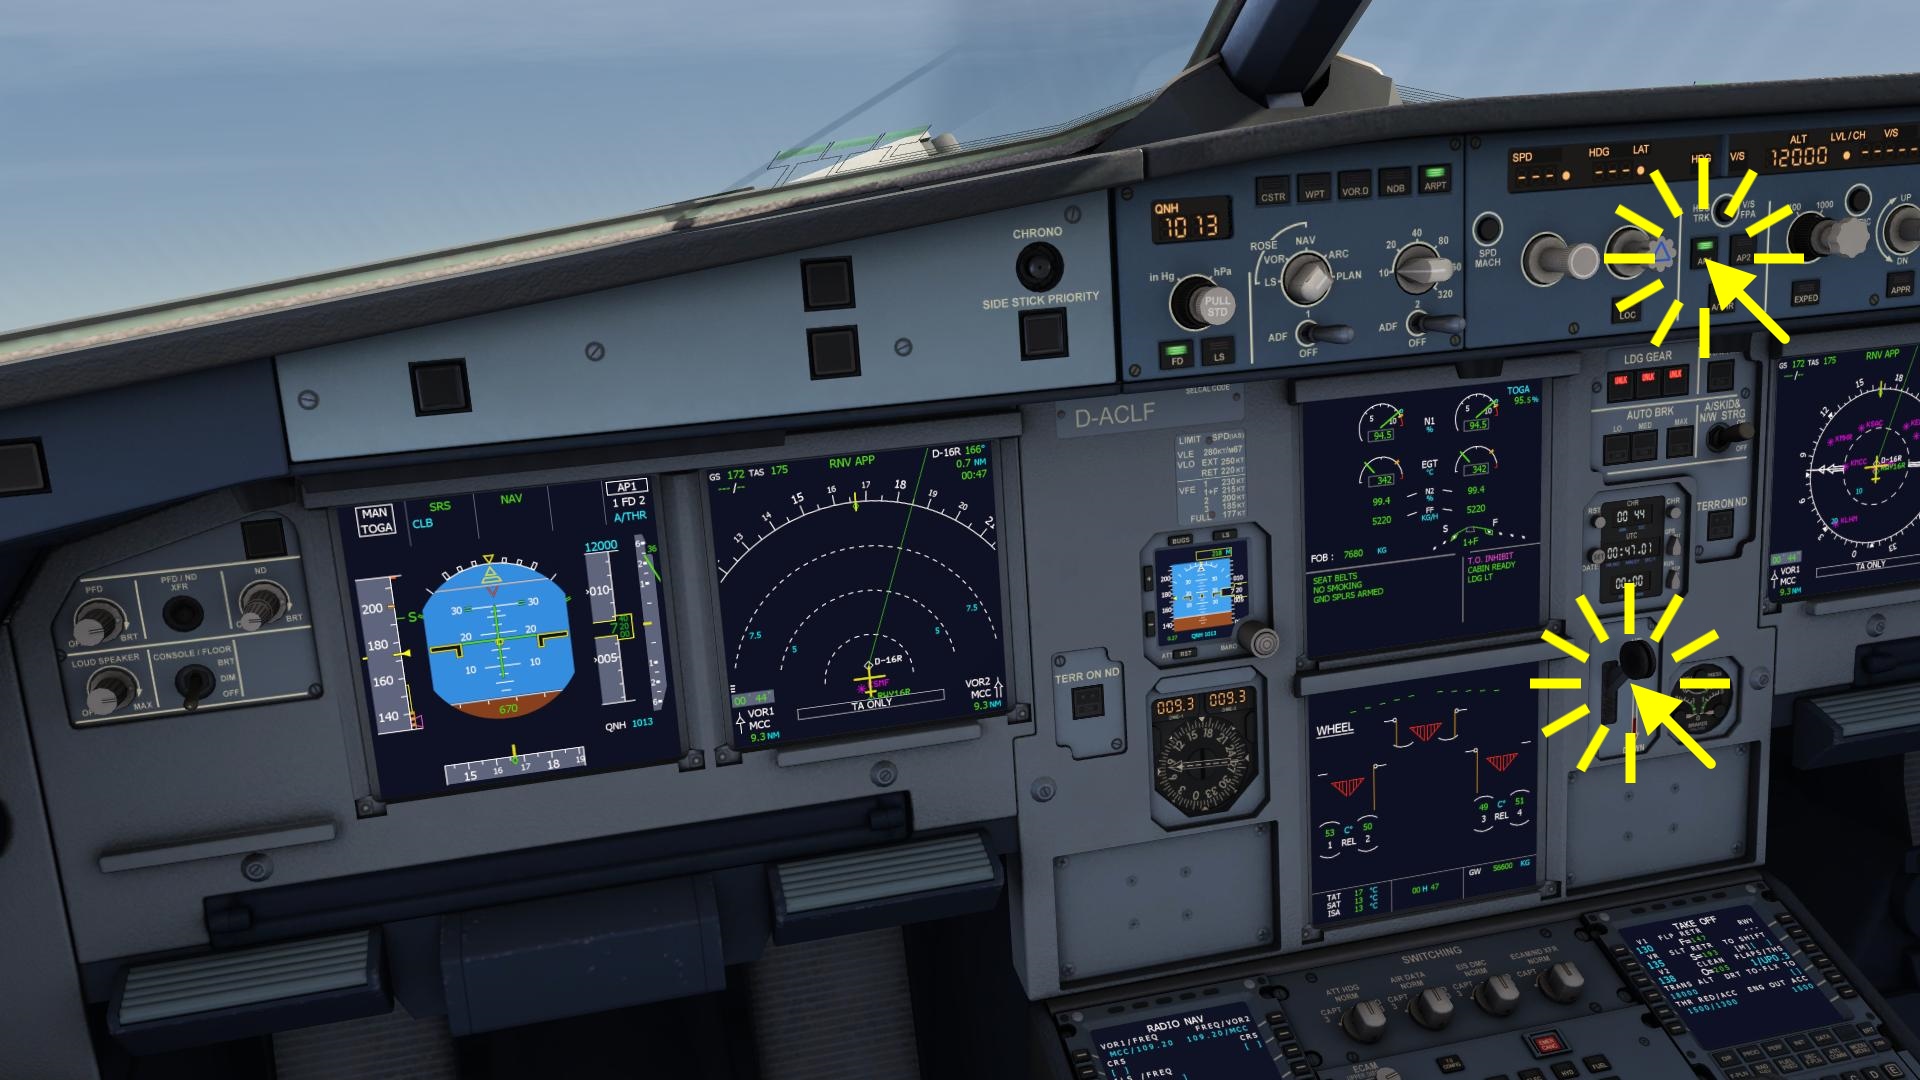
- Press the “g” key on your keyboard or click the gear lever to retract the landing gear.
or
- Click the gear lever or hold down the left mouse button and move the mouse up to drag the gear lever up.
Autopilot On
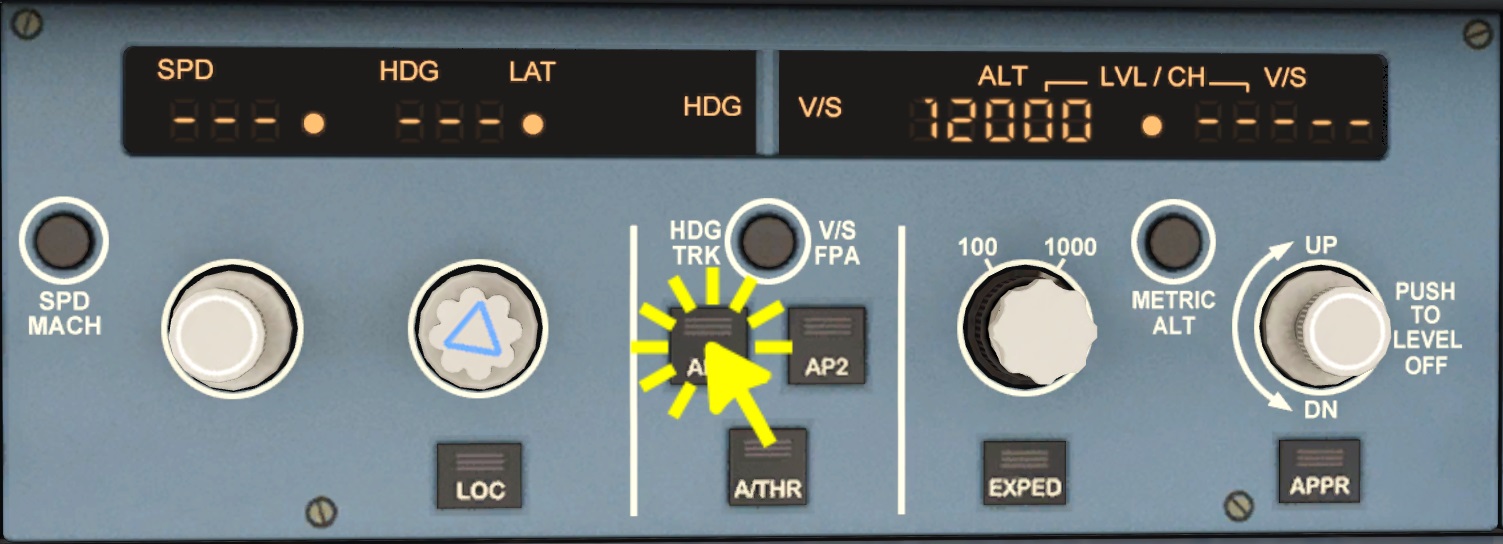
Press the “a” key on your keyboard or press the autopilot (AP1) button.
Climb
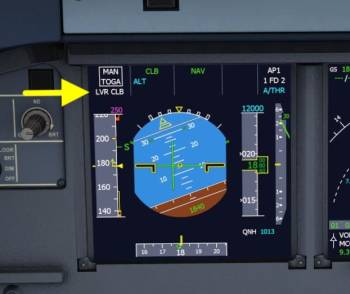
LVR CLB Flashing
At about 1000 feet above the runway a white “LVR CLB” (lever climb) text will start flashing on the primary flight display in front of you. At this point the thrust should reduced for climb thrust because the engines can only maintain the takeoff thrust for about 5 minutes before they are starting to degrade and take damage from the heat and vibrations. In the Aerofly the engines won't fail because of this (not yet anyway) but the autopilot won't be able to control engine thrust if you leave it like this.
Reduce To Climb Thrust
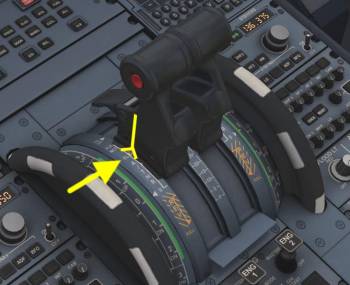
- Slowly move back your throttle input until the flashing LVR CLB message disappears.
Note - If the green text above says “THR LVR” and “LVR CLB” is flashing in white you have pulled back to far. Advance the thrust again by a bit.
The green text in the top left corner of the display should now show “THR CLB”.
If you look at the thrust levers in the cockpit it is quite clear where you need to position your throttle input. The levers should snap to the climb “CLB” detent and will remain there until we are literally seconds before touch down.
Flap Retraction
Once the airspeed is above the green -S (slat retraction) speed we can safely retract the flaps and slats.
- Either hold down the left mouse button and move the mouse to drag the flap lever
or
- Use your scroll wheel whilst pointing at the lever to retract set the flap lever to the forward position. You can also use the default key assignments for this (Shift + F) or your assigned inputs.
Lean Back And Enjoy
The autopilot is flying now and we have a little break. The next thing we have to do will be just before we start descending. You can change the camera and look around for the time being. This flight isn't very long so don't play around for too long. About 6 minutes after lift off we already have to think about descending again 
Cruise
The autopilot will stop climbing at the selected altitude, which is 12000 ft for our flight. The primary flight display should now show in green: “SPEED”, “ALT CRZ” and “NAV” as seen on the screenshot below. You can start with the descent preparations as soon as “ALT CRZ” is shown in green in the second column of the primary flight display.
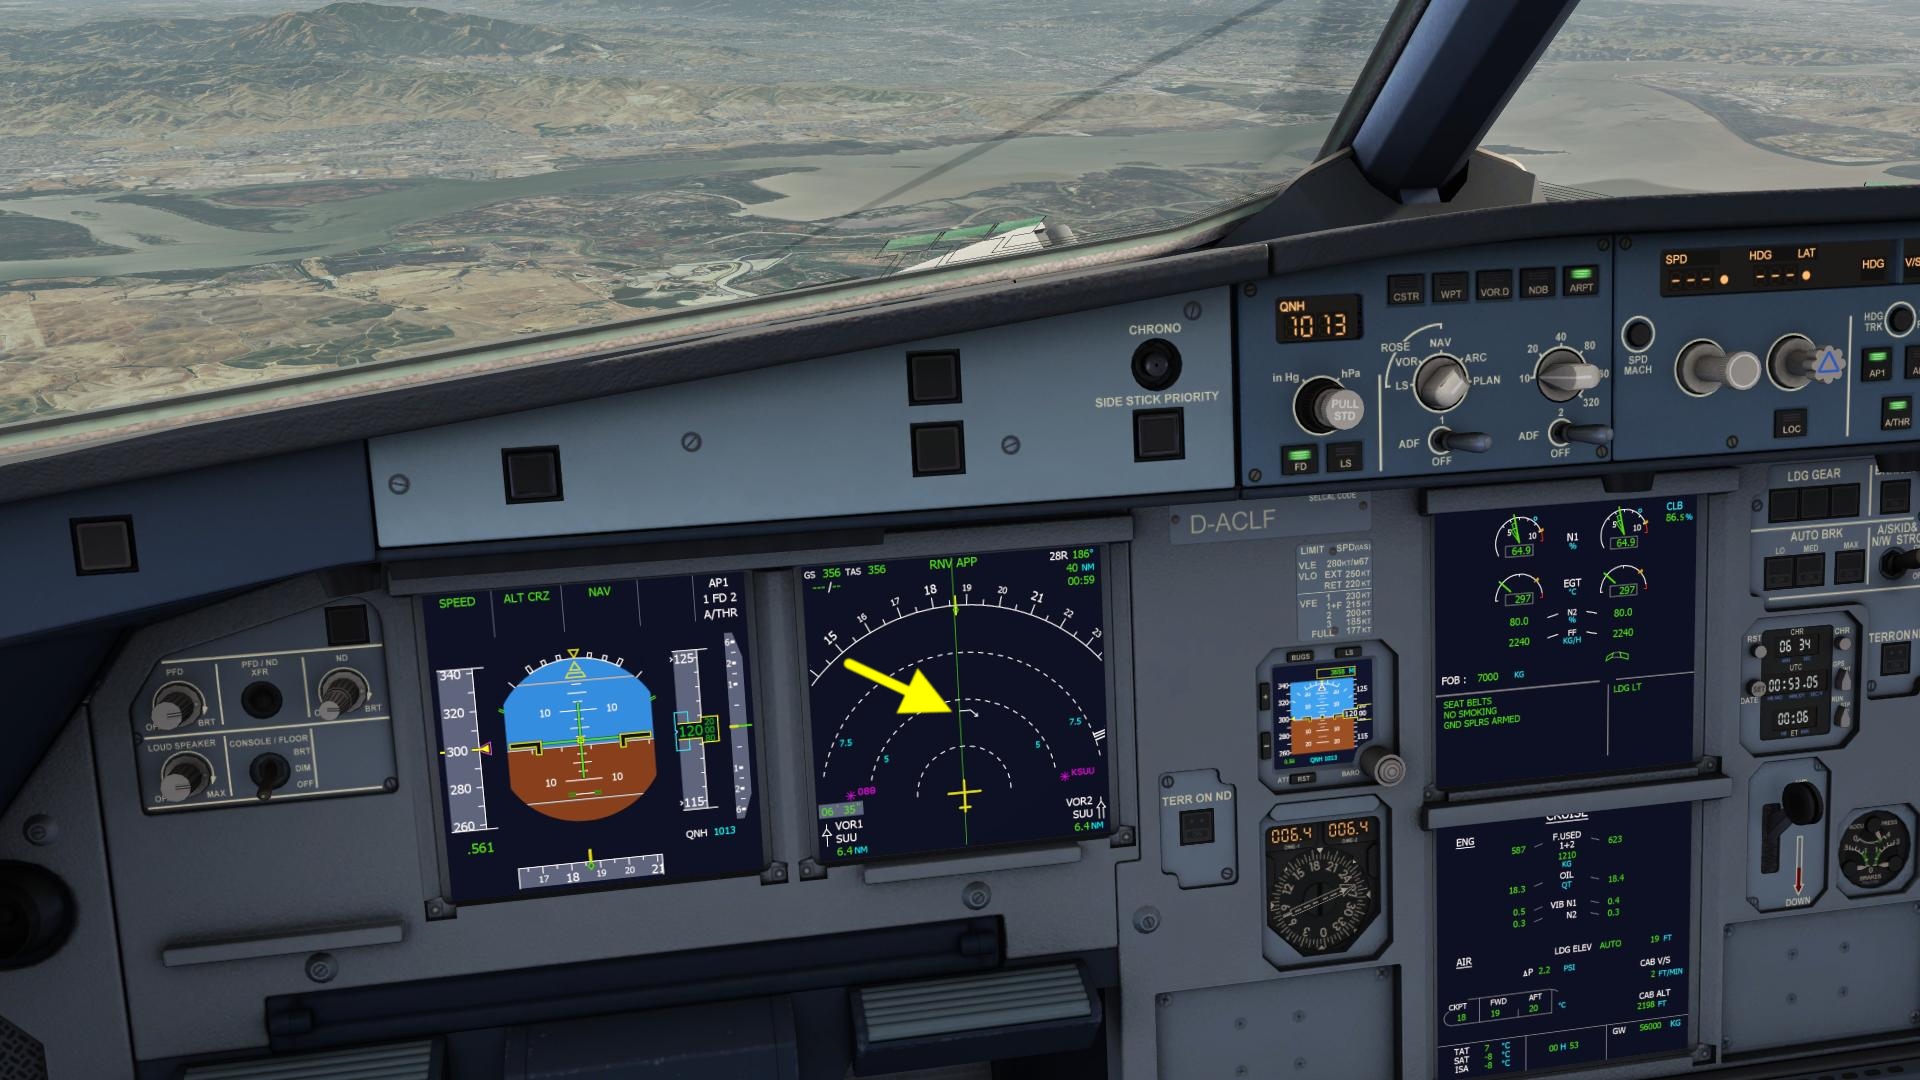
Top Of Descent Arrow
A white arrow comes into view on the navigation display of the A320. This white arrow marks the point at which the descent starts, the so called top of descent point.
Decrease Selected Altitude
For the upcoming descent we have to select a lower altitude for the autopilot.
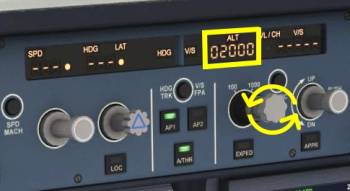
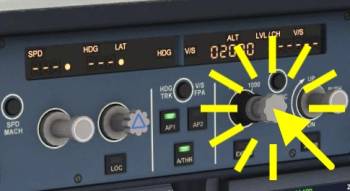
- Move the mouse cursor over the altitude knob of the autopilot. Scroll down to decrease the selected altitude value to 2000 ft. Don't click or press anything at this point.
Start Descent
When the white arrow comes really close to our aircraft symbol you should initiate the descent. Unlike the Boeing 747 for example the Airbus A320 won't descent automatically.
- Click the altitude knob with the left mouse button to push it in.
Descent
The autopilot will command idle thrust in the descent and tries to match the magenta target speed range and the green altitude target by just pitching up and down. When too high the autopilot flies a bit faster and with the increased drag it can catch up to the profile.
Display The ILS
- Click the “LS” button in the glare shield to display the ILS localizer and glide slope on the primary flight display.
Note - Depending on how far you are to the runway only the scale for the localizer and glide slope will show up but no magenta needles can be seen. This is normal because the ILS ground stations only have limited range and we can't receive them yet.
Approach
Let the aircraft descent until you reach 5000 to 4000 feet. We are now going to prepare the approach into San Francisco. Luckily for this there is actually barely anything to do in the A320.
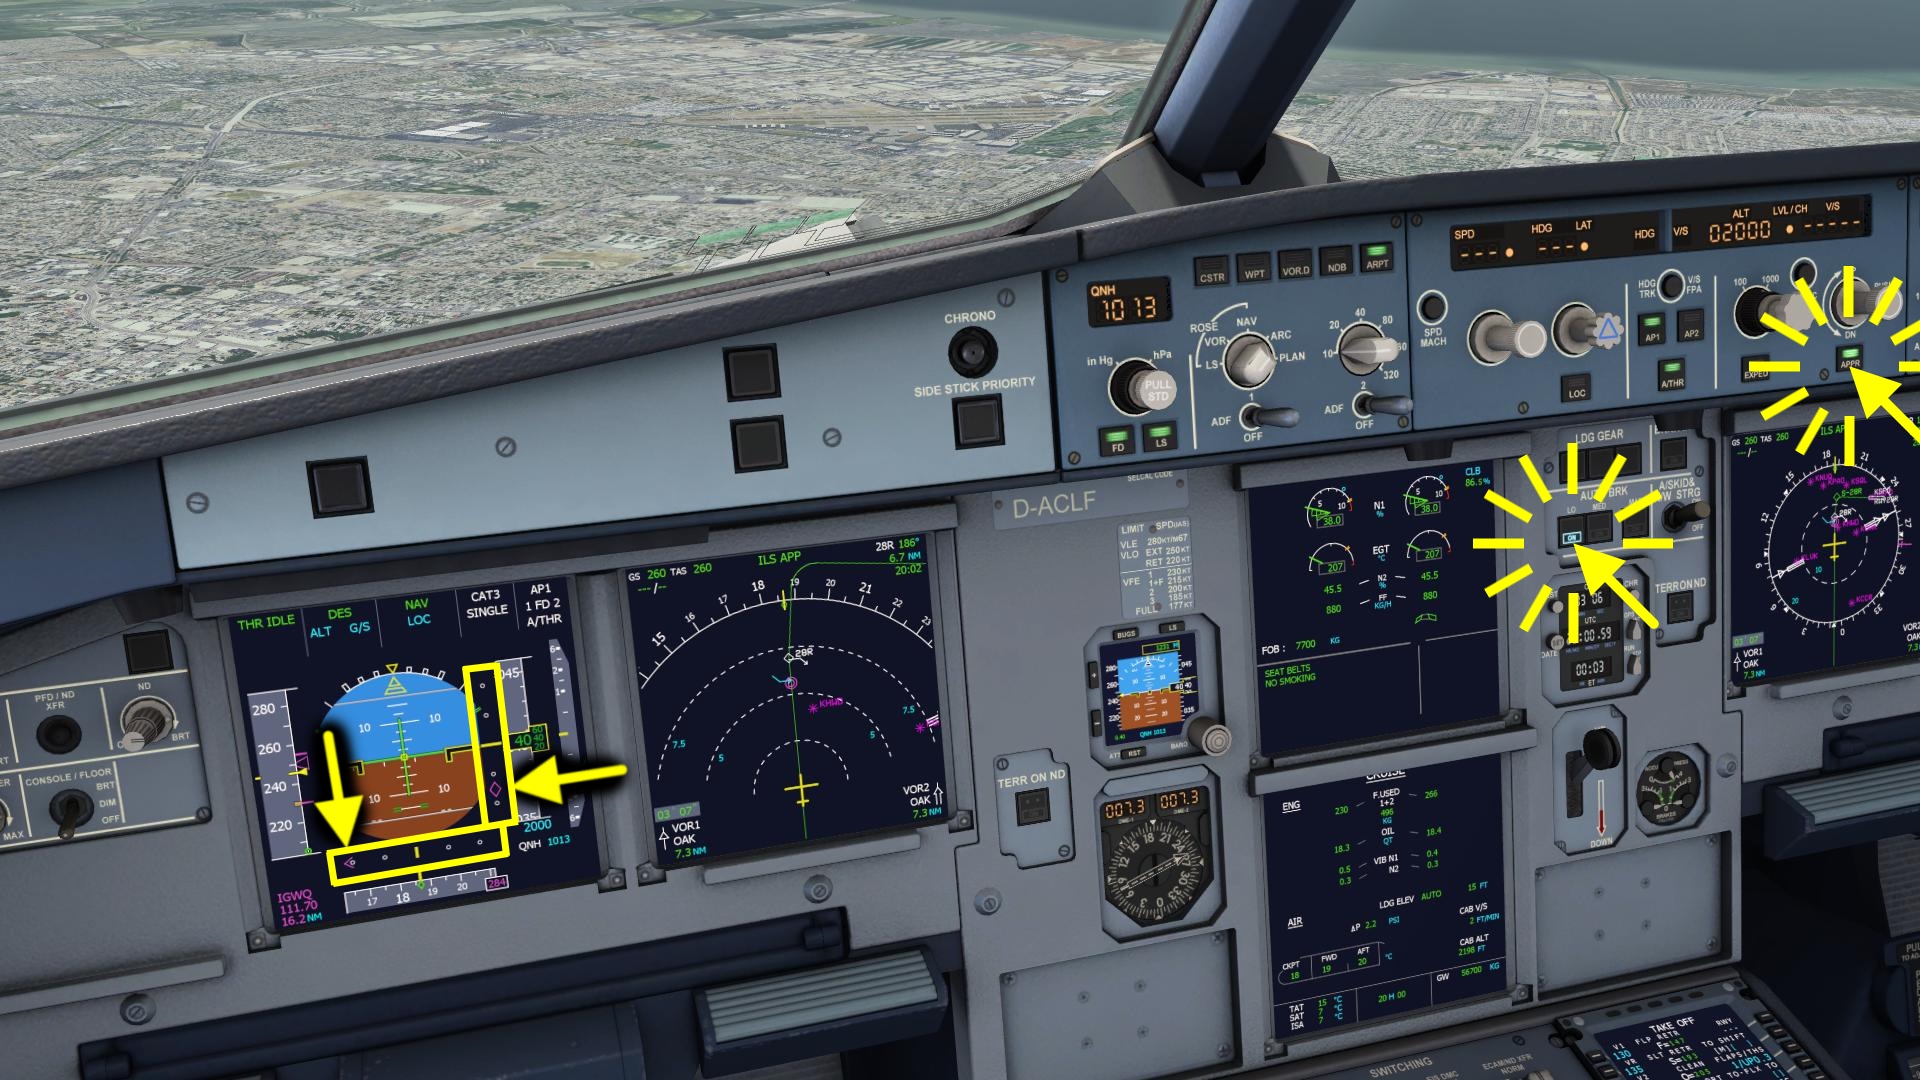
At this point the ILS should be automatically tuned and you can see magenta arrows for the ILS localizer and glide slope deflections on the primary flight display in front of you as highlighted on the next screenshot.
Arm ILS Approach
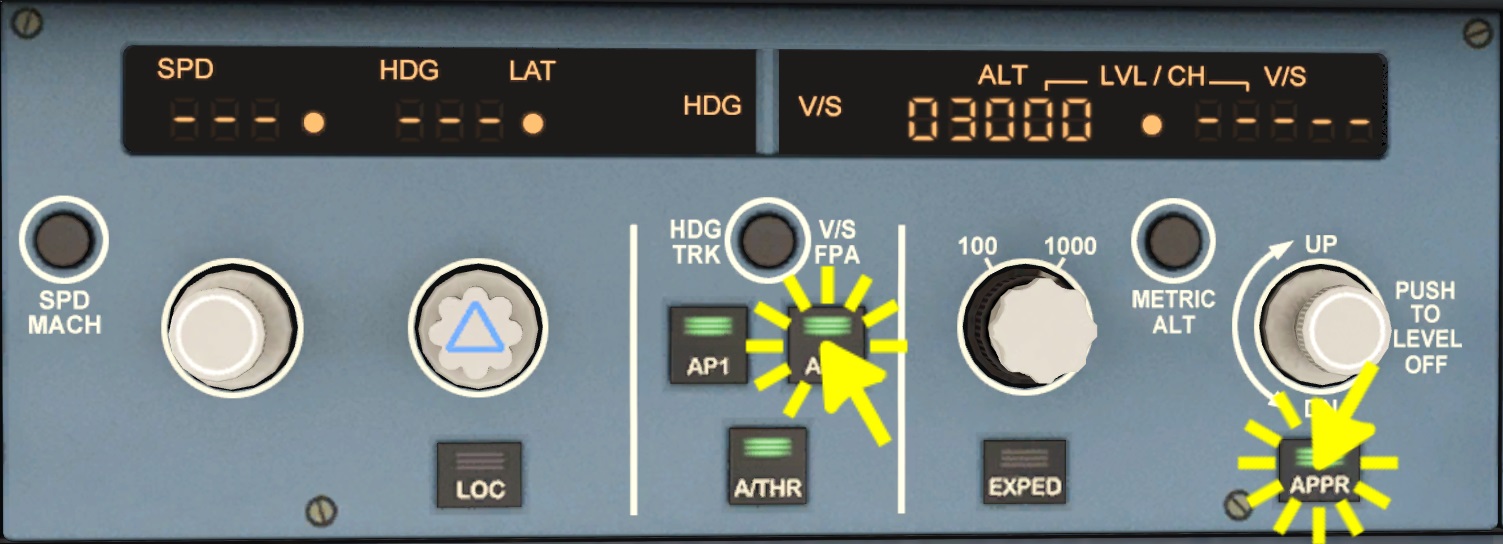
On the autopilot panel click the approach button (“APPR”).
Arm Auto-Brake
Click the “LO” button on the AUTO BRK (auto-brake) panel.
Approach Speed
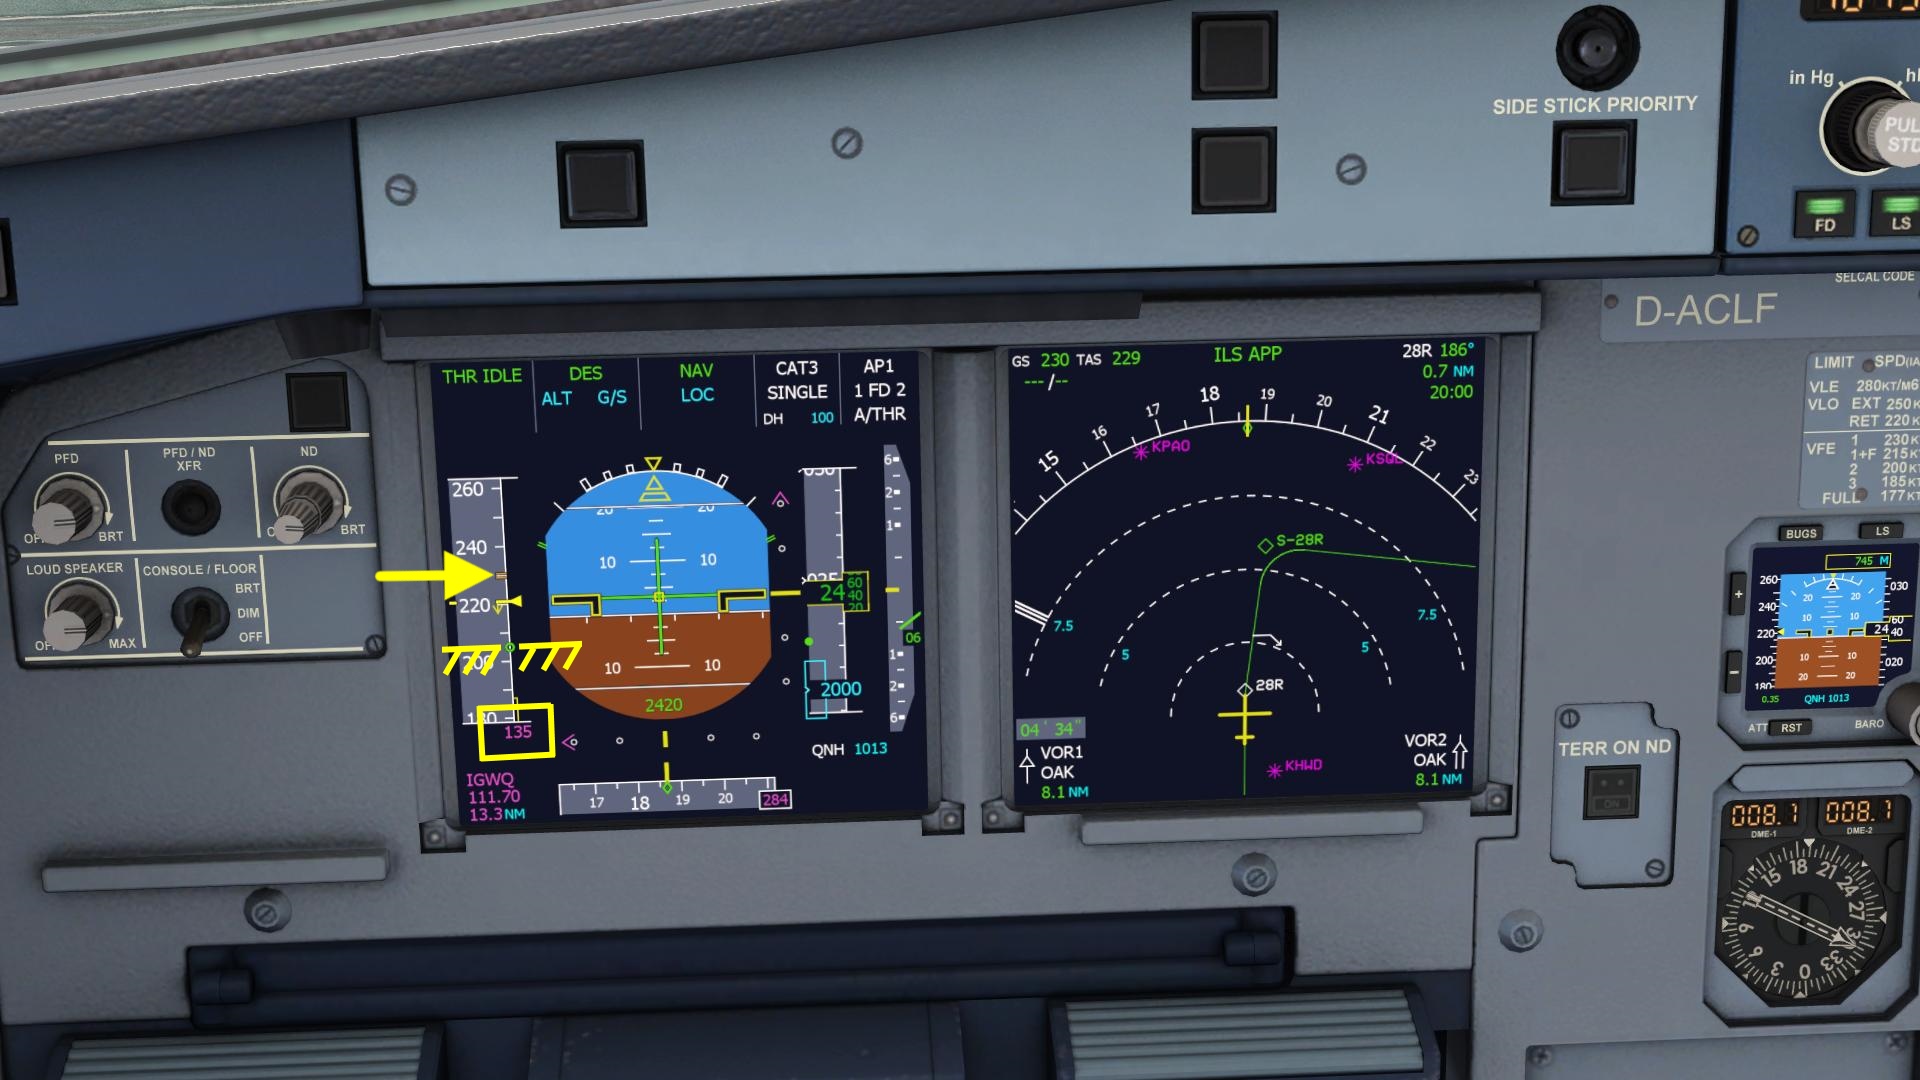
When passing the magenta “D” point on the map the aircraft will start to decelerate to approach speed. In managed speed mode the speed will be kept high until you select more flaps. Watch the speed target of the autopilot on the primary flight display. It switches to 135 knots on the display. However the auto-thrust system will not allow you to fly slower than the green dot speed at this point. When you extend flaps further than the speed minimum is reduced to -S, -F and finally the approach speed.
Flaps 1
Let the aircraft decelerate to this green dot speed. Make sure that the airspeed is below the two amber bars that mark the maximum airspeed for the next flap. Then select Flaps 1.
- Press the default key command “F” or any of your assigned control inputs for the flaps
or
- Point at the flaps lever or hold down the left mouse button and move the mouse to drag the flap lever to the first position
or
- Use the mouse wheel whilst pointing at the flap lever to increase the flap setting.
Now the speed is allowed to drop to the -S speed (slat retraction speed). If you wanted to retract the flaps for some reason you could do so safely because the speed is kept high enough.
Engage Second Autopilot
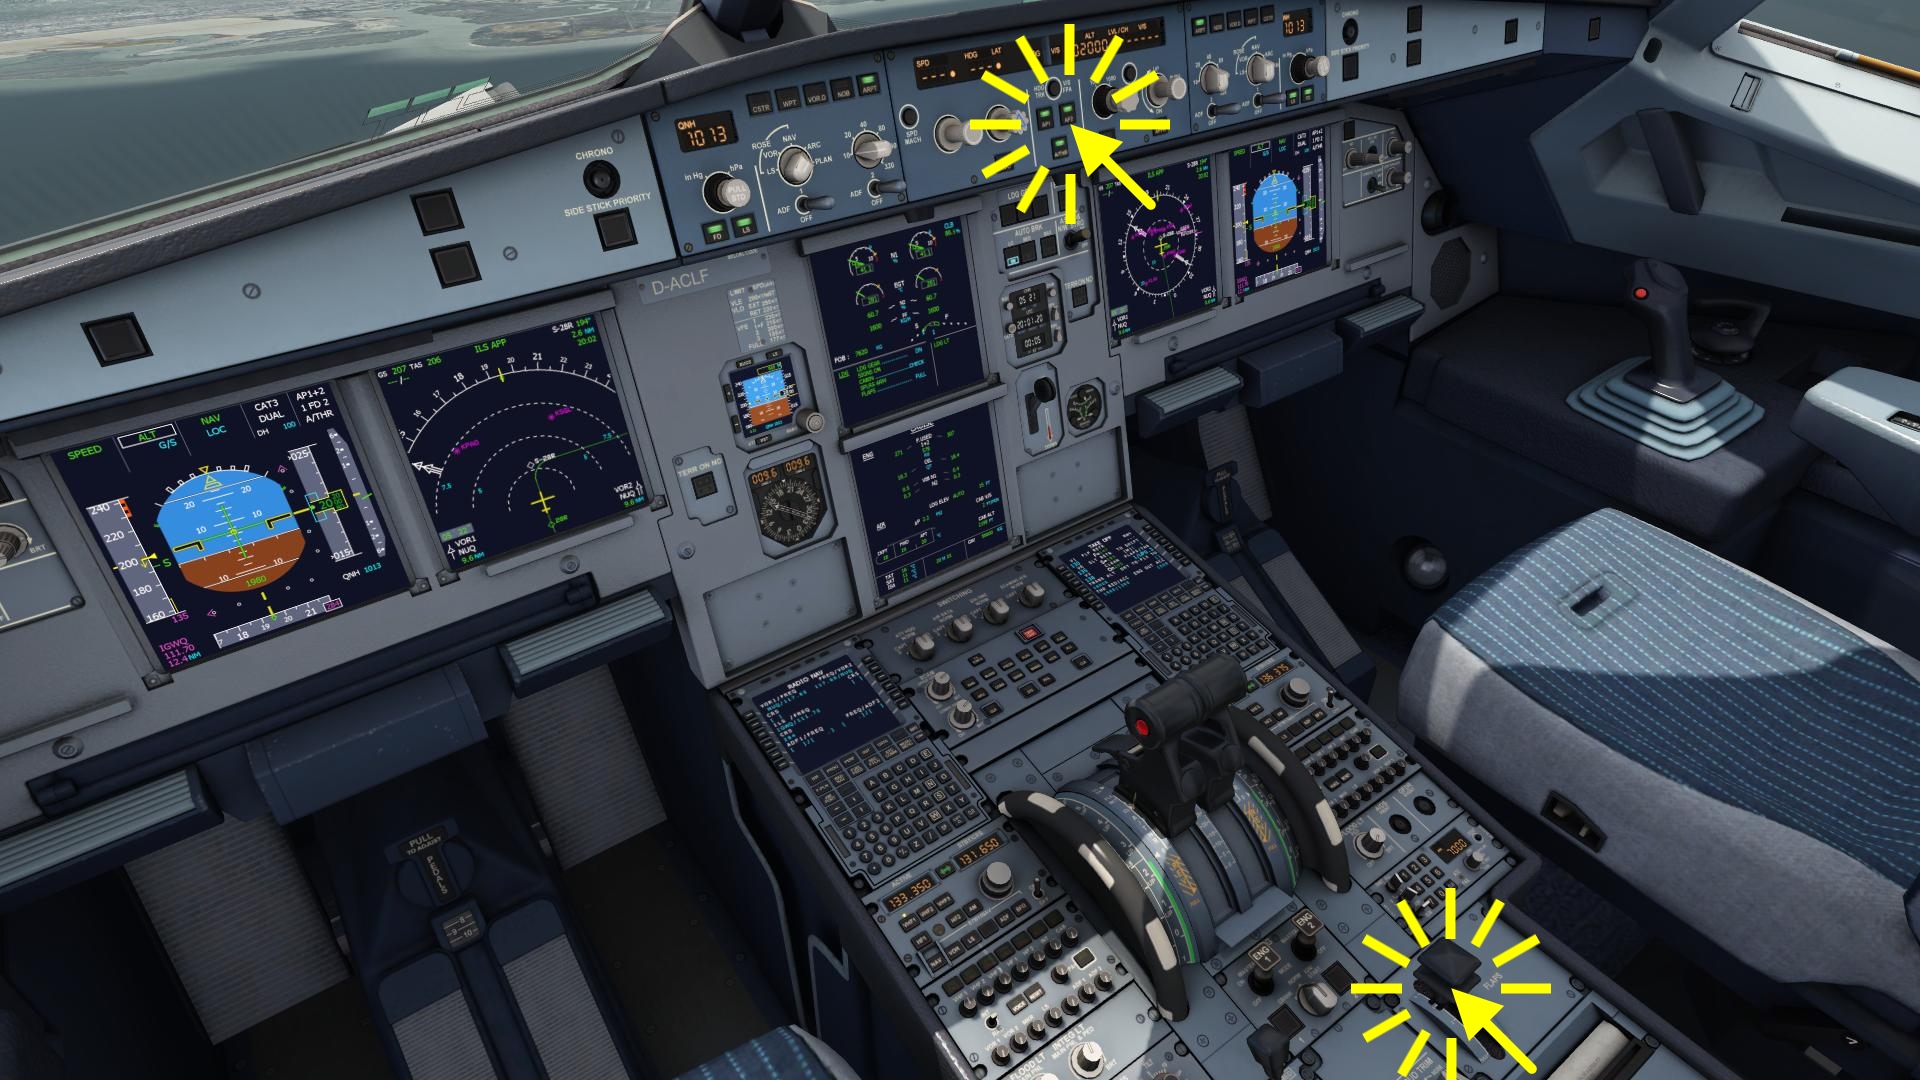
- Click the AP2 button
Localizer Capture
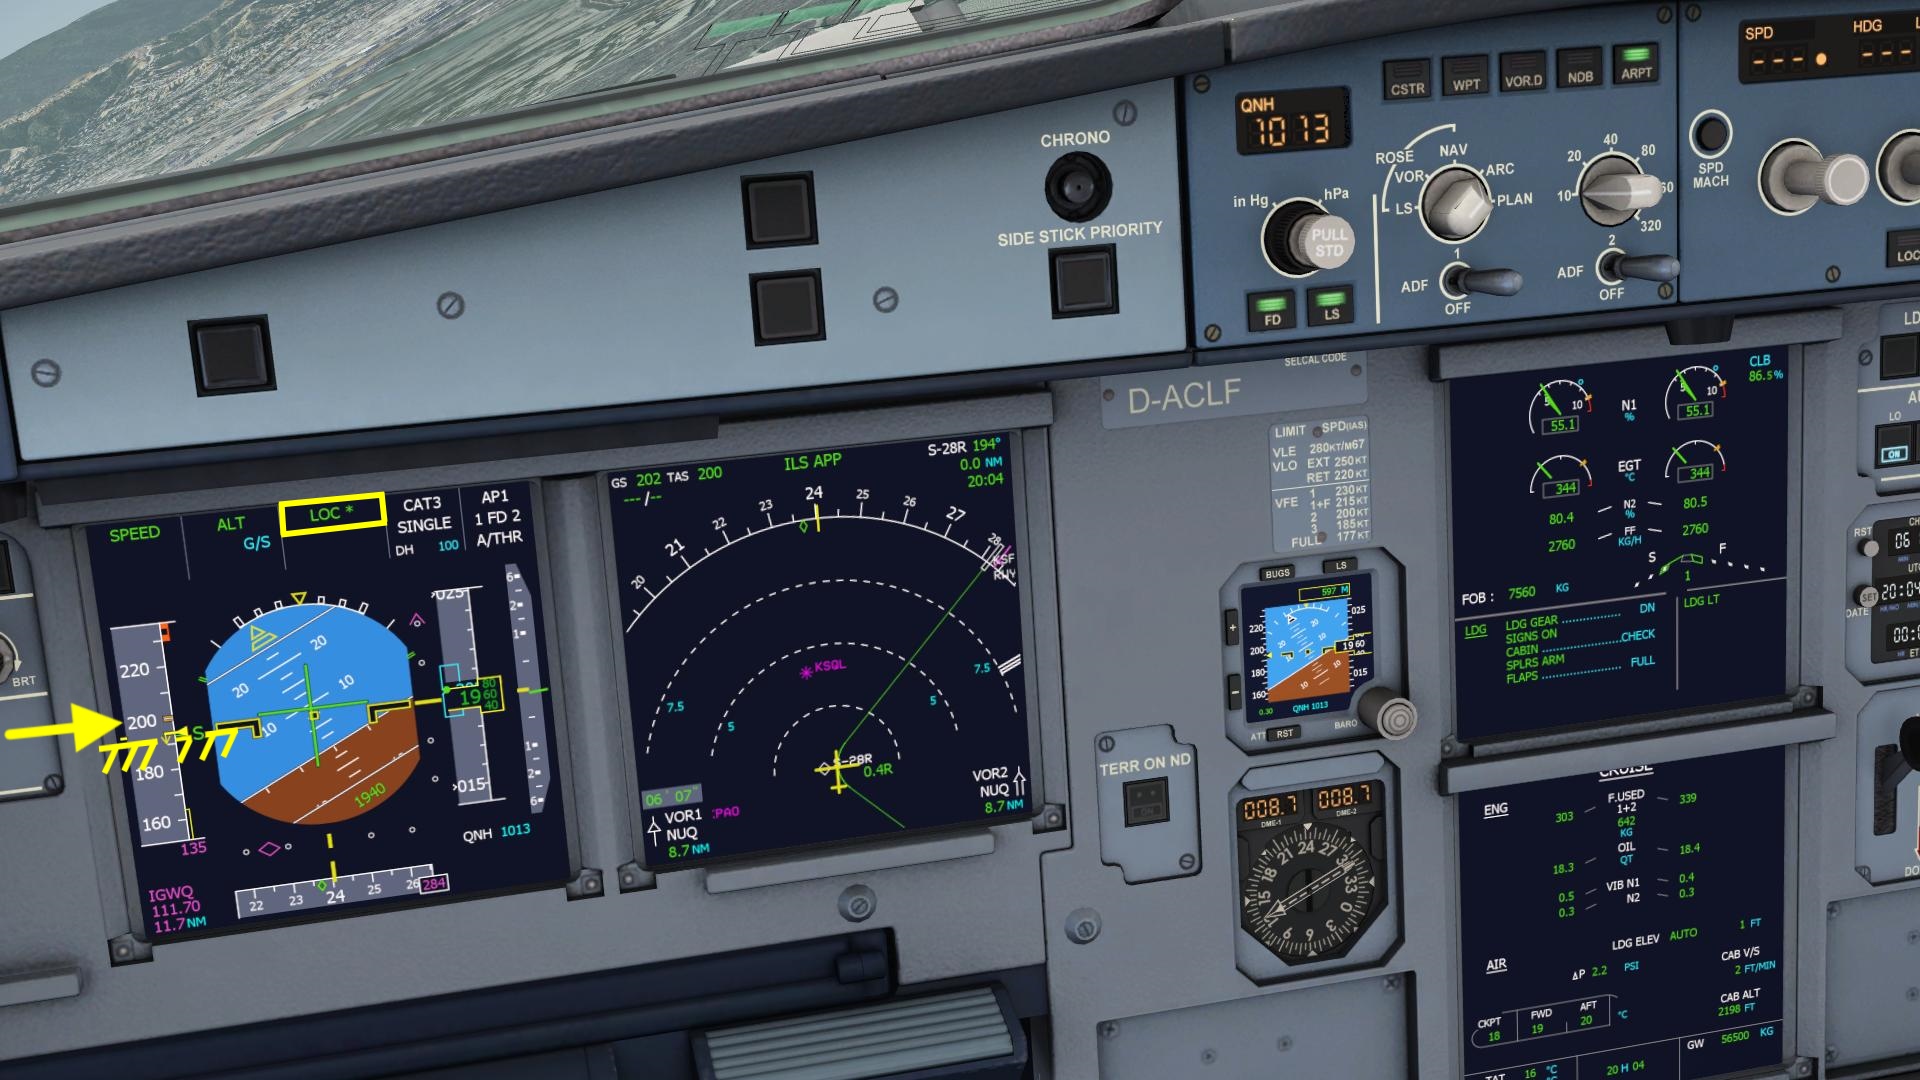
The autopilot will capture the localizer needle and steer us to the runway laterally. The primary flight display will show “LOC *” followed by “LOC” in the top row. No action required.
Flaps 2
When your airspeed matches the -S speed you are slow enough for the next flap setting. As shown for the first stage of flap, use the mouse wheel over the flap lever or use the shortcut “f” or other methods to increase flaps to two.
Gear Down
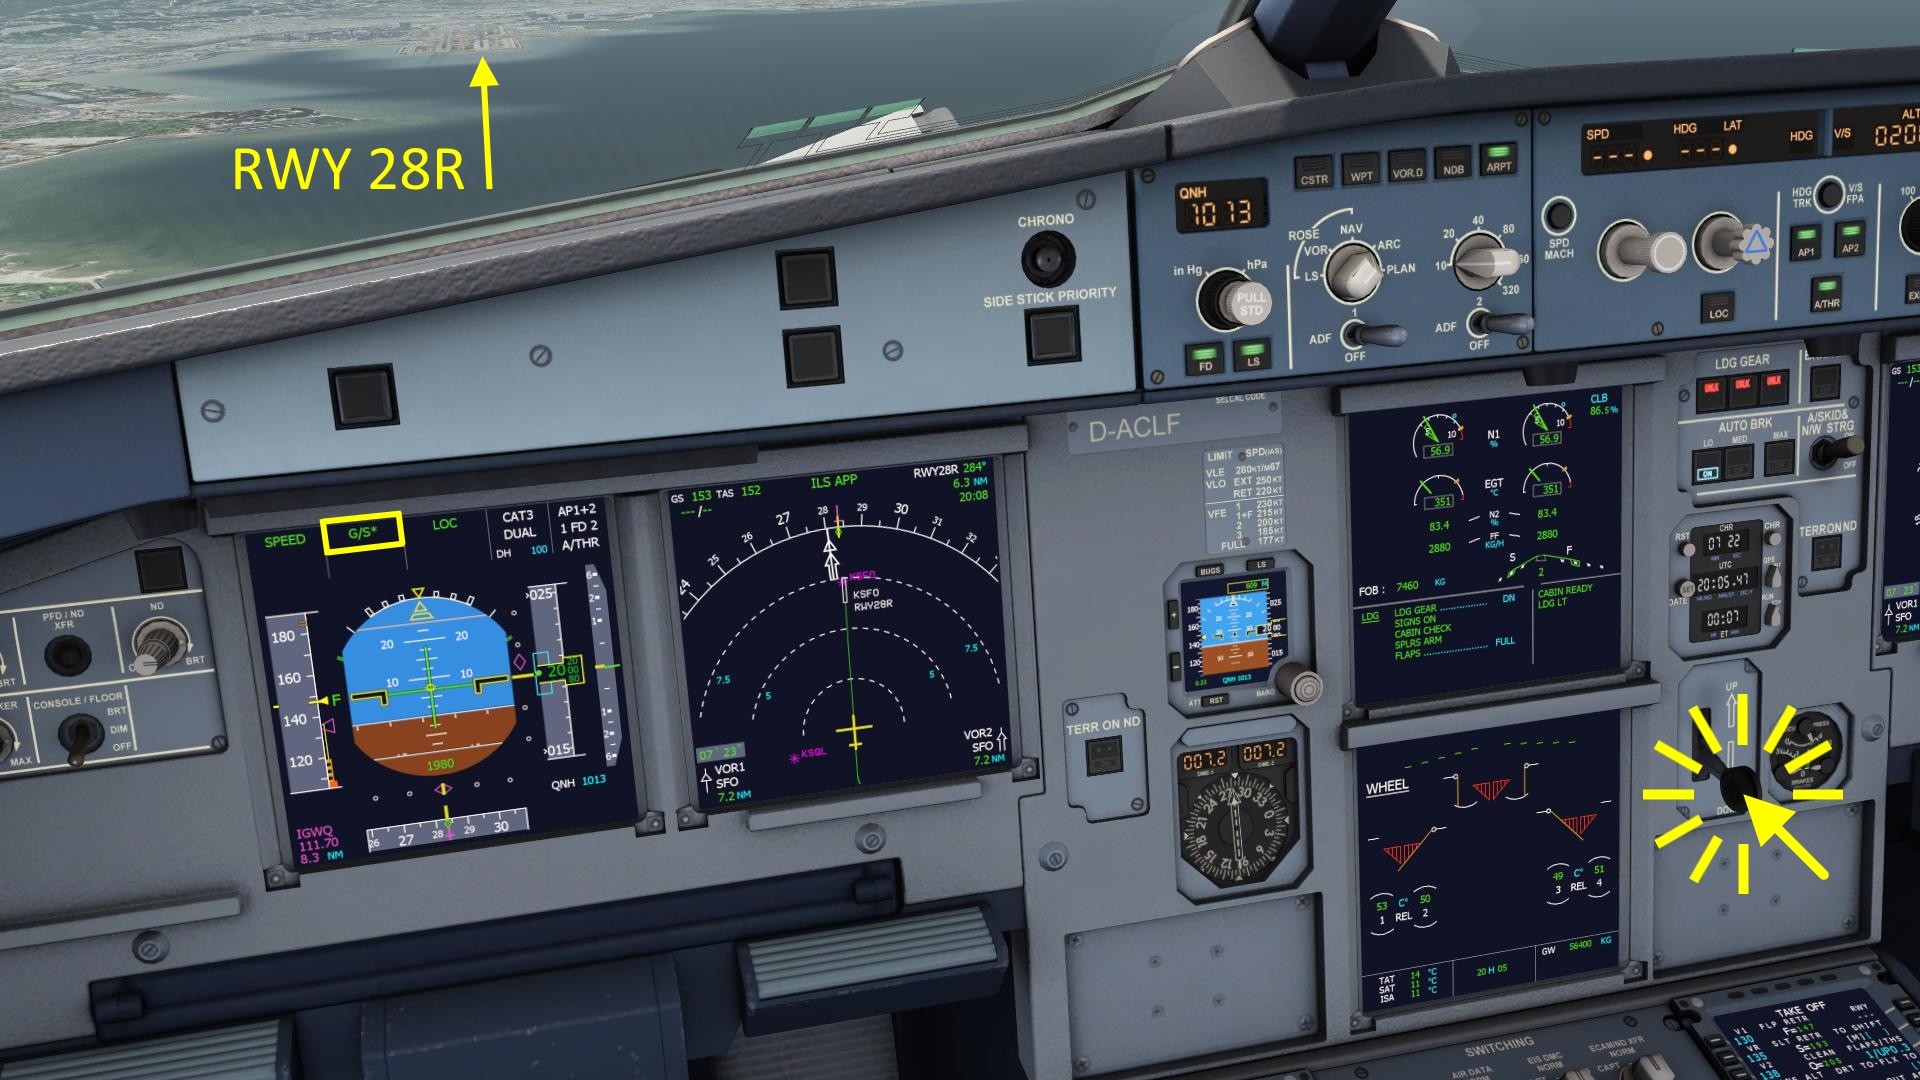
When the glide slope diamond moves towards the center of the scale the autopilot will capture it because we armed the approach earlier. Now is a good time to select the gear down and help us decrease the speed further and get it to the -F, flap retraction speed in case of go-around.
- Click the gear lever
or
- Use the mouse wheel over the gear lever
or
- Point at the gear lever and hold down the left mouse button and then move the mouse down to drag the lever
or
- Press any of your assigned control inputs for the gear (default key “g”)
Flaps 3, Flaps Full
When the airspeed dropped to the -F speed you can select the flaps from 2 to full.
Landing Checklist
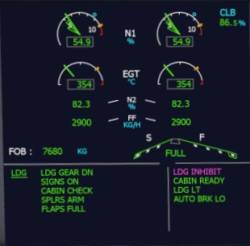
Let's quickly check that we didn't forget anything. The A320 has a nice built in checklist for this. Check that there are no blue items remaining on that list.
The aircraft is now prepared for a fully automatic landing.
Tip - If you want to return to this state you can exit to the main menu, then open the location dialog and click the yellow aircraft symbol on the map approaching San Francisco Runway 28R.
Flare
The autopilot will start the flare at about 30 ft above the runway and will try to touch down gently. At ten feet you should retard your throttle to idle.
Landed, Disengage Autopilots
The auto-brake slows us down and we come to a complete stop on the runway.
- Press the autopilot disengage button if you have it assigned or click the red button on the side stick to kick out the autopilot.
- To be able to vacate the runway advance your throttle a bit, this should also disengage the auto-brake.
Congratulations, you just completed your first A320 flight and landed in San Francisco!
A320 Advanced Tutorial
We just experienced how easy it can be to fly an airliner with all the automation helping us. But we sort of skipped the whole procedures for setting up a flight plan with the on-board computers (MCDU), preparing the aircraft for takeoff and all the checklists and the powerful auto-flight (autopilot+auto-thrust) system.
A320 Autopilot Introduction
The Airbus A320 autopilot in the Aerofly FS 2 is an realistic simulation of the real world autopilot. Therefor you can also refer to A320 autopilot videos, other descriptions or tutorials or the flight crew operating manual (FCOM) if you need to. We're going to provide an overview of what the autopilot buttons do.
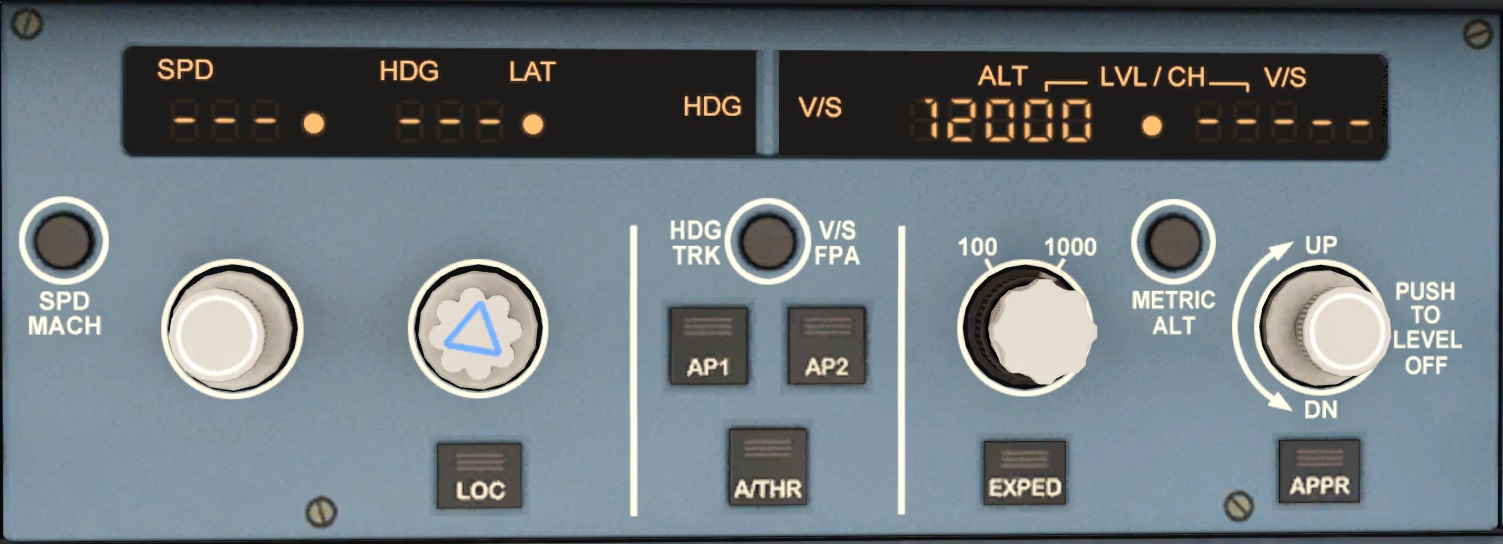
The flight control unit (FCU) is the interface between the pilots and the flight guidance system (autopilot, flight management). It consists of four knobs that can be turned, pulled out and pushed.
Flight Director (FD) and Flight Mode Annunciator
Autopilot (AP) Master
The autopilot actuates the elevator, ailerons and spoiler and rudder to steer the aircraft laterally and vertically. The elevator is used to control the pitch attitude of the aircraft to climb and descent. The ailerons, spoilers and rudder is used to bank the aircraft and fly coordinated turns.
- Push the autopilot button 1 or 2 to engage one of the two autopilots. Only for a fully automated landing with ILS would two autopilots be engaged at the same time.
The state of the autopilot is shown in the top right of the primary flight display (PFD). The PFD either shows AP1 or AP2 or AP 1+2 when the autopilot(s) are engaged.
The lateral and vertical mode that the autopilot is operating in is displayed at the top of the primary flight display in the second (vertical mode) and third column (lateral mode).
Auto-Thrust (A/THR) Master
The Auto-Thrust (A/THR) (a.k.a. auto-throttle in other aircraft) controls the thrust to the engines. Depending on what the flight director vertical mode is the engine thrust is either constantly adjusted to maintain a target airspeed or the thrust is advanced to full climb thrust for a climb or retarded to idle thrust for a descent.
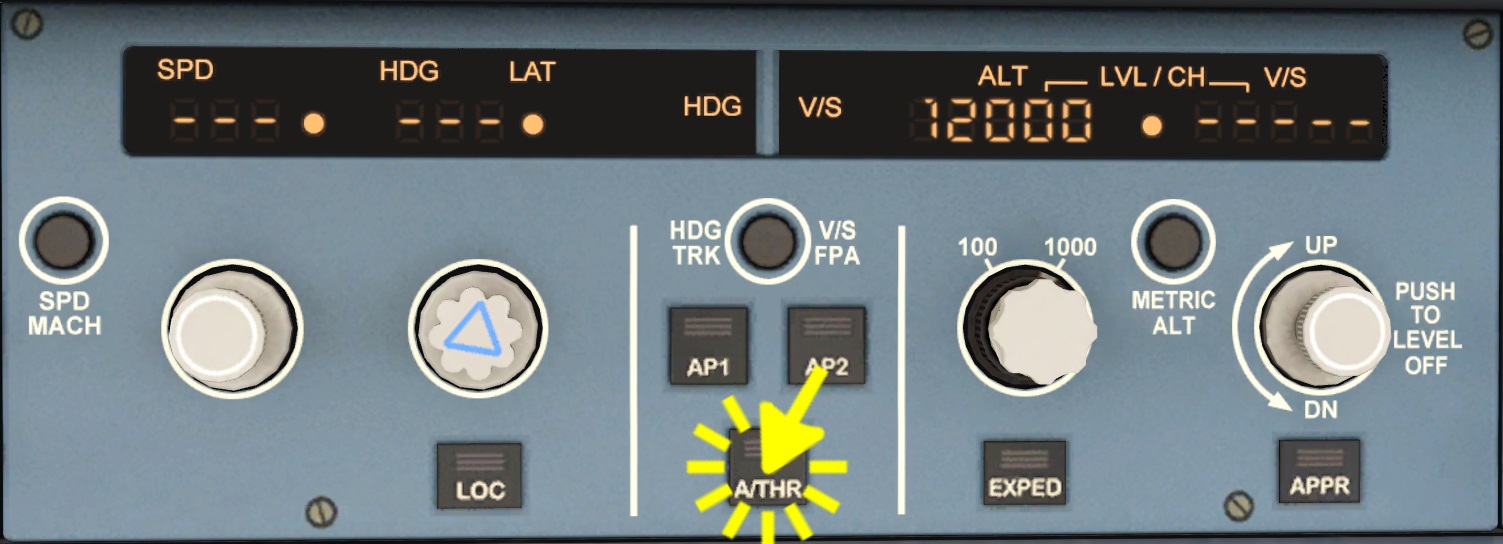
- Push the A/THR button to arm the auto thrust system
- Move the thrust levers to the climb detent to activate it.
The state of the auto thrust system is displayed in the top right corner of the primary flight display (PFD). When the text A/THR is in white color then the auto thrust is active. When the text is in cyan/blue the auto thrust has been armed but is currently not operating, e.g. because the pilot still has the thrust levers at idle or above the CLB detent (MCT with one engine failed). Setting the thrust levers into the climb detent changed the auto thrust state from armed to engaged.
The active thrust mode is shown in the top left corner of the PFD, in the first column. When it shows SPEED then the auto thrust system is controlling the airspeed and varies the thrust command to the engines accordingly. THR CLB or THR IDLE are shown when climb or idle thrust is commanded to the engines. When the mode shows MAN TOGA or MAN MCT or MAN FLX then the auto thrust is not active, you are manually overriding it with the thrust lever.
Interaction Between Vertical Mode and Auto-Thrust
If you select a vertical mode like CLB or OP CLB by pushing or pulling the altitude knob the auto-thrust system will increase the engine thrust to climb thrust (THR CLB) and maintain that. The autopilot will then pitch up to keep the speed target. This means the autopilot is controlling the speed with the climb angle now and the engines are just producing the maximum climb thrust.
When you reach the target altitude the autopilot will capture the altitude (ALT*) and then maintain it (ALT). When this happens the auto-thrust switches back to SPEED mode and change the engine thrust to maintain the speed target again. Now the auto-thrust controls the speed again and the autopilot maintains the altitude.
A similar thing happens during the descent. If you have DES or OP DES engaged the auto thrust will retard the thrust to idle (THR IDLE) and the autopilot pitches down to keep the airspeed target. So again the autopilot is controlling the speed and the auto-thrust is just keeping a fixed thrust value, in this case idle. Once the aircraft has descended to the target altitude the auto-thrust controls the speed again and the autopilot switches to altitude hold.
Note - This works pretty well if you have the autopilot and auto-thrust engaged. If you control either of them manually you have to be careful because you as a pilot then need to make sure that the airspeed is kept within limits. Imaging the engines going to full throttle but you don't pull up to keep the airspeed. Or the engines go to idle and stay there but you don't pitch the nose down. This can get out of hand quickly. This is why most airlines require the pilots to either use both: AP and A/THR or neither. Or at least make sure that for landing the auto-thrust is indeed controlling speed and no longer keeping idle thrust.
Managed/Selected Modes
Generally speaking, if a knob is pushed in the control is handed over to the automation in the managed mode. The field becomes dashed and a dot appears next to it (triple dash and a dot). Then the autopilot will use the flight plan as a reference.
If a knob is pulled out we gain manual control and can change the target values ourselves in the selected mode. If we pull the speed knob for example the speed window opens with the current airspeed and we can then turn the knob to change the selected speed.
Speed-Knob
Push the speed knob to use the route speed as computed by the flight management computers. The speed will automatically change throughout the flight and the autopilot will fly the aircraft accordingly. When there is no flight plan it won't do anything (unless you're already on approach).
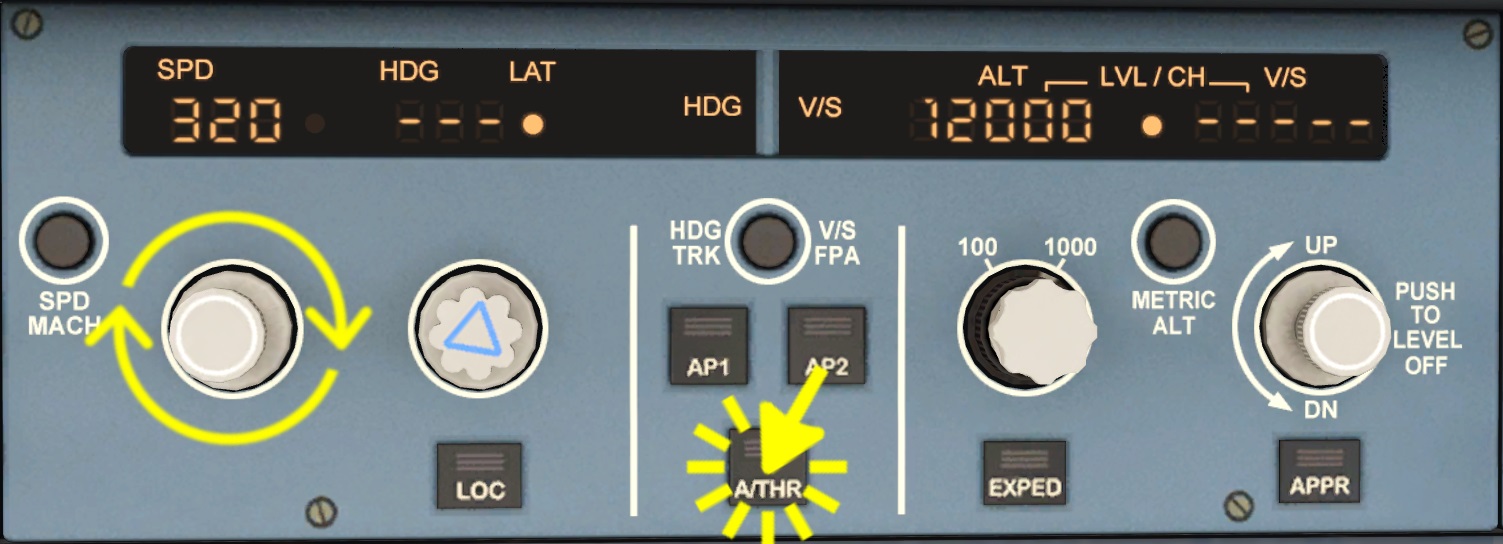
Pull the speed knob to set the autopilot target airspeed manually. Turn the knob to change the selected speed.
Depending on the vertical mode the autopilot is either pitching the airplane up or down to keep the target speed or it is using the auto thrust to keep the speed.
Heading-Knob
Push the heading knob in to arm and capture the flight route laterally. This allows the aircraft to turn left and right according to the programmed flight plan and steer towards the destination on its own in NAV mode. When there is no flight plan nearby the autopilot will keep flying on the selected heading, only when you intercept the flight plan will it capture the flight plan.
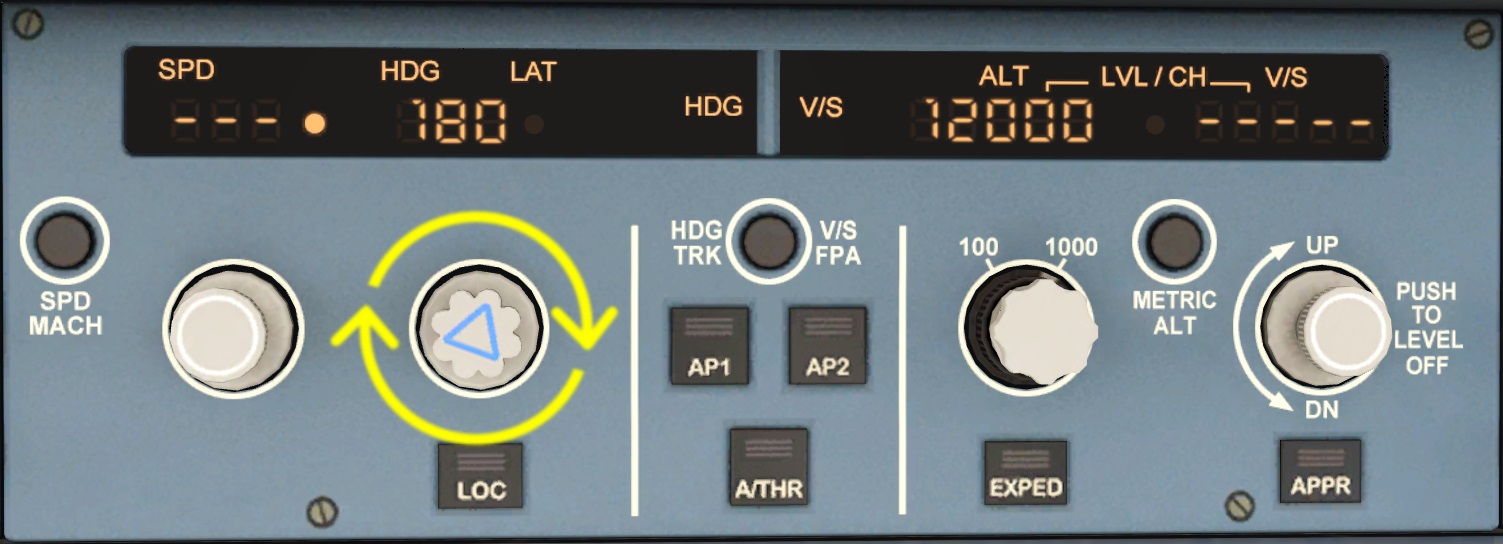
Pull the heading knob to fly a selected heading in HDG mode. Turn the knob left or right to change the target heading, the aircraft will turn towards that left or right.
Altitude-Knob
Turn the knob to set a new target altitude that the autopilot is allowed to fly to.
Pushing the altitude knob performs a managed climb (CLB) or descent (DES) towards the selected altitude when you have a route programmed. It does nothing if there is no route nearby and it only works if you are already flying along the route in NAV mode. With this mode the autopilot will automatically level off at altitude constraints if the flight plan requires that.
Pulling the altitude knob tells the autopilot to immediately climb or descent to the selected altitude without any restrictions in open climb (OP CLB) or open descent (OP DES) modes.
Vertical-Speed-Knob
Pushing the vertical speed knob is a bit different, as it doesn't put the autopilot into a managed mode. If you push the vertical speed knob the autopilot will immediately level off with vertical speed mode (VS) and maintain 0 ft/min.
Pulling the vertical speed knob also engages the vertical speed mode (VS) but it keeps the vertical speed at time of engagement unless you change the target by turning the knob.
EXPED button
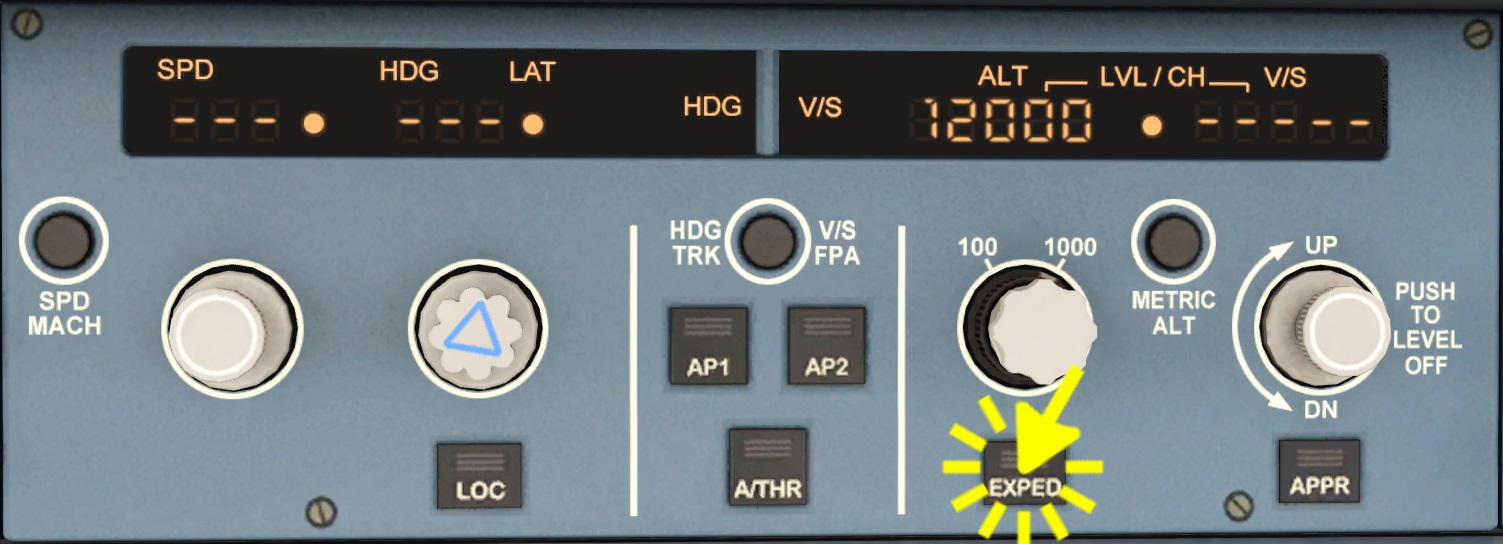
The expedite button when pressed triggers a rapid climb or descent to the target altitude. For the climb the autopilot pitches up until the speed gets pretty low (green dot speed) and for the descent it pitches down to almost the maximum speed. This button is rarely used in real life but if you need to descent quickly, this is the button you want to use. That and full airbrakes.
LOC and APPR
The localizer button (LOC) arms the localizer capture. If there is an ILS localizer signal the autopilot will capture the runway localizer and fly towards the runway. It only steers left and right for this, it doesn't change the vertical mode.
The approach button (APPR) does the same but also arms the glide slope capture. After capturing the localizer (LOC* or LOC), when the glide slope is intercepted, the autopilot will capture it (G/S*) as well and automatically descent to the runway threshold in G/S mode. When LOC and G/S are both captured a fully automatic landing can be performed if the runway allows for that.
At 400 feet above ground the autopilot will switch to LAND mode and no buttons on the flight control unit (FCU) will change that. The only way to leave this mode is to go around or land. At 50 ft the autopilot switches from LAND to FLARE. It will automatically arrest the sink rate, retard the thrust to idle, touch down and roll out. Between twenty and ten feet you need to retard the thrust levers to idle because the auto-spoilers and auto-brakes only engage when the levers are at idle or in reverse.
Speed/Mach Toggle
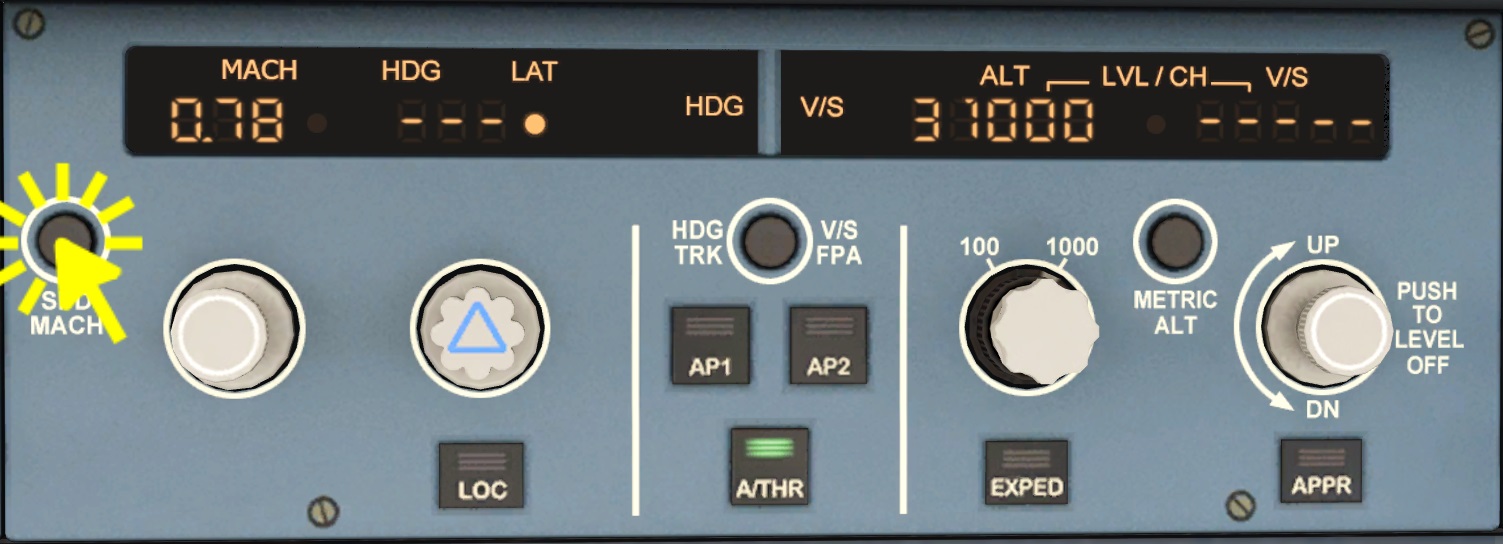
At high altitudes the Mach number (speed divided by speed of sound) becomes the relevant speed limit for the aircraft. E.g. the A320 can only fly Mach 0.85 (85% the speed of sound). At such high speeds the sound barrier starts to have an effect and creates a lot of drag. For this reason it becomes more economical to fly at lower indicated airspeeds at a fixed economical mach number (ECON Mach). At the crossover altitude the autopilot therefor automatically transitions from a speed target to a Mach target. SPEED becomes MACH.
The button SPD/MACH allows you to manually switch between the Mach and speed reference after pulling out the speed knob for the selected speed mode.
Heading/Track Vertical-Speed/Flight-Path-Angle Toggle
The HDG/TRK VS/FPA button switches between a heading and vertical speed reference (where the nose is pointing at and how fast you climb or descent) over to a track and flight path angle reference (where you're actually flying with the wind and at what angle you climb or descent).
The TRK+FPA mode is useful during an approach where you have a bit of crosswind and instead of calculating how much you need to point the nose into the wind to fly where you want to, you just tell the autopilot where you want to fly to in track mode. It automatically compensates the cross wind and keeps the aircraft flying in the same direction.
Metric Altitude Toggle
The METRIC ALT button displays the selected altitude in meters on the primary flight display (PFD) as well as on the bottom of the lower ECAM. In some countries like Russia and China the air traffic control (ATC) uses metric altitudes. So you could be given a clearance to climb to 3000 meters and thanks to the metric altitude display you don't have to guess how many feet that is.
100/1000 ft Ring
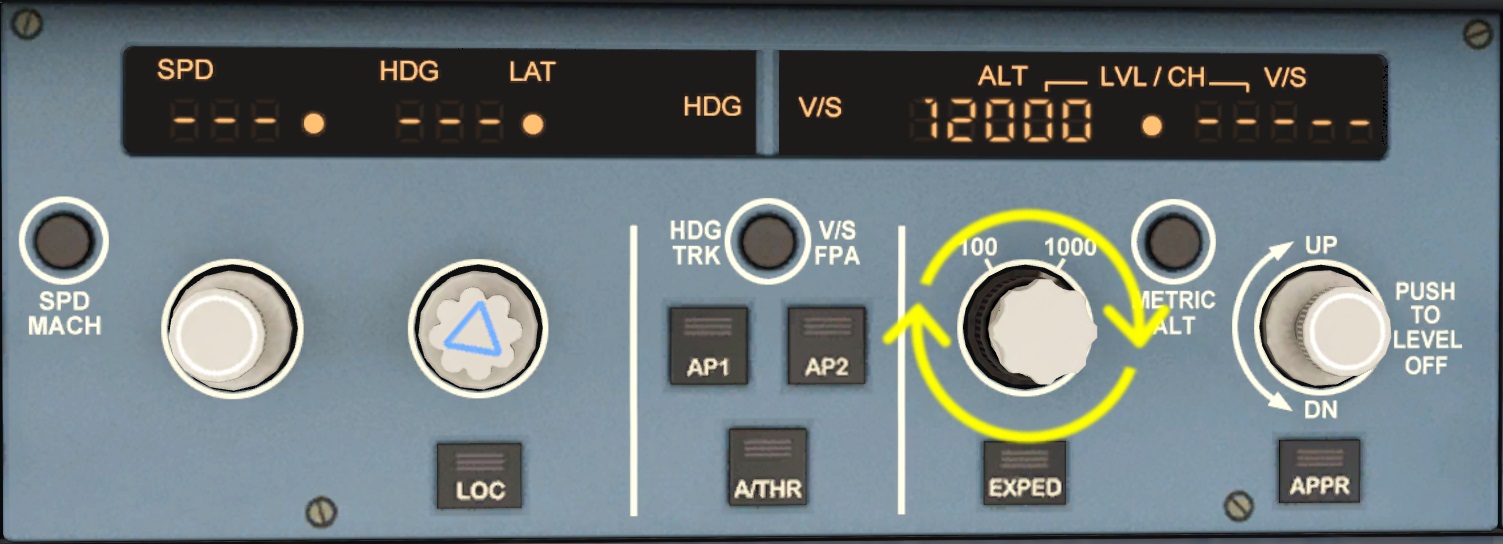
Behind the altitude knob there is a ring that can be set to the left or right to change the increments of the altitude selector between 100 and 1000 feet.
A320 MCDU Introduction
The Multipurpose Control and Display Unit (MCDU) is the interface to the flight management computer, which computes the flight plan. In this tutorial we're going to setup a flight plan from Sacramento Intl. (KSMF) to San Francisco Intl. (KSFO) similar to the beginner tutorial above. But this time we're only going to use the cockpit interfaces and not the simulator's menus.
But first we'll provide a brief overview of the MCDU. The Aerofly FS 2 A320 MCDU mainly behaves like the real world counterpart. Some functions are not available yet but this can be change in the future.
Pages in the MCDU include for example the Direct-To page, Progress, Performance, Init, Data, Flight-Plan, Radio-Navigation, Fuel-Prediction, Secondary Flight-Plan, ATC Communications, MCDU Menu.
Line Select Keys
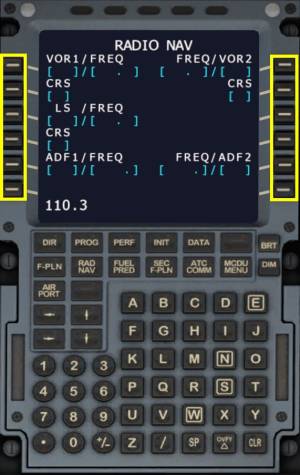
To the left and right of the MCDU display there are six line select keys (LSK). They serve the purpose to select something on the display, e.g. to insert a value into that field or to select a menu option to open other pages or options.
Scratch-Pad
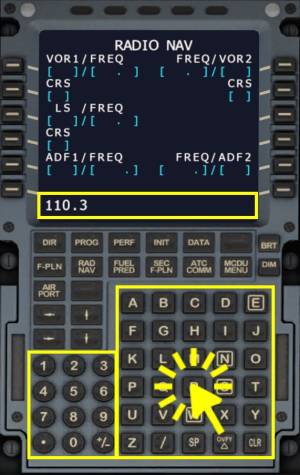
A text box at the bottom of the MCDU is used to type in values or identifiers but also show additional information, some warnings or error messages. After completing an entry a line select key is usually pressed to insert the entry into a field on the page.
The clear key in the lower right corner of the keyboard deletes the last character of the entry. When there is no text left in the scratchpad a “CLR” text is shown instead. With the CLR text in the scratchpad it is possible to remove entered values by pressing the respective line select key.
Press and hold the clear key to delete the entire entry.
Create a Flight Plan with the MCDU
In the navigation menu delete any previous flight plan. You can also delete the flight plan from within the MCDU by pressing the CLR key and then deleting the FROM/TO field on the INIT page A.
Please move your aircraft back to the Sacramento Intl. onto the parking position. Make sure the parking brake is set. We will now setup the flight plan to San Francisco.
D-I-F-R-I-P
The page sequence to setup a typical flight is
- D- Data
- I- Init Page A (From/To, Alternate)
- F- Flight Plan
- R- Radio Navigation
- I- Init Page B (Weight & Balance and Fuel)
- P- Performance
Data
The data page (A/C Status Page) shows up when the MCDU boots up. It can be opened manually by pressing the DATA key and then selecting the line select key 4L next to A/C STATUS. The data is verified, especially the navigation data base times.
Init Page A
Press the INIT button to see the first initialization page.
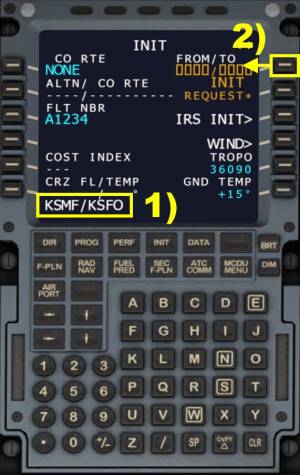
Enter the departure airport ICAO identifier, a slash and the destination airport ICAO identifier into the scratchpad. For the tutorial flight enter KSMF/KSFO. Push the line select key in 1R to insert the entry into the FROM/TO field.
Cheat: With an empty scratch-pad click the line select key next to the FROM/TO field. This will automatically fill the type the first part (nearest airport ICAO and a slash) into the scratchpad. When the first part has already been entered it will suggest the second part. This way you can quickly create a flight by just clicking the line select key 1R on the init page twice. This only works on the ground when the aircraft has not entered the takeoff phase yet.
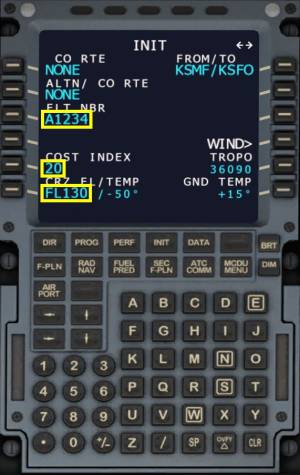
Enter a flight number into the scratchpad (e.g. A1234) and press the LSK 3L to insert the FLT NBR.
Select a cost index, type 20 into the scratch-pad and select the LSK 5L. Higher cost index consumes more fuel and gets you to the destination faster. 0 would be minimum fuel consumption, 999 would be fastest possible.
Select a cruise altitude. For our flight 12 or 13000ft would be ok, so type 13000 and insert it into the CRZ FL field.
Flight-Plan Page
Select a Departure
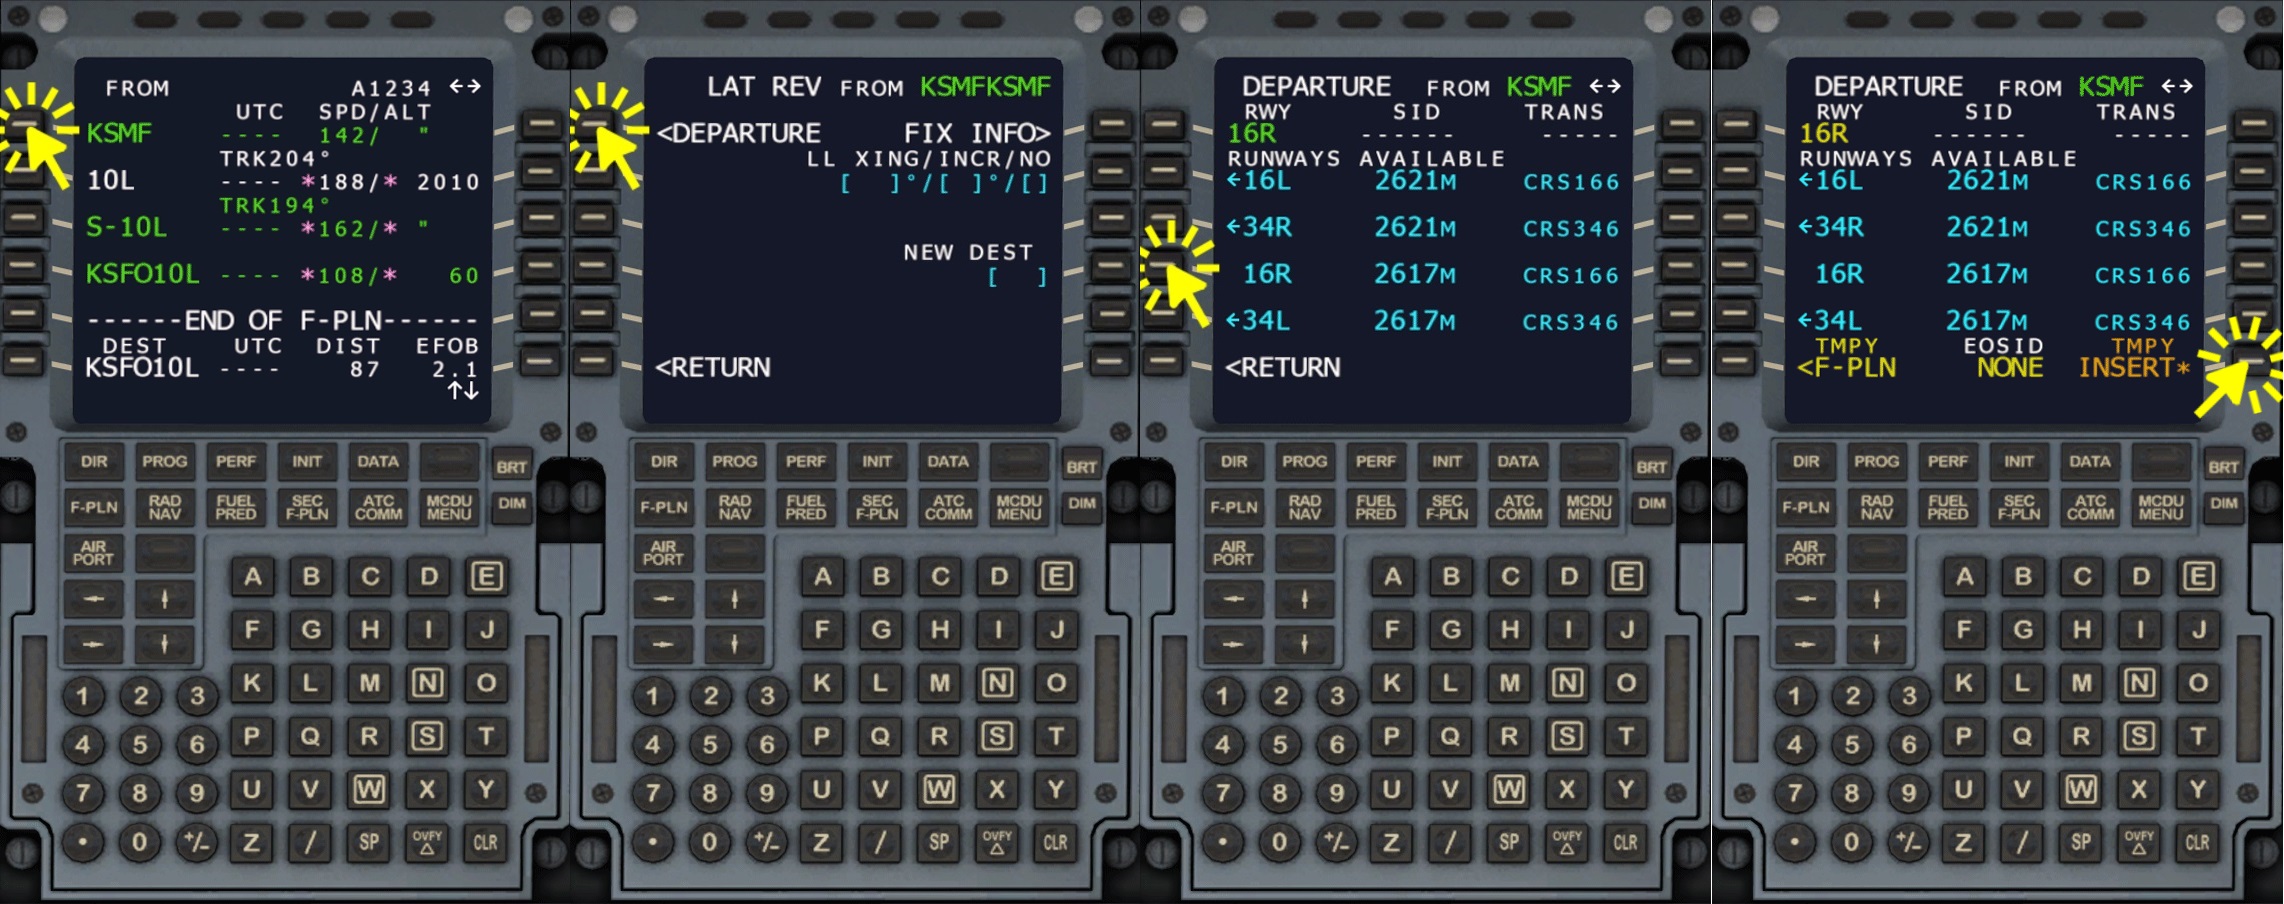
From the flight plan page press the left line select key on the first line (LSK 1L) next to the departure airport ICAO identifier to select the departure airport and to perform a so called lateral revision (LAT REV).
Select the menu option DEPARTURE with the LSK 1L.
Use up/down the arrow keys on the MCDU to scroll through the departure runways if needed, press the left side line select key that is next to the runway “16R”.
Select the line select key in the lower right corner “TMPY INSERT” to execute the temporary flight plan.
Select an Arrival
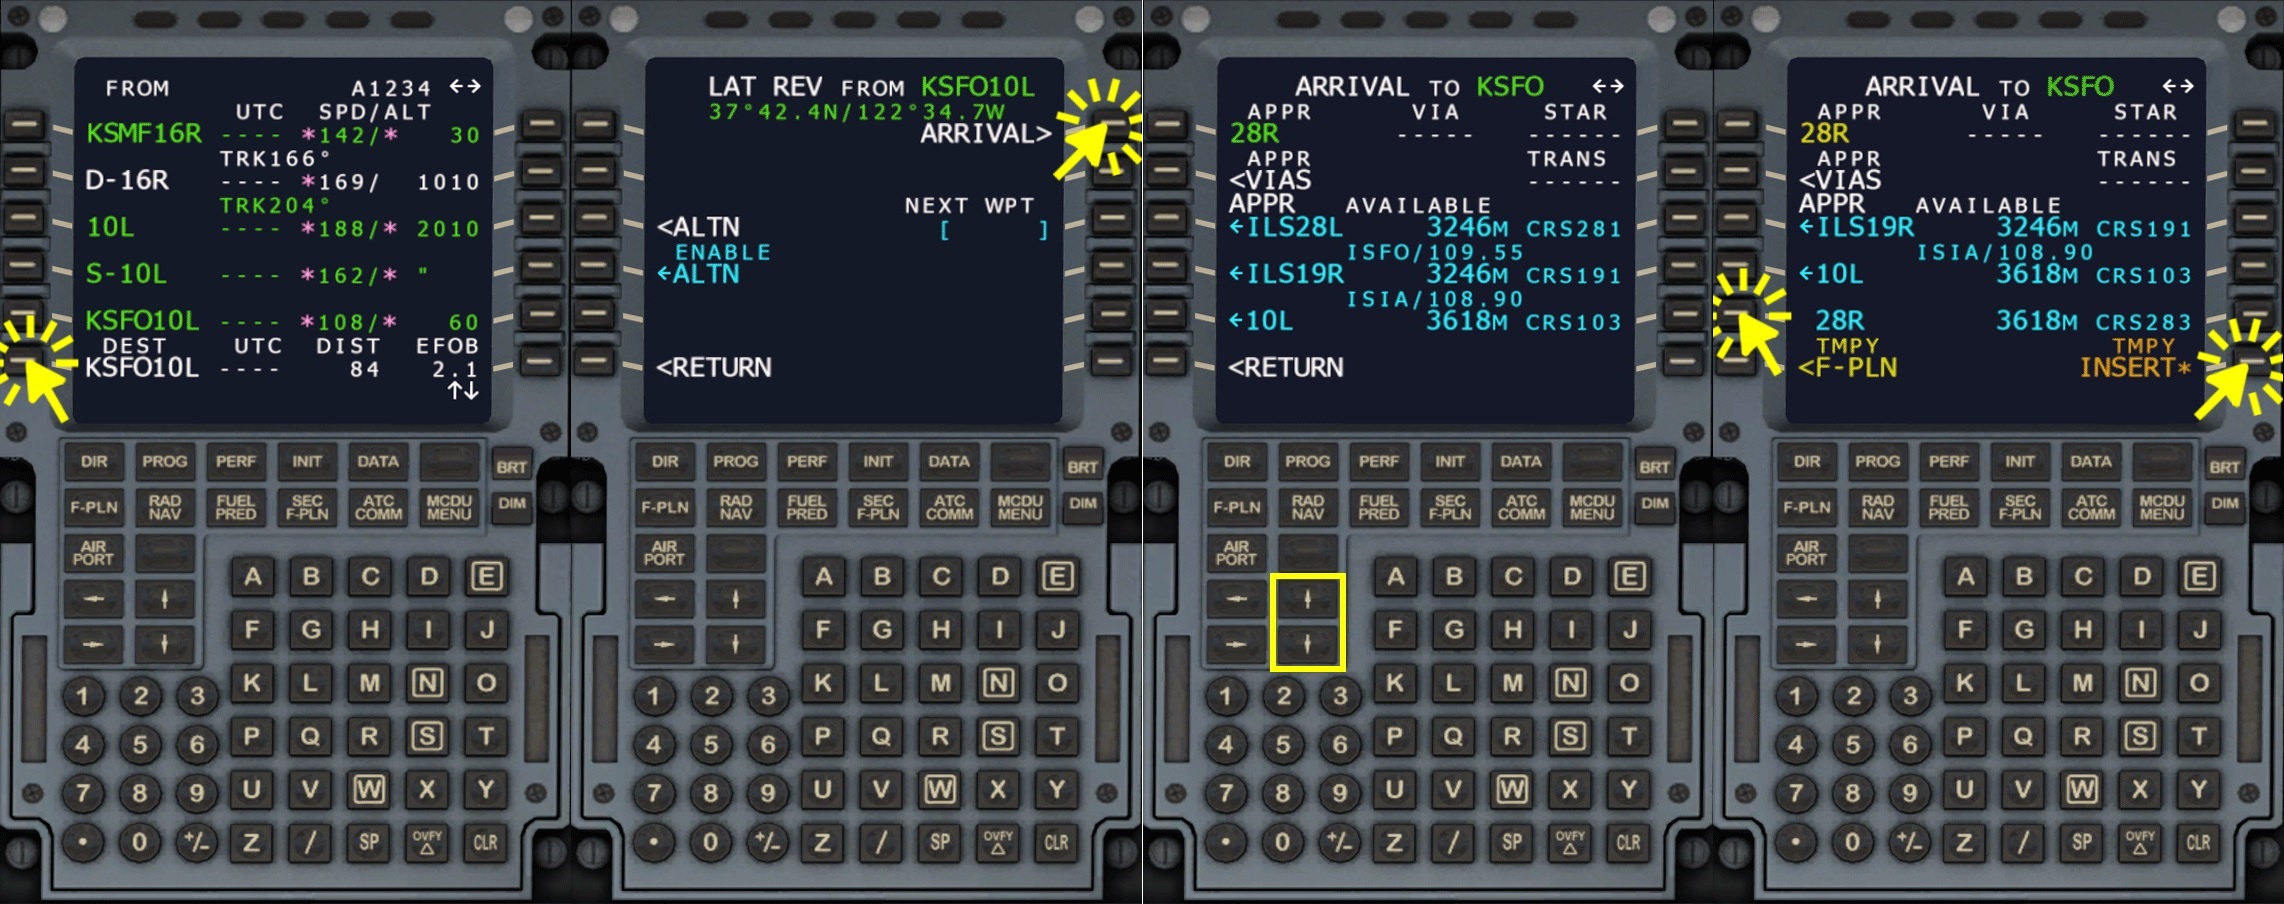
From the flight plan page press the lower left line select key next to the destination ICAO identifier and from the LAT REV page select ARRIVAL.
Use the up/down arrows on the MCDU to scroll through the list until you see ILS28R (or just 28R works too). Push the up arrow to slide the contents of the page up, as if you were pushing a drum. Similarly push the down arrow to push the contents back down (scroll back up).
Select the line select key in the lower right corner “TMPY INSERT” to execute the temporary flight plan.
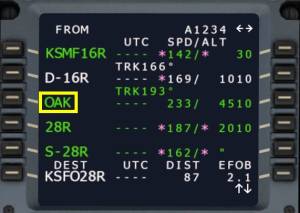
Add Waypoints
There are several ways to add waypoints to the flight plan. One option is manually typing the waypoint's name and then pressing the line select key where it should go in the list.
For the tutorial flight type OAK and click the line select key before the “28R” ILS approach.
Radio Navigation
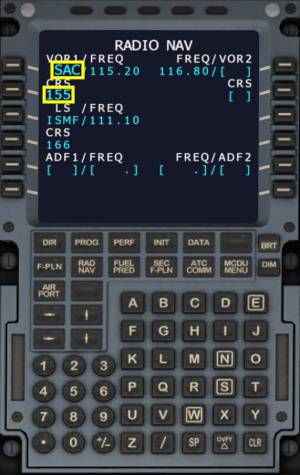
Press the RAD/NAV button to show the Radio Navigation page. This page shows how the radio receivers for the VOR1/2, ILS and ADF1/2 are tuned. You can enter either a frequency or the identifier of a station and then use the line select key to insert your entry.
The A320 automatically fills these for you if they are left empty, if you make an entry it overwrites this auto-tuning. To resume the automatic tuning of the radio frequencies you'll have to delete your manual entry by pressing the clear key ( CLR is shown) and then pressing the line select key next to it.
Go ahead and type SAC for the Sacramento VOR near our flight plan and insert it in the VOR1 field. Sacramento is now manually tuned and we can receive the DME information and a radial to that station.
Type 155 into the course field to setup an inbound course of 155 degrees to the VOR station. Switch the navigation display (ND) to VOR ROSE mode to see the typical HSI view.
Init Page B
Press the INIT button to get the the init page A, then press the left arrow button on the MCDU to get access to the second init page, Init Page B, or INIT FUEL PRED. When the engines have already been started you'll be redirected to the FUEL PRED page, which works similarly.
Enter the zero fuel weight (ZFW) in metric tons and zero fuel weight center of gravity (ZFWCG) in percent. E.g. type 49.0/30.0.
Cheat: With an empty scratchpad you can click the line select key next to the ZFW/ZFWCG field and it will automatically fill the scratchpad for you.
Enter the block fuel (e.g. fuel on board FOB as seen on the upper ECAM screen) in metric tons, e.g. 7.2.
Takeoff Performance
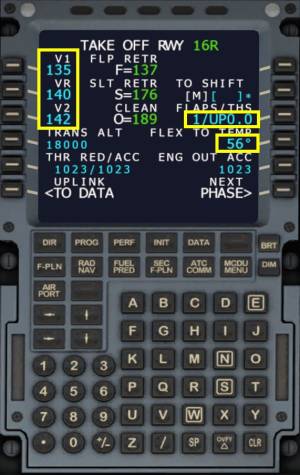
Press the PERF key to open the performance page. When you are on the ground this will show the takeoff performance page.
The performance page is filled in last, when the boarding and loading of the aircraft is completed and when the fueling has been completed. When the runway changes last minute this page will have to be revisited.
Fill in the v-speeds, V1, VR and V2.
For the tutorial flight you can use 135, 140 and 142.
Enter the takeoff flaps and trimmable horizontal stabilizer (THS) (takeoff pitch trim), e.g. 1/UP0.0
Insert a flexible takeoff temperature (FLEX TO TEMP) that is above the outside air temperature to reduce the thrust for takeoff, which in the real world at least saves fuel and reduces stress on the engines. Leave this field empty or even clear it when you have a short runway and/or the aircraft is heavy.
Confirm the thrust reduction (THR RED) and acceleration altitudes (ACC). Per default they are 1000ft above the field elevation but for some departures higher values may be necessary, e.g. for noise abatement.
Cheat: With an empty scratchpad you can click the line select keys next to the v-speeds, flap and flex temperature to receive suggested values. By just clicking the same line select key twice the entire page is filled in very quickly.
Cheat 2: When a flight plan has been inserted you'll see the UPLINK TO DATA option. When you click it a request to the company is made and it comes back with computed performance data. Click CONFIRM TO DATA in the lower right to insert all fields at once.
If you want to you can pre-select a speed for the climb phase. For this select the NEXT PHASE option, type a desired selected speed into the scratchpad and insert it into the PRESEL field. For example you can type 210. With a preset speed after takeoff when the aircraft flies above the acceleration height the speed target of the autopilot will change from managed to selected and the speed from the preset will be inserted into the flight control unit (FCU). This reduces the workload, it basically does the same as pulling the speed knob and dialing in the desired speed.
Approach Performance
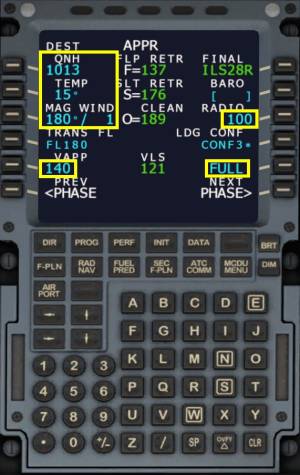
Click the PERF button. Depending on the phase of flight the current flight phase will be displayed. Move through the pages by clicking the NEXT PHASE button until you see the APPR page.
You can manually activate the approach phase in the air directly from any of the other pages. For this click the cyan option ACTIVATE APPR PHASE. The managed airspeed will be set to the VAPP speed. To leave the approach phase perform a go-around or insert a new cruise altitude on the progress page and then climb to it (e.g. by pulling the altitude knob).
Enter the destination QNH, temperature, wind and the radar decision height or barometric minimum decent altitude before landing.
For the tutorial select QNH 1013, TEMP 15 degrees Celsius, Wind 0/0 (or what ever you chose the wind to be) and enter 100 into the DH field.
Check the approach speed VAPP, it should be at least 5 knots above the velocity low speed (VLS). If required you can insert an approach speed manually, to compensate for wind gusts, etc. E.g. enter 140.
You also have the option to land with flaps CONF 3 instead of FULL - this is useful if you have a long runway and want to vacate at the end or the runway, of if you want to keep the speed up for sequencing and you are flying a rather light aircraft. If you select this, also activate the ground proximity warning system (GPWS) “LDG FLAP 3” in the left side of the overhead panel to avoid any GPWS callouts like “too low flaps”.
Progress Page
During the descent you can monitor your vertical deviation from the pre-computed glide profile on the progress page.
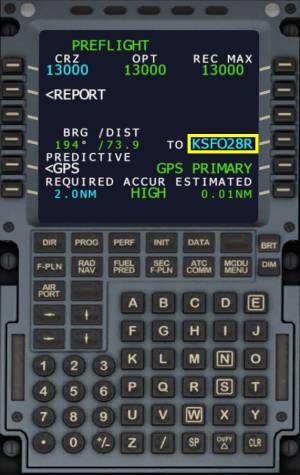
Click the PROG button to open the progress page.
On the progress page you can also check a bearing or distance of any waypoint, airport, vor, adf or even individual runway thresholds. For our tutorial type KSFO28R and enter it on the right hand line select, 4th from the top, opposite to BRG/DIST. When the identifier is recognized it will display the bearing and distance to the San Francisco Intl. runway 28R, a good measure for the remaining distance between you and the runway.
V-Speeds and Ranges
Speed Limits
| Vmo | Max Operating Speed | 350 KIAS |
| Mmo | Max Operating Speed | .82M |
| Vlo | Max Gear Extension | 250 KIAS |
| Vlo | Max Gear Retraction | 220 KIAS |
| Vle | Max Gear Extended | 280 KIAS / .67M |
| Turbulence Penetration | At or Above 20,000 FT | Below 20,000 FT |
|---|---|---|
| A320 | 275 KIAS / .76M | 250 KIAS |
| Max Flaps / Slats (Vfe) | ||||||
|---|---|---|---|---|---|---|
| Model | Position | 1 | 1+F | 2 | 3 | Full |
| A320 | Vfe | 230 KIAS | 215 KIAS | 200 KIAS | 185 KIAS | 177 KIAS |
Speeds
Cockpit Window Open Speed Maximum - 200 KIAS
| Design Maneuvering Speeds - Va (KIAS/Mach) | ||||||||
|---|---|---|---|---|---|---|---|---|
| Speed | Pressure Altitude (1000 FT) | |||||||
| SL | 10.0 | 16.0 | 20.0 | 24.0 | 28.0 | 30.0 | 39.0 | |
| *Va | 248 | 250 | 260 | 270 | 280 | 290 | 295 | .78 |
| Flaps/Slat Extended Speeds - Vfe (KAIS) | |||||
|---|---|---|---|---|---|
| Config | 1 | 1+F | 2 | 3 | FULL |
| Vfe | 230 | 215 | 200 | 185 | 177 |
| Slats | 18 | 18 | 22 | 22 | 27 |
| Flaps | 0 | 10 | 15 | 20 | 40 |
| Remarks | Initial | Takeoff | Takeoff/ | Takeoff/Approach | Landing |
| Approach | Approach | Landing | |||
Takeoff with Flaps 1 When flap configuration 1 is selected for takeoff flaps and slats are extended (1 + F), the configuration automatically changes to 1 at 210 KIAS, retracting the flaps and leaving only the slats extended.
Takeoff or Go-Around with Flaps 2 or 3 When configuration 1 is selected from flap setting 2 or higher, the 1+F configuration is obtained if airspeed is less than 210 KIAS. The Flaps automatically retract at 210 KIAS resulting in the configuration 1 (only slats)
Flaps Selection in Flight When the Flaps lever is moved from 0 to 1 in flight, only the Slats are extended (CONF 1).
| Landing Gear Limit Speeds - Vlo/Vle (KIAS/MACH) | |
|---|---|
| Retraction (Vlo) | 220 |
| Extension (Vlo) | 250 |
| Extended (Vle) | 280 / .67 |
| Maximum Tire Speed | 195 Knots Groundspeed |
| Maximum Operating Limit Speeds - Vmo/Mmo | ||
|---|---|---|
| Speed | Pressure Altitude | |
| SL-25,000 | 25,000 - 39,000 | |
| Vmo/Mmo | 350 | .82 |
Minimum Control Speed Air - Vmca Vmca - 119 KIAS
Minimum Control Speed Ground - Vmcg Vmcg - 114 KIAS
| Operating Speeds (KIAS/MACH) | |
|---|---|
| Optimum Climb (FMGC Operative) | ECON CLIMB |
| Standard Climb (FMGC Inoperative) | |
| FL290 and Above | .78 |
| 10,000 FT to FL290 | 290 |
| Best Climb Rate | 280 |
| Best Climb Angle | 220 |
| Optimum Cruise (ECON) | Cost Index=35 |
| Standard Cruise | |
| FL310 and Above | .80 |
| 10,00 FT to FS310 | 300 |
| Optimum Descent (FMGC Operative) | ECON DES |
| Standard Descent (FMGC Inoperative) | .78 |
| 10,000 FT and Above | 280 |
Stall Speeds
| Stall Speeds apply to takeoff and landing altitudes only | ||||||
|---|---|---|---|---|---|---|
| Gross Weight | Flap Position | |||||
| (1,000 Lbs) | 0 | 1 | 1+F | 2 | 3 | FULL |
| 170 | 179 | 140 | 134 | 125 | 124 | 121 |
| 160 | 170 | 136 | 130 | 120 | 119 | 117 |
| 150 | 161 | 132 | 125 | 116 | 115 | 113 |
| 140 | 154 | 127 | 119 | 112 | 111 | 109 |
| 130 | 144 | 121 | 115 | 108 | 107 | 105 |
| 120 | 138 | 116 | 110 | 104 | 103 | 101 |
| 110 | 132 | 111 | 105 | 99 | 98 | 96 |
| 100 | 126 | 106 | 100 | 95 | 94 | 92 |
| 90 | 119 | 100 | 95 | 90 | 89 | 87 |
| 80 | 114 | 95 | 90 | 85 | 84 | 82 |
Taxi Speed - Maximum When takeoff weight is higher than 167,550 lbs, do not exceed 20 KTS in a turn.


